| Although most viewers have access to the Flash Player plug-in required to view your Flash content, some may not. You can make at least some of your site available to them by providing alternate image files for their browsers to display. If you're using Flash animation for a simple Web banner, for example, you can use an animated GIF to re-create that banner for viewers who lack the Flash plug-in. Flash can publish alternate GIF, JPEG, PNG, and QuickTime files. Of course, you need a file with the proper HTML coding to direct the viewer's browser to display the alternate file. The HTML Templates named Image Map and QuickTime can assist you in creating the necessary HTML file, as can Flash's version-detection feature (see "Using Version Detection," later in this chapter). Although each image format has its own set of publishing options, the basic methods for publishing all four alternate formats are the same. This task walks you though the settings for GIF files. To publish GIF files 1. | Open the Flash document, and choose File > Publish Settings.
The Publish Setting dialog appears; choose a new publishing profile, or leave the current setting.
| 2. | In the Formats section of the dialog, choose GIF Image (.gif).
| 3. | In the GIF section of the dialog (Figure 16.40), set GIF options as described in the following tasks.
Figure 16.40. Click the GIF tab (Windows) or button (Mac) of the Publish Settings dialog to access the options for creating a static or animated GIF for your alternate image. 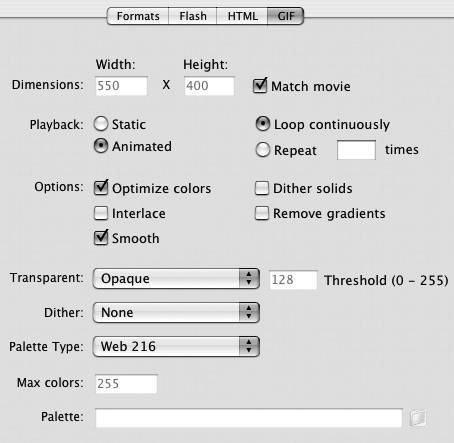
| 4. | Click Publish.
|
About the Image Map Template If your Flash file contains button symbols linking to URLs, you can convert that content to an image map, a GIF (or PNG or JPEG) file containing hot spots that link to other sites. To have Flash create an image map whose hot spots coincide with your Flash button symbols, choose HTML as well as GIF (or PNG or JPEG) in the Formats section of the Publish Settings dialog. From the Template pop-up menu in the HTML section of the dialog, choose Image Map. Click Publish. Although Flash creates a SWF file whenever you publish HTML format files, the Image Map template creates an HTML file that tells browsers to display the GIF (or PNG or JPG) file and not the SWF. When the browser displays the image map, viewers see your graphic content, and the buttons seem live because they're active links. (Note that the Image Map template creates hot spots only from button symbols, not button components or movie clips acting as buttons). |
 Tip Tip
The GIF section of the Publish Settings dialog contains a pop-up menu labeled Transparent, with choices of Opaque, Transparent, and Alpha. In previous versions of Flash, choosing Transparent created a GIF with a transparent background; choosing Alpha also created a GIF with a transparent background and allowed you to set a Threshold value for converting partly transparent Flash fills to completely transparent areas of the GIF (any fills with Alpha settings lower than the specified threshold became completely transparent in the published GIF). In Flash 8, however, the feature seems to be broken. No matter what settings you choose, the published GIF file always turns out to be fully opaque.
To set the dimensions of the GIF image About the QuickTime Template To convert your Flash content to a QuickTime movie, choose QuickTime and HTML in the Formats section of the Publish Settings dialog. From the Template pop-up menu in the HTML section of the dialog, choose QuickTime. Click Publish. The QuickTime template embeds the QuickTime version of your content within the HTML file. Note that currently, the QuickTime player can only handle playback of Flash Player 5 (or earlier) content. |
To create static or animated GIFs Under Playback in the GIF section of the Publish Settings dialog (Figure 16.42), choose either of the following options: Static creates a static GIF. Animated creates an animated GIF. The animation settings become active. To make the animation run repeatedly, choose Loop Continuously. To repeat the animation a set number of times, choose Repeat and enter a number in the Repeat field. Flash exports all the frames of the movie as an animated GIF. Figure 16.42. To preserve the motion of your Flash movie (though not the sound or interactivity) for viewers who lack the Flash plug-in, choose Animated for Playback in the GIF section of the Publish Settings dialog. 
Tips By default, when creating a static GIF, Flash uses the first frame of your movie. To use another frame, create a keyframe at the desired frame number. Assign it the frame label #Static (Figure 16.43). Figure 16.43. Assigning the frame label #Static tells Flash to use that frame for static GIF files. 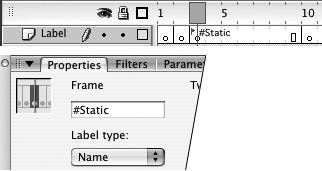 When creating animated GIFs, you can tell Flash to publish a subset of the movie's frames. Assign the label #First to the first keyframe of the subset; assign the label #Last to the keyframe that ends the subset. Flash creates an animated GIF from that range of frames (Figure 16.44). Figure 16.44. Assigning the frame labels #First and #Last lets you limit the range of frames that Flash publishes as an animated GIF. 
To balance size, download speed, and appearance Under Options in the GIF section of the Publish Settings dialog (Figure 16.45), choose any of the following options: Optimize colors removes any unused colors from the GIF file's color table. Interlace makes the GIF appear quickly at low resolution and come into focus as the download continues. (The Interlace option should be used only for static GIFs.) Smooth makes Flash create smoothed bitmaps for your animated GIF. Deselecting Smooth reduces the size of the file. Dither solids applies the dither method to solids as well as gradients and bitmapped images. Remove gradients reduces file size by converting gradient fills to solid fills. (Flash uses the first color in the gradient as the solid fill color.) Figure 16.45. The Options settings in the GIF section of the Publish Settings dialog help you limit the amount of time that your viewers spend looking at a blank screen, waiting for an image to appear. (The Remove Gradients option is available only in the Publish Settings dialog, not in the Export GIF dialog.) 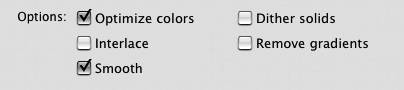
To control colors that aren't in the current color palette 1. | From the Dither pop-up menu in the GIF section of the Publish Settings dialog (Figure 16.46), choose one of the following options:
None replaces the missing color with the closest match from the current palette.
Ordered simulates the missing color by applying a regular pattern of colors from the current palette.
Diffusion simulates the missing color by applying a random pattern of colors from the Web 216 palette. (You must also choose Web 216 as your Palette Type in step 2 for Diffusion to work.)
Figure 16.46. The GIF format has three options for dithering the colors that aren't included in the current color table. 
| 2. | From the Palette Type pop-up menu, choose a color table for use with this GIF (Figure 16.47).
Figure 16.47. Choose a palette that optimizes colors for the published GIF image. You can create custom palettes or use the Web-safe or adaptive palettes provided by Flash. 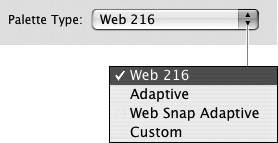
Your choices are Web 216 (the standard 216 Web-safe colors), Adaptive (only colors used in your document; 256 colors maximum), Web Snap Adaptive (a modified Adaptive palette, substituting Web-safe colors for any near matches to colors in the document that aren't Web safe), and Custom (the color table specified in step 4).
| 3. | If you chose Adaptive or Web Snap Adaptive as the Palette Type, in the Max Colors field, type the number of colors you want to use.
This option lets you further limit the size of the color table available for the GIF and thus reduce file size.
| 4. | If you chose Custom as the Palette Type, load the custom palette (Figure 16.48).
Figure 16.48. When you choose Custom from the Palette Type pop-up menu, you must enter a filename in the Palette field. Click the Browse button (the folder icon) to open a dialog for locating the file. 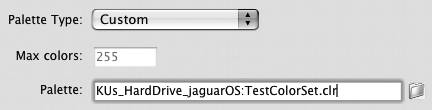
Click the Browse button (the folder icon). The file-import dialog appears; navigate to the custom palette file, select it, and click Open.
|
|
