| To put an animated graphic symbol to work, you must place an instance of it in your main movie. The layer of the movie where you place the symbol must have enough frames to display the symbol. You can use instances of an animated graphic symbol just as you would any other symbolcombine it with other graphics on a layer; motion-tween it; modify its color, size, and rotation; and so on. To place an instance of an animated graphic symbol 1. | In the movie you created in the preceding section, choose Insert > Scene to create a new scene.
Flash displays the new scene's Timelinea single layer with a blank keyframe in frame 1. The Stage is empty.
Adding a new scene gives you a blank Stage to work with and makes it easy to compare the two animations: the original (created directly in the main movie Timeline) and the instance of the graphic symbol placed in the movie.
| 2. | Access the Library panel.
If it's not open, choose Window > Library.
| 3. | In the Library panel for your document, select the Ping-PongAnimation symbol.
The first frame of the animation appears in the preview window (Figure 11.32).
Figure 11.32. Select the graphic symbol you want to use, and then drag a copy to your Flash document to place an instance on the Stage. 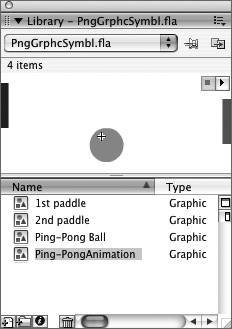
| 4. | Drag a copy of the selected symbol to the Stage.
Flash places the symbol in keyframe 1. At this point, you can see only the first frame of the animation (Figure 11.33). The animation is 20 frames long, so you need to add least 20 frames to view the symbol in its entirety.
Figure 11.33. When you drag an instance of the animated graphic to the Stage, you see the symbol's first frame with its graphics selected. You must add frames to allow the full animation of the symbol to play in the main movie. 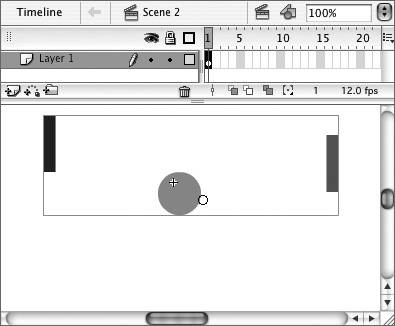
| 5. | In the Timeline, select frame 20, and choose Insert > Timeline > Frame.
Flash adds in-between frames 220.
| 6. | Play the movie.
Now Flash can display each frame of the animated graphic symbol in a frame of the movie. Frame 2 of the symbol appears in frame 2 of the movie, frame 5 of the symbol appears in frame 5 of the movie, and so on (Figure 11.34). If you place fewer than 20 frames in the movie, Flash truncates the symbol and displays only as many frames of the symbol as there are frames in the movie.
Figure 11.34. Frames 120 have a tweening property of None, but they still display animation. Flash displays the 20 tween frames of the graphic symbol that you placed in keyframe 1. It's as though the symbol is a tray of slides, and Flash is projecting one image per frame in the main movie. If the main movie is longer than the slide show, Flash starts the slide show over. 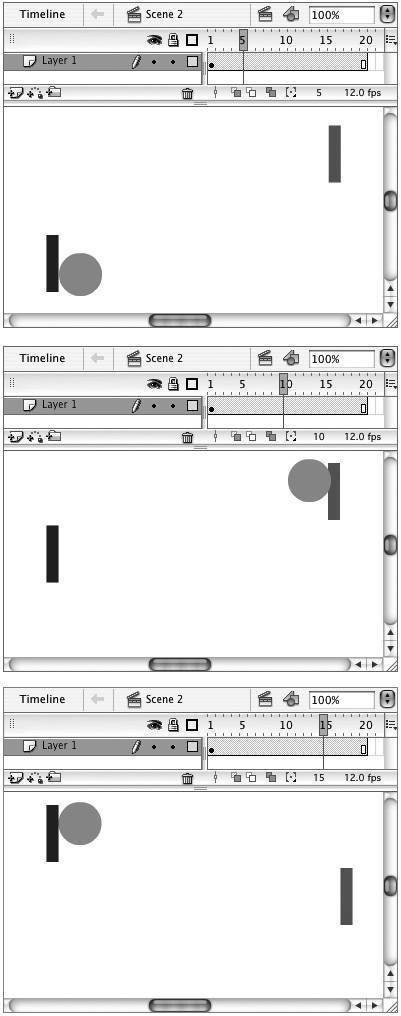
|
 Tips Tips
By default, Flash loops the animation of graphic symbols. If the layer containing the animated symbol instance in the main Timeline has more frames than the symbol requires, Flash starts playing the graphic symbol over again to fill those extra frames. You can prevent such looping. Select the symbol instance on the Stage. In the Properties tab of the Property inspector, from the Options for Graphics menu, choose Play Once (Figure 11.35). The options settings also let you choose to start the symbol's animation with a frame other than 1. Enter the desired frame number in the First field. (You can even choose to display just one frame of the animated graphic symbol. From the Options for Graphics menu, choose Single Frame, and then enter the desired frame number in the First field. You can use this technique to pause the animation of the symbol for a certain number of frames in the main movie. At the frame where the symbol should start running, add another keyframe and another copy of the symbol and set it to loop.) Figure 11.35. By default, animated graphic symbols move in lock step with the Timeline of the main movie. If the symbol's animation contains fewer frames than does the layer containing the symbol instance in the main Timeline, the animated graphic symbol loops. To stop the selected symbol instance from looping, in the Properties tab of the Property inspector, from the Options for Graphics menu, choose Play Once. 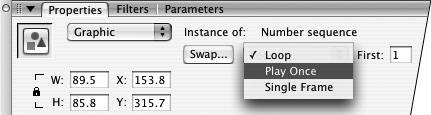
Animated Graphic Symbols Increase File Size Although symbols are used to keep file size down, animated graphic symbols don't do as good a job at that as movie-clip symbols. For each in-between frame that displays part of an animated graphic, Flash exports roughly 12-15 bytes of data. That's true even if you're just adding extra in-between frames and looping the animated graphic. You don't need any in-between frames to display the movie-clip symbol's animation If you nest animated graphic symbols inside animated graphic symbols, you compound the problem because each in-between frame in the nested copy of the symbol adds its 12 bytes of data too. Reusing and nesting movie-clip symbols adds little extra data to your file. To test for yourself, nest an animated graphic symbol inside a copy of that symbol and place an instance of the symbol on the stage in a 20-frame keyspan. Test the movie (choose Control > Test Movie). Check the amount of data in each frame using the Bandwidth Profiler (see Chapter 16). Go back to the Flash document and change the symbols' type to movie-clip and test again. |
A Note about Timeline Effects In the previous version of Flash, Macromedia initiated a feature called Timeline Effects. The goal was to help less-experienced Flash users create a few special effects (such as a drop shadow and blur) and perform a few common animation tasks (such as moving an element in a straight line or breaking it apart as if it explodes) quickly and easily. To create Timeline Effects, you choose settings in an Effects dialog; Flash uses those settings to create symbols and animation for you. (Some of the symbols Flash creates are static, like the ones you learned about in Chapter 7; others are animated, like the ones you're learning about in this chapter.) Unfortunately, Flash names its effect symbols in confusing ways; adds a new folder to your Library panel to hold some, but not all, of the new symbols; and makes changes to the Timeline, renaming the active layer and adding frames to accommodate the animation. You may find these changes confusing. An even greater problem is that once the symbols and Timeline changes have been made, you're not free to use standard techniques to reuse and edit them; if you do, you risk breaking the effect. You must use a special command to access the Effects dialog to edit an effect; you must use another special command to remove the effect and all the changes to the Timeline and Library panel. Flash 8 continues to offer the eight Timeline Effects, but nothing has been done to improve the pitfalls of using them. |
Using Timeline Effects Timeline Effects are easy to create but difficult to work with and they're not recommended (see the sidebar "A Note about Timeline Effects"). For anyone who would like to try them, as a quick-and-dirty solution, the procedures for creating the various effects are similar, though the precise settings vary. Here's a quick rundown for one effect. To create a Timeline Effect: 1. | Select one or more graphic-objects on the stage and convert them to a symbol.
You don't have to apply Timeline Effects to symbols, but it's a good idea. That way, you'll have a copy of the original graphic should the effect go wrong and you want to start again.
| 2. | Select the symbol instance on the Stage.
| 3. | Choose Insert > Timeline Effects > Effect Category > Effect Name (Figure 11.36).
Figure 11.36. Choose Insert > Timeline Effects > Effect Category > Effect Name to apply effect to a selected object. 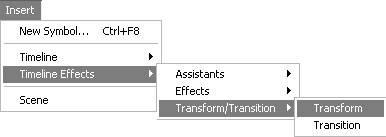
The Effect Setting dialog appears. The dialog bears the name of the effect you're creating (Figure 11.37).
Figure 11.37. The Effect Setting dialog's name and settings change for each effect. The Transform effect contains settings for changing the color, transparency, size, and/or location of an object over the specified number of frames. To preview changes to your settings, click the Update Preview button. 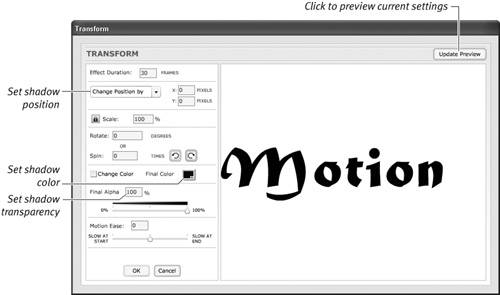
| 4. | Use any of the dialog's menus, color controls, sliders, or entry fields to adjust the settings for the selected effect.
| 5. | To see how the new settings look, click the Update Preview button.
The resulting effect plays in the preview area of the dialog.
| 6. | To apply the settings to your selected symbol, click OK.
Flash creates special effects symbols and a folder named Effects Folder in the Library panel, renames the Timeline layer containing your original symbol (or graphic-object), and adds layers and frames as needed to create the effect (Figure 11.38).
Figure 11.38. When you apply an effect to a selected graphic on the Stage, Flash replaces your original selection with an instance of the finished-effect symbol. 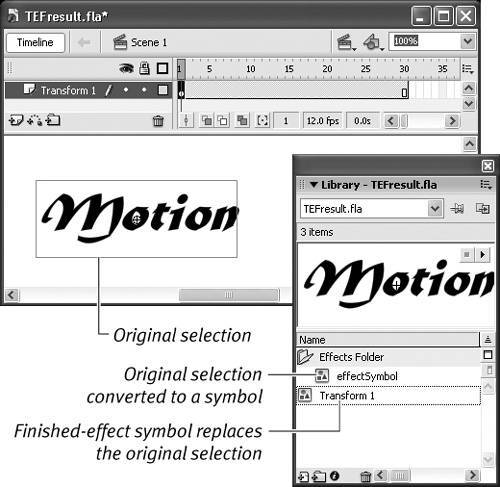
|
To edit an existing Timeline Effect: 1. | Select the Effect symbol on the Stage or select its keyframe span in the Timeline.
| 2. | Choose Modify > Timeline Effect > Edit Effect.
The Effect dialog appears and you can change the effect's settings. When you do, Flash re-creates the effect symbol, and yet again renames items in the library and Timeline.
|
To delete an existing Timeline Effect: 1. | Select the Effect symbol on the Stage or select its keyframe span in the Timeline.
| 2. | Choose Modify > Timeline Effects > Remove Effect.
Flash restores your original symbol instance (or graphic-object) on the Stage, removes the effects symbols and folder from the Library panel, removes any layers and frames added to the Timeline, and restores the orignal layer name.
|
|
|