Saving Animations as Movie-Clip Symbols


The procedure you use to save an animation as a movie-clip symbol is the same as for saving an animated graphic symbol, except that you define the symbol as a movie clip in the Create New Symbol dialog.

To convert an animation to a movie-clip symbol

1.

Open the document you created to make the Ping-Pong animation in "Animating Multiple Motion Tweens" earlier in this chapter.

The Ping-Pong animation is a 3-layer, 20-frame animation.

2.

In the Timeline, select all 20 frames in all 3 layers.

3.

Choose Edit > Timeline > Copy Frames.

4.

Choose Insert > New Symbol, or press -F8 (Mac) or Ctrl-F8 (Windows).

The Create New Symbol dialog appears.

5.

In the Name field, type a name for your symbolfor example, Ping-PongClip.

Flash remembers the symbol type you selected for the last symbol you created and selects that type for you again when you choose Insert > New Symbol.

6.

Select Movie Clip as the symbol type (Figure 11.39).

Figure 11.39. Selecting Movie Clip in the Type section of the Create New Symbol dialog defines a symbol that has an independent Timeline. The entire movie-clip symbol runs in a single frame of the main movie.


7.

Click OK.

Flash creates a new symbol in the Library panel and switches you to symbol-editing mode, with that symbol selected.

The name of your symbol appears in the Edit Bar. The default Timeline for your new symbol consists of one layer and a blank keyframe at frame 1.

8.

In the symbol Timeline, select keyframe 1, and choose Edit > Timeline > Paste Frames.

Flash pastes all 20 frames and 3 layers that you copied from the original Ping-Pong animation into the Timeline for the Ping-PongClip symbol (Figure 11.40). If you want to make any adjustments in the animation sequence, you can do so at this point.

Figure 11.40. After you name the symbol and define its type in the Create New Symbol dialog, Flash switches to symbol-editing mode. The icon that precedes the name of the symbol indicates that this symbol is a movie-clip. Now you can paste the animation frames into the symbol's Timeline.


9.

To return to document-editing mode, click the current scene name in the Edit Bar.

Tip

  • To make a movie clip that contains exactly the same frames as an existing animated graphic symbol (as you did in the preceding task), you can duplicate that symbol and change its type. Select the animated graphic symbol in the Library panel. From the Library panel's Options menu, choose Duplicate. The Duplicate Symbol dialog appears, allowing you to rename the symbol and set its type to movie clip.


The Mystery of 9-Slice Scaling

One of the beauties of Flash is the way it lets you reuse elements. One of the frustrations of reusing elements is that resizing can distort them. Imagine creating a rounded rectangle that you'll resize for various situations; it could be the graphic for an interface element, such as a button, or it could be a building block for an artistic animation. You would expect the amount of rounding in the corners to remain the same when you make the rectangle larger or smaller. In fact, the corners can change, sometimes distorting horizontally, sometimes vertically.

This distortion can occur in the Flash document, as you create your content, or at runtime when people view your movie. Runtime resizing happens if you create scripts that scale elements dynamically; it can also happen if people resize the browser window displaying your movie. You have some control over the second type of scaling when you set options for publishing a movie (see Chapter 16).

In Flash 8, when publishing for Flash Player 8, you can impose conditions on the way one type of graphic elementa movie-clip symbolscales at runtime by invoking 9-slice scaling guides. When you activate the 9-slice guides, Flash superimposes a grid over your movie-clip symbol. The corner sections defined by the grid don't scale at all; the other sections of the grid scale up or down as required, and then the corners are pasted back on. This method allows you to keep the corners of an element uniform at all sizes.

To activate 9-slice scaling when you originally create a movie-clip symbol, open the Advanced section of the Symbol Properties dialog, and select the "Enable guides for 9-slice scaling" check box (Figure 11.41) To enable the guides later, select a symbol in the Library panel, choose Properties from the Library panel's Options menu to open the Symbol Properties dialog, and then select the "Enable guides for 9-slice scaling" check box. (You can also enable 9-slice scaling through ActionScript.)

Figure 11.41. To enable 9-slice scaling for movie-clip symbols, in the Symbol Properties dialog, click the Advanced button to access the advanced settings (top). In the Source section, select the "Enable guides for 9-slice scaling" check box (bottom).


When the 9-slice guides are enabled, grid-lines appear in the symbol preview window in the Library panel and also when you edit the symbol (Figure 11.42). In symbol-editing mode, you can drag the guide lines to define the non-scaling corner areas appropriate to the graphic content of the movie-clip symbol you're creating.

Figure 11.42. With 9-slice scaling enabled, a symbol shows its scaling guides in the Library panel. In symbol-editing mode, the guides appear on the Stage and are adjustable. Drag a guide to reposition it.
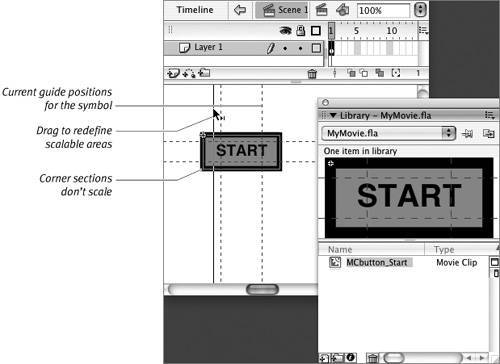


Macromedia Flash 8 for Windows & Macintosh Visual QuickStart Guide
Macromedia Flash 8 for Windows & Macintosh
ISBN: 0321349636
EAN: 2147483647
Year: 2005
Pages: 204

flylib.com © 2008-2017.
If you may any questions please contact us: flylib@qtcs.net