| Especially with shape tweening, you can't always rely on Flash to create in-between frames that capture the exact movement you want. You can combine Flash's tweening with your own frame-by-frame efforts, however, letting Flash do the work whenever it can. Or, let Flash create the broad outlines of your animation, and then add keyframes to refine the movement. Flash helps with the process by allowing you to convert those intangible in-between frames to keyframes that you can edit and refine yourself. In the preceding section, you created a crude version of a flickering flame. In the following tasks, you refine it. To convert in-between frames to keyframes 1. | Open the Flash document you created in the preceding section.
| 2. | In the Timeline, position the playhead in frame 2.
The first step in this tween isn't particularly effective: The central flame portion seems to be a bit too far to the side (Figure 11.25). Because frame 2 is an in-between frame, however, you can't edit it. You can try to improve the motion by adding shape hints, or you can create a new keyframe to refine the animation.
Figure 11.25. Flash's shape tween in frame 2 leaves something to be desired. 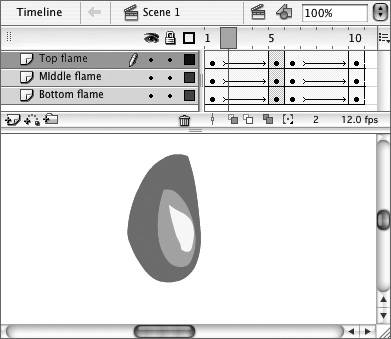
| 3. | To convert the in-between frame to a keyframe, in the Timeline, select frame 2 in all three layers.
| 4. | Choose Modify > Timeline > Convert to Keyframes, or press F6 (Figure 11.26).
Figure 11.26. Choose Modify > Timeline > Convert to Keyframes to create a keyframe you can use to adjust your multilayer tween. 
Flash converts frame 2 from an in-between frame to a keyframe; then it creates the contents of keyframe 2 from the transitional shapes it created for the shape tween at that frame. Now you're free to edit the contents to improve the tweening action (Figure 11.27). If you want to create a smoother motion, expand the tween between keyframe 1 and keyframe 2.
Figure 11.27. After you convert frame 2 from an in-between frame (part of a tween) to a keyframe, you can edit the flame shapes. 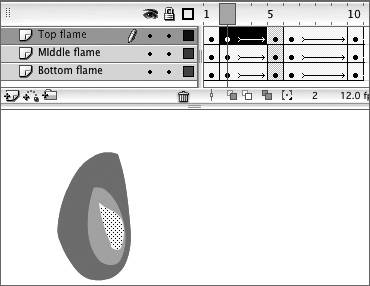
| 5. | To add more in-between frames, position the playhead in keyframe 1 by clicking the number 1 above the layers or by dragging the playhead.
| 6. | Choose Insert > Timeline > Frame, or press F5.
Flash adds new in-between frames in all layers. You can repeat the Insert > Timeline > Frame command to add as many frames as you like. These frames inherit the shape-tween property that you defined for keyframe 1. Now you can examine Flash's tweening for the new frames and repeat the process of converting any awkward tween frames to keyframes and editing them.
|
 Tips Tips
In step 4 of the preceding task, when converting in-between frames of a shape tween to keyframes, Flash always creates the new shapes as merge-shapes (even if the shapes in the preceding keyframe are drawing-objects). This could result in unexpected consequences if your shapes are on a single layer. It's another reason to make sure your shapes are on separate layers for tweened animation. Flash limits you to one color change per tween sequence. To speed the process of making several color changes, set up one long tween (either motion or shape) that goes from the initial color to the final color. Then selectively convert in-between frames to keyframes so that you can make additional color changes.
|