| Despite its limitations and cross-browser compliance issues, JavaScript is still a very popular and useful technology in today's Web pages. Unfortunately, many new PHP programmers have difficulty grasping how PHP and JavaScript interact and differ. The most significant difference between the two languages is that JavaScript is client-side (meaning it runs in the Web browser) and PHP is server-side. Therefore, JavaScript can detect the size of the browser in pixels, create pop-up windows, and make image mouseovers, whereas PHP cannot. But while PHP cannot do certain things that JavaScript can, PHP can be used to create or work with JavaScript (just as PHP can create HTML). In this example, PHP will list all the images uploaded by the upload_image. php script and make clickable links using their names. The links themselves will call a JavaScript function that creates a pop-up window. Three new PHP functions are used in this example. The first, getimagesize(), returns an array of information for a given image (Table 11.2). The second, scandir(), returns an array listing the files in a given directory (it was added in PHP 5). The third, filesize(), returns the size of a file in bytes. Table 11.2. The getimagesize() function returns this array of data.The getimagesize() Array | | |
|---|
ELEMENT | VALUE | EXAMPLE |
|---|
0 | image's width in pixels | 423 | 1 | image's height in pixels | 368 | 2 | image's type | 2 (representing JPG) | 3 | appropriate HTMLimg data | height="xx" width="yy" |
Sending JavaScript Data to PHP As the example in this section shows, sending data from PHP to JavaScript is rather easy as simple as creating any HTML. Transferring data from JavaScript to PHP, however, is a bit more complicated. There are three obvious methods for doing so: Use JavaScript to set a cookie and then retrieve this cookie on another page using PHP. Append the variable and value to a URL (e.g., script.php?name=Jude) with JavaScript, and then use JavaScript to redirect the Web browser to that URL. Have JavaScript set the value of a hidden input type in an HTML form, and then have the user submit the form to the PHP script.
For example, if I wanted to determine the size of a browser window, I would need to first detect this in JavaScript (it cannot be done with PHP). If I wanted this information passed to a PHP script (to store in a database, maybe), I would need to use one of the preceding methods to accomplish this task. Notice that in every JavaScript-to-PHP transfer, one HTML page must use JavaScript to perform the detection and a separate PHP script must be used to receive the information. You cannot pass JavaScript data to PHP without requesting a PHP page from the server after JavaScript has done its thing. |
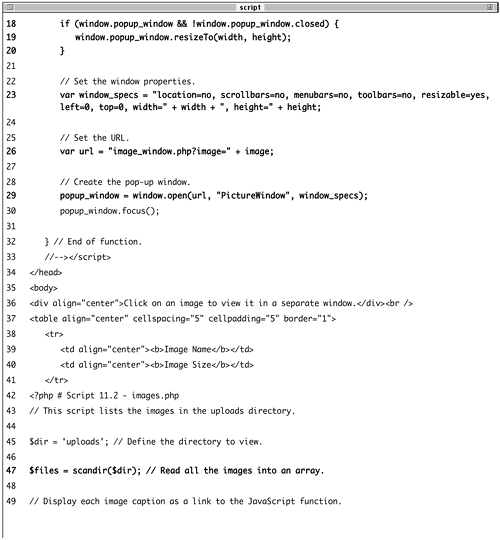
To create JavaScript with PHP 1. | Begin a new PHP document in your text editor (Script 11.2).
<!DOCTYPE html PUBLIC "-//W3C//DTD  XHTML 1.0 Transitional//EN "http://www.w3.org/TR/xhtml1/DTD/ xhtml1-transitional.dtd> <html xmlns="http://www.w3.org/1999/ xhtml xml:lang="en" lang="en"> <head> <meta http-equiv="content-type" XHTML 1.0 Transitional//EN "http://www.w3.org/TR/xhtml1/DTD/ xhtml1-transitional.dtd> <html xmlns="http://www.w3.org/1999/ xhtml xml:lang="en" lang="en"> <head> <meta http-equiv="content-type"  content="text/html; charset= iso-8859-1 /> <title>Images</title> content="text/html; charset= iso-8859-1 /> <title>Images</title>
Script 11.2. The images.php script uses JavaScript and PHP to create links to images stored on the server. 
This first script will display a list of images, along with their file sizes, and create a link to view the actual image itself in a pop-up window. The pop-up window will be created by JavaScript, although PHP will be used to set certain parameters.
| 2. | Begin the JavaScript function.
<script language="JavaScript"> <!-- // Hide from old browsers function create_window (image, width, height) { width = width + 25; height = height + 50;
The JavaScript create_window() function will accept three parameters: the image name, its width, and its height. Each of these will be passed to this function when the user clicks a link, the exact values of the image name, width, and height being determined by PHP.
Some pixels will be added to the width and height values to create a window slightly larger than the image itself.
| 3. | Resize the pop-up window if it is already open.
if (window.popup_window && !window. popup_window.closed) { window.popup_window.resizeTo (width, height); }
This code first checks if the pop-up window exists and if it is not closed. If it passes both tests (which is to say it's already open), the window will be resized according to the new image dimensions. The purpose of this code is to resize the existing window from one image to another if it was left open.
| 4. | Determine the properties of the pop-up window and the URL, and then create the window.
var window_specs = "location=no, scrollbars=no, menubars=no, toolbars=no, resizable=yes, left=0, top=0, width=" + width + ", height=" + height; var url = "image_window.php?image=" + image; popup_window = window.open(url, "PictureWindow, window_specs); popup_window.focus();
The first line sets the properties of the pop-up window (the window will have no location bar, scroll bars, menus, or toolbars; it should be resizable; it will be located in the upper-left corner of the screen; and it will have a width of width and a height of height). The plus sign is used to perform concatenation in JavaScript, allowing me to add a variable's value to a string.
The second line sets the URL of the pop-up window, which is image_window.php?image= plus the name of the image.
Finally, the pop-up window is created using the defined properties and URL, and focus is given to it, meaning it should appear above the current window.
| 5. | Conclude the JavaScript function and the HTML head.
} //--></script> </head>
| 6. | Create the introductory text and begin the table.
<body> <div align="center">Click on an image to view it in a separate window.</div><br /> <table align="center" cellspacing= "5 cellpadding="5" border="1"> <tr> <td align="center"><b> Image Name</b></td> <td align="center"><b> Image Size</b></td> </tr>
I'm not putting a lot of effort into the appearance of the page. It will be just one table with a caption.
| 7. | Start the PHP code and create an array of images by referring to the uploads directory.
<?php # Script 11.2 - images.php $dir = 'uploads'; $files = scandir($dir);
This script will automatically list and link all of the images stored in the uploads folder (presumably put there by upload_image.php, Script 11.1). I begin by defining the directory as a variable, so that it's easier to refer to. Then I use the scandir() function, which returns an array of files and directories found within a folder. This array is assigned to $files.
If you are not running PHP version 5 or later, see the manual's page for the scandir() function, which lists an alternative syntax you can use.
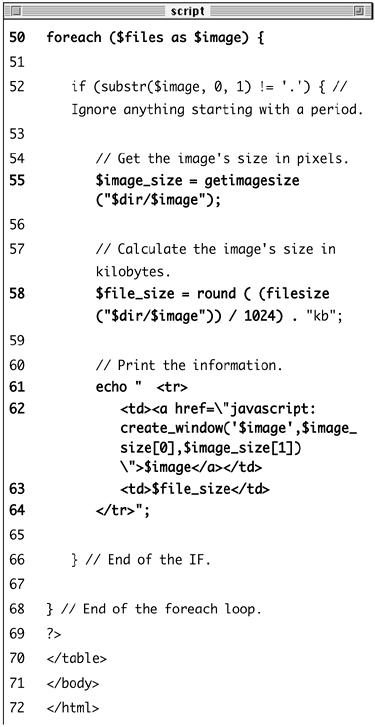
| 8. | Loop through the $files array, linking each image to the JavaScript function.
foreach ($files as $image) { if (substr($image, 0, 1) != '.') { $image_size = getimagesize ("$dir/$image); $file_size = round ( (filesize ("$dir/$image)) / 1024) . "kb; echo " <tr> <td><a href=\"javascript: create_window('$image, $image_size[0],$image_ size[1])\">$image</a></td> <td>$file_size</td> </tr>"; } }
This loop will go through every image in the array and create a row in the table for it. There are two PHP functions I'm using here that I have not used before (for more information on either, check the PHP manual): getimagesize() and filesize(). The former returns an array of information about an image. The values returned by this function will be used to set the width and height sent to the create_window() JavaScript function.
The filesize() function returns the size of a file in bytes. To calculate the kilobytes of a file, I divide this number by 1,024 (there are that many bytes in a kilobyte) and round it off.
Finally, the loop creates the HTML table row, consisting of the linked image name and the image size. The caption is linked as a call to the JavaScript create_window() function so that when the link is clicked, that function is executed.
| 9. | Complete the PHP code and the HTML page.
?> </table> </body> </html>
| 10. | Save the file as images.php, upload to your Web server (in the same directory as upload_image.php and the uploads folder), and test in your Web browser (Figure 11.10).
Figure 11.10. The images.php file (Script 11.2) lists all of the files stored in the uploads directory, creating JavaScript links to each (see Figure 11.11). 
Figure 11.11. Each image is linked as a call to a JavaScript function. The function call's parameters were created by PHP. 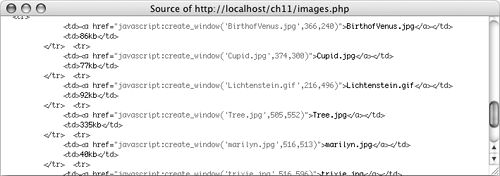
| 11. | View the source code to see the dynamically generated links (Figure 11.11).
Notice how the parameters to each function call are appropriate to the specific image. The getimagesize() function is used to determine the image's width and height.
|
The last step here is to make the image_window.php script, which is used by the pop-up window. This script simply shows the image. To make the image viewing script 1. | Begin a new PHP document in your text editor (Script 11.3).
<!DOCTYPE html PUBLIC "-//W3C//DTD XHTML 1.0 Transitional//EN "http://www.w3.org/TR/xhtml1/DTD/ xhtml1-transitional.dtd> <html xmlns="http://www.w3.org/1999/ xhtml xml:lang="en" lang="en"> <head> <meta http-equiv="content-type" content="text/html; charset= iso-8859-1 /> <title>View Image</title> </head> <body>
Script 11.3. This script displays an image, using the getimagesize() function to determine its dimensions. 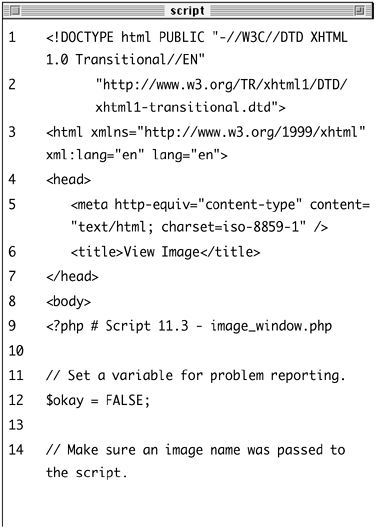

| 2. | Begin the PHP section and create a new variable.
<?php # Script 11.3 - image_window. php $okay = FALSE;
The $okay variable will be used to confirm that the image was displayed. If it could not bebecause no valid image name was received by the script or because the image could not be accessed$okay will still be FALSE and an error message will be displayed.
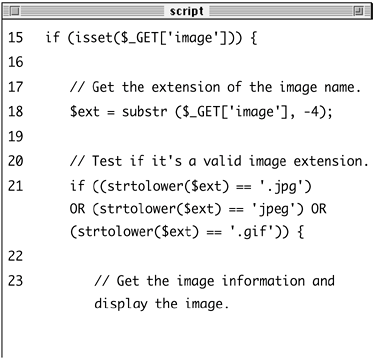
| 3. | Validate the received image name.
if (isset($_GET['image'])) { $ext = substr ($_GET['image'], -4); if ((strtolower($ext) == '.jpg') OR (strtolower($ext) == 'jpeg) OR (strtolower($ext) == '.gif)) {
Before attempting to access the image on the server, I validate it twice. The first conditional just checks that an image value was sent to the page through the URL. The second conditional makes sure that the image name (i.e., the filename) has a valid extension (.jpg, jpeg, or .gif) by checking the last four characters of the received filename (notice that the four-character extensions include jpeg without the initial period). To also allow for files with an extension of .JPG, .GIF, and .JPEG, I call the strtolower() function.
There are two assumptions being made here regarding the received image name. First, it shouldn't contain spaces or other problematic characters, as that will cause problems when passed in the URL. Second, I assume that the image name has an extension. Alternatively, you could use the mime_content_type() function to check the file's type, regardless of the presence of an extension.
| 4. | Display the image.
if ($image = @getimagesize ('uploads/' . $_GET['image])) { echo "<img src=\"uploads/{$_GET ['image]}\" $image[3] border= \"2\" />"; $okay = TRUE; }
If the script can retrieve the image information, the image will be displayed (by creating the appropriate HTML code) and the $okay variable set to TRUE. The fourth array element returned by the getimagesize() function makes it easy to generate the proper HTML for the image.
| 5. | Complete the conditionals and print an error message if necessary.
} } if (!$okay) { echo '<div align="center"> <font color="red size="+1"> This script must receive a valid image name!</font></div>'; }
If $okay is not trUE, then some problem occurred and a generic error message is printed to the Web browser.
| 6. | Complete the PHP code and the HTML page.
?> <br /> <div align="center"><a href= "javascript:self.close();">Close This Window</a></div> </body> </html>
This final bit of JavaScript will create a link that, when clicked, will close the pop-up window.
| 7. | Save the file as image_window.php, upload to your Web server (in the same directory as images.php), and test in your Web browser (Figure 11.12).
Figure 11.12. The image is displayed by having PHP create the appropriate HTML. 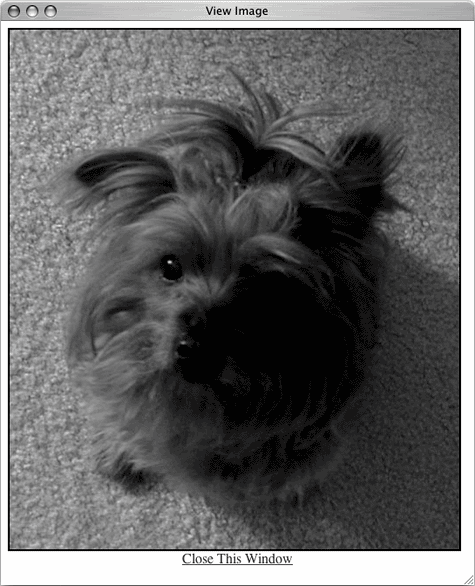
If any problems are encountered, the image_window.php script will look like Figure 11.13.
Figure 11.13. If no image name or an invalid image name is supplied to this page, this error message is displayed. 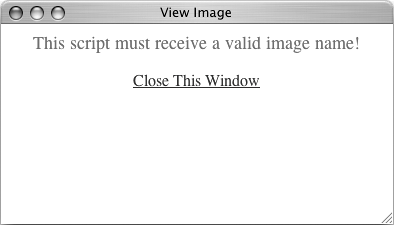
|
 Tips Tips
Not to belabor the point, but most everything Web developers do with JavaScript (for example, resize or move the browser window) cannot be done using the server-side PHP. There is a little overlap between the PHP and JavaScript. Both can set and read cookies, create HTML, and do some browser detection. The PHP function file_exists()it tests for the existence of a file on the servercould also be used in both of these scripts to validate the presence of an image before linking to or displaying it.
|