| I'm going to begin this chapter by demonstrating how to accept file uploads in your forms. Like handling any HTML form using PHP, the process of uploading a file has two dimensions. First the HTML form must be displayed, with the proper code to allow for file uploads. Then upon submission of the form, the PHP script must copy the uploaded file to the proper location. However, for this process to work, several things must be in place: PHP must run with the proper settings. A temporary storage directory must exist with the proper permissions. The final storage directory must exist with the proper permissions.
With this in mind, I'll first adjust the server to ensure that file uploads are allowed. Then I'll create the upload script itself. Allowing for file uploads As I said, certain settings must be established in order for PHP to be able to handle file uploads. I'll first discuss why or when you'd need to make these adjustments before walking you through the steps. The first issue is PHP itself. There are several settings in the php.ini file that dictate how PHP handles uploads, specifically dictating how large of a file can be uploaded and where the upload should temporarily be stored. Generally speaking, you'll need to edit this file if either of these two conditions apply: If you don't have access to your php.ini file, meaning that you're using a hosted site, presumably the host has already made the necessary alterations. If you installed PHP on Mac OS X or Unix, you should also be good to go (assuming reasonable-sized files). The second issue is the location of, and permissions on, the temporary directory. This is where PHP will store the uploaded file until your PHP script moves it to its final destination. If you installed PHP on your own Windows computer, you'll need to take steps here. Mac OS X and Unix users need not worry about this. Finally, the final destination folder must be created and have the proper permissions established on it. This is a step that everyone must take for every application that handles file uploads. Because there are important security issues involved in this step, please also make sure that you read and understand the sidebar , "Secure Folder Permissions," on page 426. With all of that in mind, I'll now walk you through the steps. To prepare the server 1. | Open php.ini in your text editor.
If you do not know where your php.ini file is, see Appendix A, "Installation," which covers how to identify and edit this file. If you are not allowed to edit your php.ini file (if, for instance, you're using a hosted server), then presumably any necessary edits would have already been made to allow for file uploads. You can confirm this by checking the settings listed in Step 2 in a phpinfo() script (again, see the first appendix).
| 2. | Under the File Uploads section (approximately line 475), adjust the following lines as needed (Figure 11.1):
file_uploads = On ;upload_tmp_dir = upload_max_filesize = 2M
Figure 11.1. Various php.ini settings affect your ability to manage file uploads in PHP. 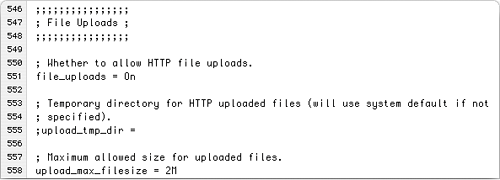
The first line dictates whether or not uploads are allowed. The second states where the uploaded files should be temporarily stored. On most operating systems, including Mac OS X and Unix, this setting can be left commented out (preceeded by a semicolon) without any problem. If you are running Windows, set this value to C:\tmp, making sure that the line is not preceded by a semicolon.
Finally, a maximum upload file size is set, in megabytes.
| 3. | Save the php.ini file and restart your Web server.
How you restart your Web server depends upon the operating system and Web serving application being used. Using Apache on Mac OS X, it's just a matter of going through the System Preferences > Sharing panel.
Windows users running Apache can type
NET STOP APACHE NET START APACHE
within a DOS prompt.
Unix and Linux users will normally use the command
apachectl graceful
| 4. | If you are running Windows, create a tmp folder within C:\and make sure that everyone can write to that directory (Figure 11.2).
Figure 11.2. Windows users need to make sure that the C:\tmp directory is writable. 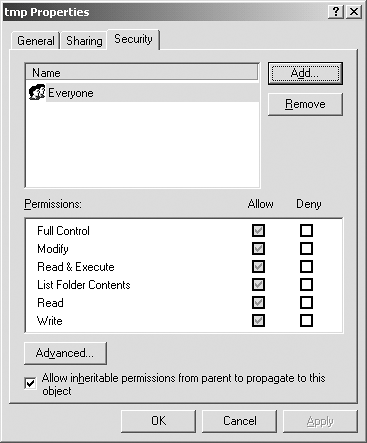
PHP, through your Web server, will temporarily store the uploaded file in the upload_tmp_dir. For this to work, the Web user (if your Web server runs as a particular user) must have permission to write to the folder.
You may not actually have to change the permissions, but to do so, depending upon what version of Windows you are running, you can normally adjust the permissions by right-clicking the folder and selecting Properties. With the Properties window, there should be a Security tab where permissions are set. It may also be under Sharing.
Mac OS X and Unix users can skip this step as the temporary directory/tmphas open permissions already.
| 5. | Create a new directory, called uploads, in the same directory where you'll be placing the file upload script.
All of the uploaded files will be permanently stored in the uploads directory. If you'll be placing your script in the C:\inetpub\wwwroot\ch11 directory, then create a C:\inetpub\wwwroot\ch11\uploads directory. Or if the files are going in /Users/<username>/Sites/ch11, make a /Users/<username>/Sites/ch11/uploads folder.
| 6. | Set the permissions on the uploads directory so that the Web server can write to it.
Again, Windows users should use the Properties window to make these changes. Mac OS X users can…
Select the folder in the Finder. Press Command+I. Allow everyone to Read & Write, under the Ownership & Permissions panel (Figure 11.3). Figure 11.3. Adjusting the properties on the uploads folder in Mac OS X. 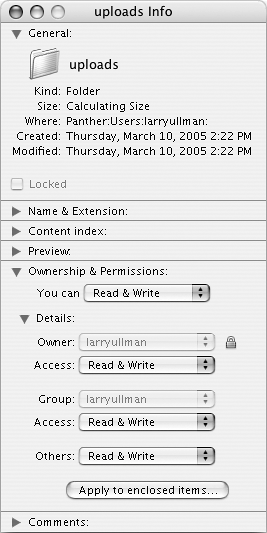
Depending upon your operating system, you may be able to upload files without first taking this step. You should try the following script before altering the permissions, just to check. If you see messages like those in Figure 11.4, then you will need to make some adjustments.
Figure 11.4. If PHP could not move the upload image over to the uploads folder because of a permissions issue, you'll see an error message like this one. Fix the permissions on uploads to correct this. 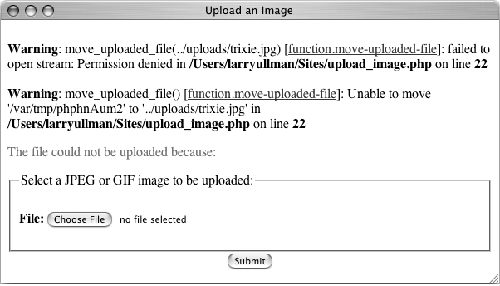
Check out the sidebar for information related to the security issues involved with this step.
|
 Tips Tips
Unix people can use the chmod command to adjust a folder's permissions. The post_max_size setting in the php.ini file dictates the total amount of data (in megabytes) that can be uploaded by a single script. It's set at 8 MB by default. If you want to accept a large file upload, you must also increase this value accordingly. Because of the time it may take to upload a large file, you may also need to change the max_execution_time value in the php.ini file or temporarily bypass it using the set_time_limit() function in your script.
Secure Folder Permissions As I've said before, increased security normally comes with a trade-off of decreased convenience. With this example, I have practically no security but the convenience of being able to easily demonstrate the file upload process. I'll explain in more detail…. The permissions I've set on the uploads folderallowing everyone read and write accessis heavy-handed and quite insecure. Literally anyone can now move, copy, or write files to the uploads folder (assuming that they know it exists). A malicious user could write a PHP script to your uploads directory and then run that script in the Web browser, doing all kinds of damage. There are several possible fixes to make this process more secure. Storing uploaded files outside of the Web directory is preferred for security reasons. Doing so will deny users access to the files directly and avoid placing a folder with loose permissions in a publicly accessible place. For example, if you are running Windows and the root of your Web directory (where http://localhost points) is C:\inetpub\wwwroot, then you would create a C:\inetpub\uploads directory. On Mac OS X, where /Users/<username>/Sites is the Web root (http://localhost/~username points there), you would create /Users/<username>/uploads. Unfortunately placing the uploads folder outside of the Web directory would render the set of scripts that display the uploaded imageswritten in the JavaScript section of the chaptercompletely useless. The uploaded images simply would not be viewable. One work-around for this is demonstrated in Chapter 14, "ExampleE-Commerce," although that involves a bit more programming. If you must keep the uploads folder publicly accessible, the permissions could be tweaked. For security purposes, you ideally want to allow only the Web server user to read, write, and browse this directory. This means knowing what user the Web server runs as and making that userand no one elseruler of the uploads. This isn't a perfect solution, but it does help a bit. This change also limits your access to that folder, though, as its contents would belong to only the Web server. Finally, if you're using Apache, you could limit access to the uploads folder using an .htaccess file. Basically, you would state that only image files in the folder be publicly viewable, meaning that even if a PHP script were to be placed there, it could not be executed. Information on how to use .htaccess files can be found online (search on .htaccess tutorial). Sometimes even the most conservative programmer will make security concessions. The important point is that you're aware of the potential concerns and that you do the most you can to minimize the danger. |
Uploading files with PHP Now that the server has (hopefully) been set up to properly allow for file uploads, you can create the PHP script that does the actual file handling. There are two parts to such a script: the HTML form and the PHP code. The required syntax for a form to handle a file upload has three parts: <form enctype="multipart/form-data"  action="script.php method="post"> <input type="hidden" name="MAX_FILE_SIZE" action="script.php method="post"> <input type="hidden" name="MAX_FILE_SIZE"  value="30000 /> File <input type="file" name="upload" /> value="30000 /> File <input type="file" name="upload" />
The enctype part of the initial form tag indicates that the form should be able to handle multiple types of data, including files. Also note that the form must use the POST method. The MAX_FILE_SIZE hidden input is a form restriction on how large the chosen file can be, in bytes, and must come before the file input. Finally, the file input type will create the proper button in the form (Figures 11.5 and 11.6). Figure 11.5. The file input as it appears in IE 6 on Windows. 
Figure 11.6. The file input as it appears in Safari on Mac OS X. 
As of PHP 4.1, the uploaded file can be accessed using the $_FILES superglobal. The variable will be an array of values, listed in Table 11.1. Table 11.1. The data for an uploaded file will be available through these array elements.The $_FILES Array |
|---|
INDEX | MEANING |
|---|
name | The original name of the file (as it was on the user's computer). | type | The MIME type of the file, as provided by the browser. | size | The size of the uploaded file in bytes. | tmp_name | The temporary filename of the uploaded file as it was stored on the server. | error | The error code associated with any problem in uploading. |
Once the file has been received by the PHP script, the move_uploaded_file() function can transfer it from the temporary directory to its permanent location. move_uploaded_file ('temporary_filename',  '/to/destination/filename'); '/to/destination/filename');
If the move was successful, then the temporary version of the file will have been moved over to its new destination. This next script will let the user select a file on their computer and will then store it in the uploads directory. The script will check that the file is of an image type. In the next section of this chapter, another script will list, and create links to, the uploaded images. To handle file uploads in PHP 1. | Create a new PHP document in your text editor (Script 11.1).
<!DOCTYPE html PUBLIC "-//W3C//DTD  XHTML 1.0 Transitional//EN "http://www.w3.org/TR/xhtml1/DTD/ XHTML 1.0 Transitional//EN "http://www.w3.org/TR/xhtml1/DTD/  xhtml1-transitional.dtd> <html xmlns="http://www.w3.org/1999/ xhtml1-transitional.dtd> <html xmlns="http://www.w3.org/1999/  xhtml xml:lang="en" lang="en"> <head> <meta http-equiv="content-type" xhtml xml:lang="en" lang="en"> <head> <meta http-equiv="content-type"  content="text/html; charset= content="text/html; charset=  iso-8859-1 /> <title>Upload an Image</title> </head> <body> <?php # Script 11.1 - upload_image iso-8859-1 /> <title>Upload an Image</title> </head> <body> <?php # Script 11.1 - upload_image  php php
Script 11.1. This script allows the user to upload an image file from their computer to the server. 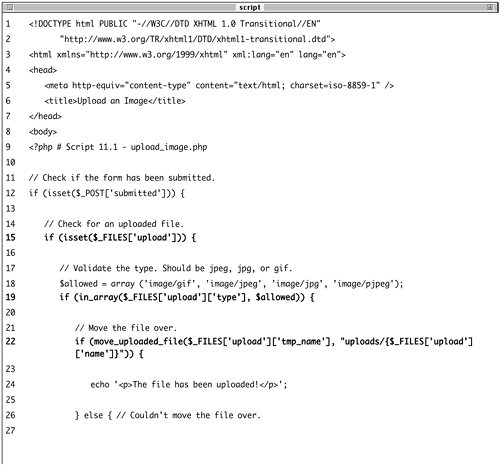 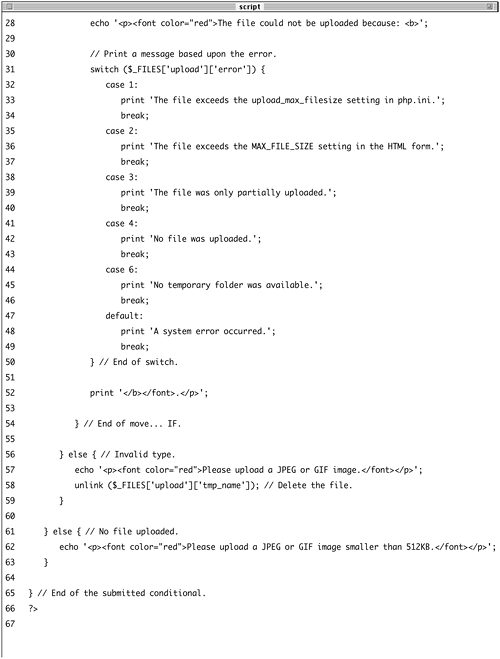 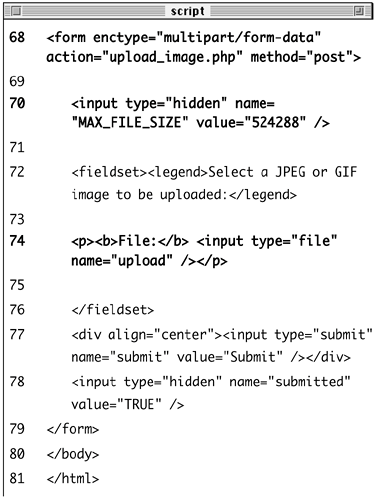
| 2. | Check if the form has been submitted and that a file was selected.
if (isset($_POST['submitted'])) { if (isset($_FILES['upload'])) {
Since this form will have no other fields to be validated, this is the only conditional required. You could also validate the size of the uploaded file to determine if it fits within the acceptable range (refer to the $_FILES['upload']['size'] value).
| 3. | Check that the uploaded file is of the proper type.
$allowed = array ('image/gif',  'image/jpeg, 'image/jpg', 'image/jpeg, 'image/jpg',  'image/pjpeg); if (in_array($_FILES['upload'] 'image/pjpeg); if (in_array($_FILES['upload']  ['type], $allowed)) { ['type], $allowed)) {
The file's type is its MIME type, indicating what kind of file it is. The browser will determine and provide this information, depending upon the properties of the selected file. An image should have a type of image/gif, image/jpeg, or image/jpg (you could also allow for image/png). Microsoft Internet Explorer also uses the image/pjpeg for type, so I allow for that.
To validate the file's type, I first create an array of allowed options. If the uploaded file's type is in this array, the file is valid and should be handled.
| 4. | Copy the file to its new location on the server.
if (move_uploaded_file($_FILES  ['upload]['tmp_name'], "uploads/ ['upload]['tmp_name'], "uploads/  {$_FILES['upload]['name']}")) { echo '<p>The file has been {$_FILES['upload]['name']}")) { echo '<p>The file has been  uploaded!</p>'; uploaded!</p>';
I'll use the move_uploaded_file() function to move the temporary file to its permanent location (in the uploads folder). The file will retain its original name. In the next chapter, you'll see how to give the file a new name, which is generally a good idea.
As a rule, you should always use a conditional to confirm that a file was successfully moved, instead of just assuming that the move worked.
| 5. | Report on any errors if the file could not be moved.
} else { echo '<p><font color="red">The  file could not be uploaded file could not be uploaded  because: <b>'; switch ($_FILES['upload'] because: <b>'; switch ($_FILES['upload']  ['error]) { case 1: print 'The file exceeds the ['error]) { case 1: print 'The file exceeds the  upload_max_filesize setting upload_max_filesize setting  in php.ini; break; case 2: print 'The file exceeds the in php.ini; break; case 2: print 'The file exceeds the  MAX_FILE_SIZE setting in MAX_FILE_SIZE setting in  the HTML form; break; case 3: print 'The file was only the HTML form; break; case 3: print 'The file was only  partially uploaded; break; case 4: print 'No file was uploaded'; break; case 6: print 'No temporary folder partially uploaded; break; case 4: print 'No file was uploaded'; break; case 6: print 'No temporary folder  was available; break; default: print 'A system error was available; break; default: print 'A system error  occurred.'; break; } print '</b></font>.</p>'; } occurred.'; break; } print '</b></font>.</p>'; }
There are several possible reasons a file could not be moved. The first and most obvious one is if the permissions are not set properly on the destination directory.
In such a case, you'll see an appropriate error message (refer back to Figure 11.4). PHP will often also store an error number in the $_FILES['upload']['error'] variable. The numbers correspond to specific problems, from 0 to 4, plus 6 (oddly enough, there is no 5). The switch conditional here prints out the problem according to the error number. The default case is added because $_FILES['upload']['error'] may not always have a value.
| 6. | Complete the conditionals and the PHP section.
} else { echo '<p><font color="red">  Please upload a JPEG or GIF Please upload a JPEG or GIF  image.</font></p>'; unlink ($_FILES['upload'] image.</font></p>'; unlink ($_FILES['upload']  ['tmp_name]); } } else { echo '<p><font color="red"> ['tmp_name]); } } else { echo '<p><font color="red">  Please upload a JPEG or GIF Please upload a JPEG or GIF  image smaller than 512KB. image smaller than 512KB.  </font></p>'; } } ?> </font></p>'; } } ?>
The first else clause concludes the type in_array() conditional. If the file was not of the right type, an error message is printed. Also, the uploaded file is deleted from the server using the unlink() function.
The second else clause concludes the isset($_FILES['upload']) conditional. That variable may not be set either because the user failed to select a file for uploading or because the file was larger than the MAX_FILE_SIZE value.
| 7. | Create the HTML form.
<form enctype="multipart/form-data"  action="upload_image.php action="upload_image.php  method="post> <input type="hidden" name= method="post> <input type="hidden" name=  "MAX_FILE_SIZE value="524288" /> <fieldset><legend>Select a JPEG or "MAX_FILE_SIZE value="524288" /> <fieldset><legend>Select a JPEG or  GIF image to be uploaded: GIF image to be uploaded:  </legend> <p><b>File:</b> <input type="file" </legend> <p><b>File:</b> <input type="file"  name="upload /></p> </fieldset> <div align="center"><input type= name="upload /></p> </fieldset> <div align="center"><input type=  "submit name="submit" value= "submit name="submit" value=  "Submit /></div> <input type="hidden" name= "Submit /></div> <input type="hidden" name=  "submitted value="TRUE" /> </form> "submitted value="TRUE" /> </form>
This form is very simple (Figure 11.7), but it contains the three necessary parts for file uploads: the form's enctype attribute, the MAX_FILE_SIZE hidden input, and the file input.
Figure 11.7. The HTML form, indicating that a file has been selected (in Safari on Mac OS X). 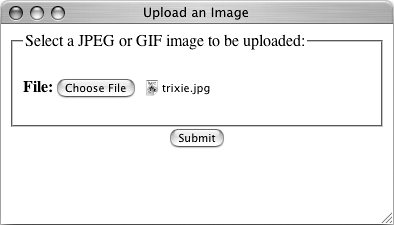
| 8. | Complete the HTML page.
</body> </html>
| 9. | Save the file as upload_image.php, upload to your Web server, and test in your Web browser (Figures 11.8 and 11.9).
Figure 11.8. If the file was successfully uploaded and moved to its final destination, a simple message is printed. 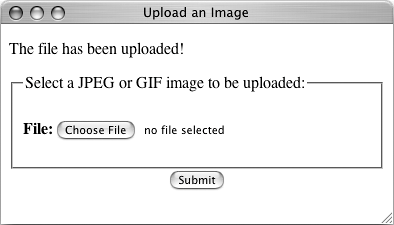
Figure 11.9. If an invalid file type is uploaded, this error message is displayed and the file is deleted (behind the scenes). 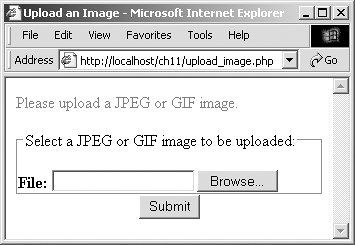
|
 Tips Tips
Omitting the enctype form attribute is a common reason for file uploads to mysteriously fail. The existence of an uploaded file can also be validated with the is_uploaded_file() function. Windows users must use forward slashes or double backslashes to refer to directories (so C:\\or C/: rather than C:\). This is because the backslash is the escape character in PHP. The move_uploaded_file() function will overwrite an existing file without warning if the new and existing files both have the same name. In Chapter 12, you'll learn how to upload multiple files at once. At that time you'll also store the names of the uploaded files in a database and give the uploaded files new names on the server. The MAX_FILE_SIZE is a restriction in the browser as to how large a file can be, although not all browsers abide by this restriction. The PHP configuration file has its own restrictions. You can also validate the uploaded file size within the receiving PHP script. A file's MIME type can also be detected in PHP 4.3 and later using the mime_content_type() function.
|


 Tips
Tips action="script.php method="post"> <input type="hidden" name="MAX_FILE_SIZE"
  content="text/html; charset=


