| A very welcome addition to the MySQL family of products is the free (free!) MySQL Administrator. This is a graphical tool that will run on most operating systems, starting with Windows, Mac OS X, and Linux. The application works with MySQL servers versions 4.0 and greater. You can perform all of your MySQL administration using this tool. This includes backing up and restoring databases, repairing tables, optimizing performance, and so on. In short, the MySQL Administrator can do everything that the individual utilities MySQL comes with can. In this first section of the chapter, I'll talk about getting, installing, and running the application. In subsequent sections, I'll demonstrate how you use the MySQL Administrator to manage particular administrative tasks. Note that I've taken the screenshots using both Mac OS X and Windows. For some reason, there are many differences in the application on different operating systems: different layouts, different labels, etc. It's almost as if each version was put out by a separate company! Nevertheless, the functionality is the same regardless of the operating system in use. To use the MySQL Administrator: 1. | Download the MySQL Administrator from www.mysql.com.
At the time of this writing, the latest version is 1.1, which supports MySQL versions 4.0 through 5.0. (The precise version numbers are 1.1.9 on Windows, 1.1.6 on Unix, and 1.1.3 on Mac, unless you build it from the source code.)
| 2. | Install the application on your computer.
Windows users will download and run a Windows Installer file (.msi). Mac users need to mount the downloaded disk image and then copy the application to your hard drive. Linux users just need to untar the download.
| 3. | Start the application.
Windows users can use the Start menu shortcut. Mac users can double-click the application itself. Linux users should move into the program's installation directory (/opt/mysql-administrator/bin) and start the application from there.
| 4. | At the first prompt (Figure 13.1), enter the correct username, hostname, and password combination.
Figure 13.1. Start MySQL Administrator, connecting as root or another superuser. 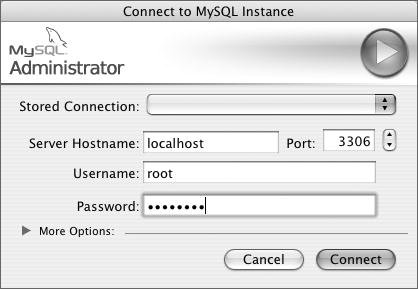
To administer MySQL running on the same computer, you'll likely want to enter localhost as the host. You'll then want to use either root or another administrative account, and the correct password for that user. These values correspond to the users and permissions established within the MySQL server.
| | | 5. | Click OK or Connect, depending upon your version of the application, to take you into the application.
Assuming that you used a valid administrative username/hostname/password combination, this will connect to the MySQL server. Figure 13.2 shows the result on Windows; Figure 13.3 is the Mac OS X view.
Figure 13.2. MySQL Administrator on Windows, showing the Server Information pane. 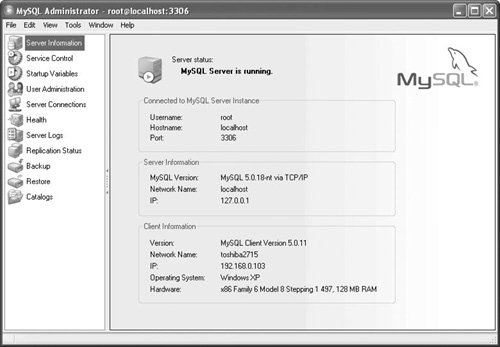
Figure 13.3. MySQL Administrator on Mac OS X, showing the Information pane. 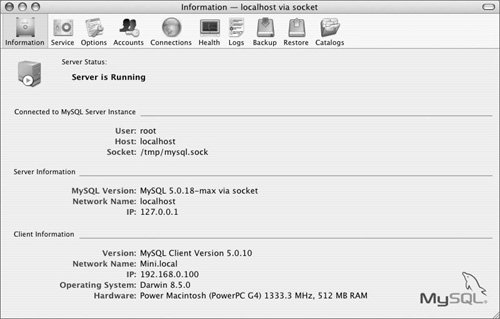
| 6. | Use the Server Information (Windows) or Information (Mac OS X) pane to learn about the MySQL and system status (Figures 13.2 and 13.3).
This includes information such as the version of MySQL, how much RAM the server has installed, the server's IP address, and so on.
| 7. | Use the Service Control (Windows) or Service (Mac OS X) pane to start, stop, and control the MySQL service.
The Windows version of this window (Figure 13.4) contains more options than the Mac version. With Windows, what you can do here is similar to what you can do in the Windows Services control panel (see Chapter 2, "Running MySQL").
Figure 13.4. The Service pane starts and stops the MySQL server. 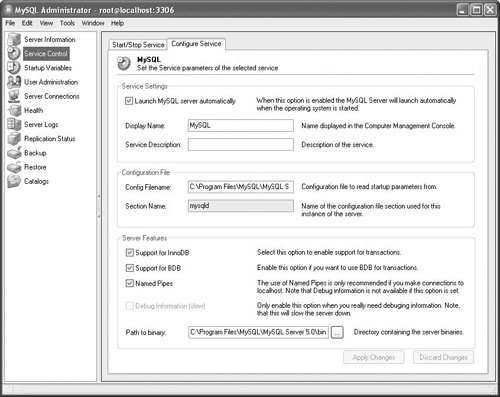
| 8. | Use the Server Connections (Windows) or Connections (Mac OS X) pane to view the active MySQL connections.
You can also terminate any connections in this window. If you're running MySQL on your own computer without a lot of activity, you won't see much here.
| | | 9. | Go into User Administration (Windows) or Accounts (Mac OS X) to manage the MySQL users.
You can manage all of the MySQL usersset their passwords, usernames, hosts, privileges, and morein this application instead of using SQL commands with the mysql client. I don't cover this feature in this chapter, but if you poke around it's easy enough to use.
| 10. | Continue through the rest of the chapter to use the MySQL Administrator for specific tasks.
|
 Tips Tips
You can connect to multiple MySQL servers simultaneously using the MySQL Administrator. Just create a new connection for each. This also means that you can connect to the same MySQL server using different login information. On Windows, in the application's Tools menu, there's a shortcut for quickly connecting to MySQL through the mysql client. The connection will use the same access information as provided to the MySQL Administrator. You can also enable the MySQL System Tray Monitor, which puts quick access to common MySQL information and tools in the Windows System Tray (Figure 13.5). Figure 13.5. Enable the System Tray tool on Windows to give yourself really easy access to common MySQL utilities and commands. 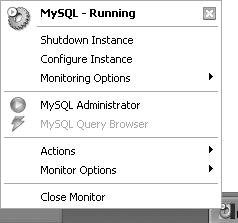 On Windows, under Tools > Options, you can set how the MySQL Administrator behaves. This includes saving passwords and connections. On Mac OS X, you can find the equivalent by select MySQL Administrator > Preferences. You may or may not also have a Replication Status pane in your MySQL Administrator. If present, this pane would be used to view the status of any replication you have established. Replication is where one MySQL server mimics the behavior of another: any changes made to a database on one will also be made to the other.
|