Unattended Clean Install
|
|
For the third installation, you’re going to perform a clean install of Enterprise Edition using the standard unattended installation method. First you’ll install the support tool Setup Manager on the previously installed Standard Server machine. You’ll use this tool to create an answer file and shared distribution point on the server. Then you’ll use a modified version of your previously created network boot disk to boot a wiped machine, connect to the distribution point, and perform a completely unattended installation.
Microsoft Windows Corporate Deployment Tools
The \Support\Tools folder on the Windows Server 2003 product CD contains a number of goodies, including Deploy.cab, a Windows cabinet file that contains various tools and documentation for automated deployment of Windows Server 2003 including
-
Setupmgr.exe An application called Setup Manager that is used for creating answer files and distribution points for automated installation of Windows Server 2003
-
Deploy.chm A Windows Help file containing the Microsoft Windows Corporate Deployment Tools User Guide, with documentation on how to use Setup Manager, Sysprep, and other automated deployment tools
-
Ref.chm The Microsoft Windows Preinstallation Reference, with documentation of the various types of answer files you can create with Setup Manager
To use these tools, extract them from the cabinet file by copying them to the hard drive on the file server you plan to use for hosting the shared distribution point. Microsoft sometimes calls this machine the technician computer, while the machine you want to automatically deploy Windows on is the target or destination computer.
Running Setup Manager
Double-click the extracted Setupmgr.exe file to start Setup Manager on your technician computer (see Figure 4-15). This opens a wizard screen that walks you through the process of preparing for automated deployment. You’ll use the wizard now to create an answer file called unattend.txt that will allow you to perform a fully automated installation of Enterprise Edition using the following parameters:
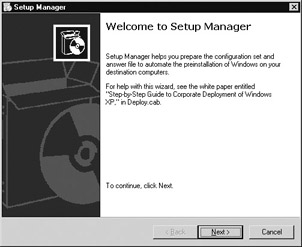
Figure 4-15: Using Setup Manager to prepare for automated deployment
-
Computer name: MACBETH
-
Workgroup: WORKGROUP
-
IP address: 172.16.11.175
-
Subnet Mask: 255.255.255.0
-
Default Gateway: 172.16.11.1
-
Time Zone: Central Time and so forth.
I won’t show all the screens of the Setup Manager wizard here. Instead, I’ll walk you through the steps you would perform to prepare for the installation. First, make sure your Enterprise Edition product CD is in the CD-ROM drive of the technician machine, and then select the following options on each screen of the wizard:
-
New Or Existing Answer File: select Create New.
-
Type Of Setup: select Unattended Setup (other options are Sysprep and RIS).
-
Product: select Windows .NET Enterprise Server.
-
User Interaction: select Fully Automated (the other four options have various degrees of user interaction during Setup).
-
Distribution Share: select Create A New Distribution Share.
-
Location Of Setup Files: select On The CD.
-
Distribution Share Location: accept the defaults of C:\windist as the distribution share location and Windist as the share name.
-
License Agreement: select the check box to accept the license agreement.
Note The listed pages of the wizard vary depending on what selections you make as you move through it. The preceding steps are typical for creating an answer file for fully automated unattended Setup.
The initial wizard screen disappears and the main Setup Manager window is displayed (see Figure 4-16). The wizard now walks you through the process of specifying answers to Setup prompts for creating the answer file.
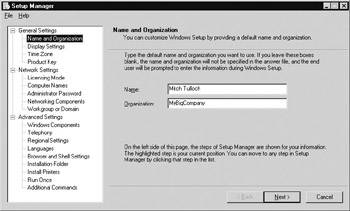
Figure 4-16: Using Setup Manager to create an answer file -
Name And Organization: Fill in your own name and company (I’ll use Mitch Tulloch and MyBigCompany for purposes of illustration).
-
Display Settings: leave as Windows Default.
-
Time Zone: Specify your time zone (I’ll choose Central Time).
-
Product Key: enter your 25-character product key.
-
Licensing Mode: leave at Per Server, Max 5 Connections.
-
Computer Names: add the name for the target computer here (I’ll use MACBETH). Note that you can enter multiple computer names here, and then use .udf files in conjunction with unattend.txt for installing multiple machines using a single answer file—see the Corporate Deployment Guide on your Windows Server 2003 product CD for more information.
-
Administrator Password: enter your Administrator password and select the option to encrypt the password in the answer file (for extra security in case your answer file is lost or stolen).
-
Network Components: select the Custom option and specify the IP address, subnet mask, default gateway, and DNS server addresses as previously indicated.
-
Workgroup Or Domain: leave as WORKGROUP because you’re deploying a stand-alone server.
-
Windows Components: Select the World Wide Web Service to install IIS.
-
Telephony: leave unspecified.
-
Regional Settings: select English (United States).
-
Languages: leave settings as they are.
-
Browser and Shell Settings: leave settings as they are.
-
Installation Folder: leave as A Folder Named Windows.
-
Install Printers: leave unspecified.
-
Run Once: leave unspecified.
-
Additional Commands: leave unspecified.
-
Click Finish, and a screen appears prompting you for the name and location to save your newly created answer file (see Figure 4-17). The default is to create a file named unattend.txt in the distribution folder C:\windist. Accept the defaults by clicking OK, and Setup Manager will begin copying the Enterprise Edition source files to the distribution folder. This will take a few minutes.
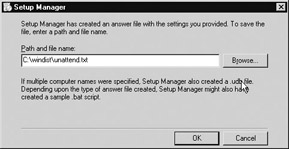
Figure 4-17: Specifying a name and location for your newly created answer file
Results of Running Setup Manager
When Setup Manager has finished running, your distribution point and answer point are ready for use. Here’s what the answer file unattend.txt from my own walkthrough looks like (yours will differ slightly depending on the choices you made in the preceding walkthrough):
;SetupMgrTag [Data] AutoPartition=1 MsDosInitiated="0" UnattendedInstall="Yes" [Unattended] UnattendMode=FullUnattended OemSkipEula=Yes OemPreinstall=Yes TargetPath=\WINDOWS [GuiUnattended] AdminPassword=4bac4743f2c462e0944e2df489a880e45f19da0790b6ebe30cf4eed547c5d972 EncryptedAdminPassword=Yes AutoLogon=No AutoLogonCount=1 OEMSkipRegional=1 TimeZone=20 OemSkipWelcome=1 [UserData] ProductKey=DWYG2-CYP93-QKYJ4-49QMQ-WF66M FullName="Mitch Tulloch" OrgName="MyBigCompany" ComputerName=Macbeth [LicenseFilePrintData] AutoMode=PerServer AutoUsers=5 [RegionalSettings] LanguageGroup=1 Language=00000409 [SetupMgr] DistFolder=C:\windist DistShare=windist [Components] accessopt=On calc=On charmap=On clipbook=On deskpaper=On templates=On mousepoint=On paint=On freecell=Off hearts=Off zonegames=Off minesweeper=Off solitaire=Off spider=Off indexsrv_system=On msnexplr=Off certsrv=Off certsrv_client=Off certsrv_server=Off iis_www=On iis_ftp=Off iis_smtp=Off iis_smtp_docs=Off iis_nntp=Off iis_nntp_docs=Off reminst=Off rstorage=Off TerminalServer=Off wms=Off wms_admin_asp=Off wms_admin_mmc=Off wms_server=Off chat=On dialer=On hypertrm=On cdplayer=On mplay=On media_clips=On media_utopia=On rec=On vol=On [Identification] JoinWorkgroup=WORKGROUP [Networking] InstallDefaultComponents=No [NetAdapters] Adapter1=params.Adapter1 [params.Adapter1] INFID=* [NetClients] MS_MSClient=params.MS_MSClient [NetServices] MS_SERVER=params.MS_SERVER [NetProtocols] MS_TCPIP=params.MS_TCPIP [params.MS_TCPIP] DNS=No UseDomainNameDevolution=No EnableLMHosts=Yes AdapterSections=params.MS_TCPIP.Adapter1 [params.MS_TCPIP.Adapter1] SpecificTo=Adapter1 DHCP=No IPAddress=172.16.11.175 SubnetMask=255.255.255.0 DefaultGateway=172.16.11.1 DNSServerSearchOrder=205.200.16.65,205.200.16.69 WINS=No NetBIOSOptions=0
Note that in the walkthrough, Setup Manager also created a batch file called unattend.bat that you can view to learn more about how to use your answer file. Here are the contents of unattend.bat:
@rem SetupMgrTag @echo off rem rem This is a SAMPLE batch script generated by Setup Manager. rem If this script is moved from the location where it was generated, it may have to be modified. rem set AnswerFile=.\unattend.txt set SetupFiles=\\ME-LDBNY9QL4Y55\windist\I386 \\ME-LDBNY9QL4Y55\windist\I386\winnt32 /s:%SetupFiles% /unattend:%AnswerFile%
Now you need to modify your network boot disk to use your answer file for unattended Setup.
| Tip | There are a number of new answer file options for controlling how unattended installation of IIS 6 components can be performed on Windows Server 2003. You can find out more about these options in the Internet Information Services (IIS) help docs in the Help and Support Center. You can then use the Sysocmgr.exe utility together with your IIS answer file to perform a separate unattended installation of IIS after completing your installation of Windows Server 2003. |
Preparing Network Boot Disk
You’ll simply modify the network boot disk you created earlier in this chapter to enable unattended installation using the answer file. There are several ways of doing this, but perhaps the simplest is to copy the answer file (unattend.txt) to the root of the boot disk. Then use Notepad to open autoexec.bat on the boot disk and change
net use z: \\SNOOPY\I386
to
net use z: \\ME-LDBNY9QL4Y55\windist
so that the Z: drive is mapped to the folder in our shared distribution point that contains the Setup program winnt.exe. Then you need to replace the line
z:\winnt.exe /s:\\SNOOPY\I386
with
z:\I386\winnt.exe /s:z:\I386 /u:unattend.txt
and save the changes. Note that your computer names are probably different so adjust the preceding steps accordingly. You’re ready for automated Setup!
Performing an Unattended Installation
Insert the network boot disk, start the machine, and watch it connect to the distribution point, copy files, and install Windows Server 2003 without any intervention on your part!
The only issue with this method is that if you prepared the target machine’s hard drive the way the previous walkthrough was performed, the result is that Windows Server 2003 is installed on a 2GB FAT partition instead of NTFS. This is not a big issue, since you can run convert c: /fs:ntfs from the command line afterwards to schedule your boot partition to be converted from FAT to NTFS at the next system reboot. The new version of the Convert utility included with Windows Server 2003 is smart enough to apply a security template during the conversion process so that the resulting NTFS file and folder permissions are identical, as if Windows had been originally installed on NTFS instead. Then you can convert your disk to dynamic and extend the C: volume to any size desired. The downside of this approach is that the converted disk is somewhat more fragmented than if you had formatted it as NTFS during the Text Mode portion of Setup as in a manual install. Another way around this problem if you are an enterprise customer is to obtain the Windows Preinstallation Environment (WinPE) kit from your Microsoft representative. Using the WinPE CD, you can boot directly from the CD, create partitions, and format them using NTFS to prepare your disk for unattended Setup. Or you can use a third-party tool like PartitionMagic from PowerQuest to create your partitions and format your drives using NTFS. You can also use Remote Installation Services (RIS) for performing automated installs, but that topic is beyond the scope of this book.
Postinstallation Notes
The results of this installation are pretty much the same as the results of installing Standard Edition earlier in this chapter. The only website visible in the IIS console is the Default Web Site, and if you go into Control Panel and use Add Or Remove Programs, you’ll see that the following components of IIS have been installed under Application Server:
-
Enable network COM+ access
-
Internet Information Services (IIS)
-
Common Files
-
Internet Information Services Manager
-
World Wide Web Service
-
Note that neither Active Server Pages nor ASP.NET have been installed, but you can easily install them now using Add/Remove Windows Components.
|
|