Upgrading from IIS 4
|
|
Having considered various methods for performing clean installs, it’s time to move on to upgrading to IIS 6 from earlier versions of IIS. You’ll begin with upgrading a stand- alone IIS 4 (Windows NT Server 4 with NT 4 Option Pack) machine to IIS 6 (Windows Server 2003). This is likely to be a common scenario in enterprises that decided to postpone migrating their Windows NT 4 networks to Windows 2000 because of the complexity of Active Directory and fears concerning the stability and reliability of Windows 2000. Experience has shown that such fears were unfounded, since Windows 2000 turned out to be a stable and reliable operating system. Nevertheless, many enterprises decided to take a wait-and-see attitude when Windows 2000 first came out, considering that if their existing Windows NT network worked fine, there was no compelling business reason for replacing it. Instead, these enterprises decided to wait until the bugs were shaken out of Windows 2000, and many decided to postpone their network migrations until the next version of Windows came out, which turned out to be Windows Server 2003.
Preinstallation Notes
Let’s begin by reviewing the preinstallation configuration of the machine you’re going to upgrade. After the upgrade is finished, we’ll examine the postinstallation configuration and compare it for significant changes.
The IIS 4 machine I am using for this example is a stand-alone server named BORIS belonging to a workgroup named WORKGROUP (if you have an IIS 4 machine available, you can try following along; but your configuration is likely to differ in some points, so I’ve tried to make this example illustrative rather than prescriptive). The operating system is Windows NT Server 4 with Service Pack 6A and the Windows NT 4 Option Pack installed (the Option Pack was installed to upgrade from IIS 3 to IIS 4). The machine has three IP addresses assigned to it:
-
172.16.11.150
-
172.16.11.151
-
172.16.11.152
There are three IP addresses because there are three websites running on the machine (see Figure 4-18):
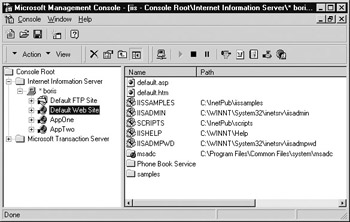
Figure 4-18: The IIS 4 machine is hosting three websites, as shown here in the Internet Services Manager console.
-
Default Web Site This site contains the sample applications included with IIS 4 and responds to any unassigned IP addresses on the machine. IIS 4 included a collection of sample applications that demonstrated how the then-new Active Server Pages (ASP) technology and scripting technologies like VBScript and JScript could be used to create dynamic web applications. The root of the Default Web Site defines the starting point of an application called Default Application, which together with the other sample applications and scripts runs in-process, which means they run in the same memory space as the default IIS process called inetinfo.exe (if necessary, you can review the architectures of IIS 4, 5, and 6 in Chapter 2, “IIS 6 Architecture”).
-
AppOne This website contains a custom ASP application and responds to the IP address 172.16.11.151. The root of the AppOne website defines the starting point of an application called First App, and the home directory (where the application’s .asp files and other content are located) is the folder C:\app1 on the local machine. Because this application is relatively untested, it has been configured to run in a separate memory space using the process isolation feature of IIS 4 (see Figure 4-19). This way, if AppOne fails, it won’t bring down other applications running on the server.
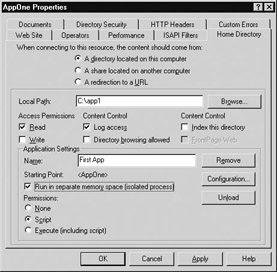
Figure 4-19: The AppOne site contains an application called First App that is configured to run out-of-process using process isolation. -
AppTwo This website contains another custom ASP application and responds to the IP address 172.16.11.152. The starting point of the application is called Second App and the home directory is C:\app2. This application is also configured to run using process isolation.
To summarize, there are three applications running on the IIS 4 machine, one in-process and two out-of-process. We’ll check later and see how these apps are running when the upgrade is complete.
Performing the Upgrade
Let’s upgrade this IIS 4 machine directly to Windows Server 2003 Standard Edition from the product CD. The steps for doing this are as follows:
-
Insert the Windows Server 2003 Standard Edition product CD into the CD-ROM drive.
-
Select the Check System Compatibility option to make sure the hardware configuration will support the upgrade.
-
If the compatibility check goes OK, select Install Windows Server 2003 Standard Edition to start the upgrade process.
-
When the Welcome To Windows Setup screen appears, leave the Installation Type as Upgrade (Recommended) and click Next (see Figure 4-20). Note that you can instead choose to do a clean install by selecting the appropriate option here.

Figure 4-20: Starting the upgrade process from IIS 4 to IIS 6 -
Accept the License Agreement, enter the product key, and wait while files are copied, the machine reboots a couple of times, and the installation finishes. It may take a while, so go pour yourself a cup of coffee—in fact, upgrades take longer than clean installs, so have a sandwich, too.
Postinstallation Notes
When the upgrade is complete and you log on as Administrator, the Manage Your Server Wizard will open, telling you that your Windows Server 2003 is running in the Application Server role (it may also be running in the File Server role). To get a better idea of which IIS and ASP.NET components are installed on the upgraded machine, go to Control Panel, select Add Or Remove Programs, select Add/Remove Windows Components, select Application Server, and click Details. Note that ASP.NET is not installed and neither is the Application Server Console MMC tool. Now select Internet Information Services (IIS), click Details, select World Wide Web Service, click Details, and note that Active Server Pages (ASP) is installed. You may want to uninstall components you won’t need (such as the Internet Database Connector, which is installed because you upgraded the sample IIS 4 website) and install other components you may need, such as FrontPage 2002 Server Extensions.
Next, let’s look at what IIS 6 isolation mode the newly upgraded server is running in. Open the Internet Information Services (IIS) console from Administrative Tools, expand the console tree in the left pane, right-click the Web Sites node, and select Properties. Switch to the Service tab of the Web Sites Properties sheet and note that your server is running in IIS 5 Isolation Mode (see Figure 4-21). This is to be expected, as this Isolation Mode is designed to support compatibility with legacy IIS 4/5 applications.
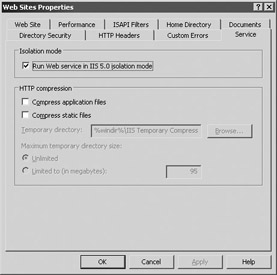
Figure 4-21: An upgraded IIS 4 web server runs in IIS 5 Compatibility mode.
| Note | You may have noticed that the Application Pools node is missing for your IIS server in the IIS Manager console tree. In your previous clean installs, this mode was always present; but when you upgrade to IIS 6 from IIS 4 or 5, this node is missing. This is because upgrading always leaves the server in IIS 5 Isolation Mode, and application pools aren’t supported in this IIS 6 Isolation Mode, they’re only supported when IIS 6 runs in Worker Process Isolation Mode. If you change the Isolation Mode from IIS 5 Isolation Mode to Worker Process Isolation Mode, the Application Pools node will magically appear. |
Remember that on the original IIS 4 server, the Default Web Site ran in-process together with inetinfo.exe while the two custom applications ran out-of-process in isolated memory spaces. Let’s look at how these three sites are configured to run once the server has been upgraded to IIS 6. In the IIS console, open the properties sheet for the Default Web Site and select the Home Directory tab (see Figure 4-22). As expected, the Default Web Site is running under Low (IIS Process) application protection, that is, in the same memory space as the WWW Service and inetinfo.exe.
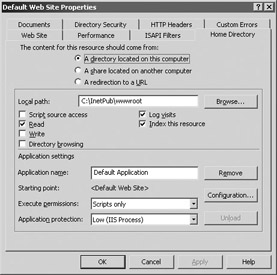
Figure 4-22;: An application running in-process on IIS 4 runs with Low (IIS process) application protection in IIS 5 compatibility mode on IIS 6.
Now let’s look at what happened to the custom applications on the upgraded server. Open the properties sheet for AppOne and select the Home Directory tab (see Figure 4-23). As expected, the application is running under High (Isolated) application protection, just as it was before the upgrade. Note also that the application name, application starting point, and permissions are the same as they were previously.
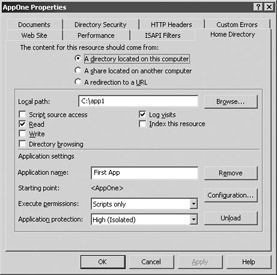
Figure 4-23: An application running out-of-process on IIS 4 runs with High (Isolated) application protection in IIS 5 compatibility mode on IIS 6.
At this point you should test your applications to make sure they still run properly (they do), and consider testing the applications under worker process isolation mode to take advantage of the new and improved architecture of IIS 6. We’ll look at configuring applications to run in different isolation modes later in Chapter 8, “Creating and Configuring Applications.”
Finally, note that if the sample content from earlier versions was installed, this content will also be present in the Default Web Site when you upgrade to version 6 of IIS. Sample content in IIS 4 and 5 includes things like Ad Rotator, Content Linker, Page Counter, and so on. You may want to delete this content from your upgraded server for security reasons. If you need any of this content afterward, you can find copies of it in the IIS 6 Resource Kit.
|
|