The Case Structure
|
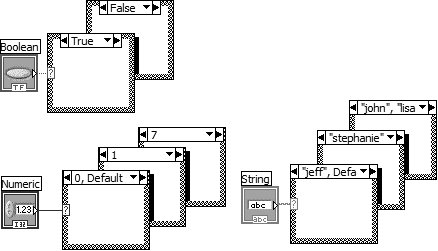
Case Selector Terminal That's enough about loops for nowlet's move on to another powerful structure. A Case Structure is LabVIEW's method of executing conditional text, sort of like an "if-then-else" statement. You can find it in the Programming>>Structures subpalette of the Functions palette. The Case Structure, shown in Figure 6.26, has two or more subdiagrams, or cases; only one of them executes, depending on the value of the Boolean, numeric, or string value you wire to the selector terminal. Figure 6.26. Three Case Structures with their subdiagrams cascaded beneath them If a Boolean value is wired to the selector terminal, the structure has two cases: FALSE and TRUE. If a numeric or string data type is wired to the selector, the structure can have from one to almost unlimited cases. Initially only two cases are available, but you can easily add more. You can specify more than one value for a case, separated by commas, as shown in the previous diagram. In addition, you typically must select a "Default" case that will execute if the value wired to the selector terminal doesn't match any of the other cases; this is very handy when you can't think of every possible case but want to specify a "catch-all" case.
A Case Structure must have cases that handle all possible values that might flow into the selector terminal, or the VI will be broken (not able to run). Having a "Default" case is an easy way to achieve this, but it is not the only way. Some data types, such as enums, have a small number of possible values. Also, frames for numerics can be configured to handle a range of values; for example, "3.." handles everything from 3 to the maximum integer value of the input data type and "2..2" handles everything in the range of 2 to 2.
You can designate a case for all values in a range by using a .. notation (for example,12..9). You will also notice that LabVIEW will condense a comma delimited list of integers to this notation if there are three or more contiguous values in the list. The .. notation can be used for strings too, but the resulting logic is not very intuitive. When you first place it on the panel, the Case Structure appears in its Boolean form; it assumes numeric values as soon as you wire a numeric data type to its selector terminal.
Decrement Arrow
Increment Arrow Case Structures can have multiple subdiagrams, but you can only see one case at a time, sort of like a stacked deck of cards (unlike it appears in the previous illustration, where we cheated and took several pictures). Clicking on the decrement (left) or increment (right) arrow at the top of the structure displays the previous or next subdiagram, respectively. You can also click on the display at the top of the structure for a pull-down menu listing all cases, and then highlight the one you want to go to. Yet another way to switch cases is to pop up on the structure border and select Show Case>>. If you wire a floating-point number to the selector, LabVIEW converts it to I32 and normal case selection is applied to the converted number. You can position the selector terminal anywhere along the left border. You must always wire something to the selector terminal, and when you do, the selector automatically assumes that data type. If you change the data type wired to the selector from a numeric to a Boolean, cases 0 and 1 change to FALSE and TRUE. If other cases exist (2 through n), LabVIEW does not discard them, in case the change in data type is accidental. However, you must delete these extra cases before the structure can execute. For string data types wired to case selectors, you should always specify the case values as strings between quotes (" "). If you enter a string value without quotes, LabVIEW will add the quotes for you.
When specifying a case as the default frame, never use quotes around the keyword Default. The use of quotes signifies a string whose value is "Default," not the default frame.
For Case Structures that have a string type wired to their case selector terminal, you can select Case Insensitive Match from the pop-up menu to change the Case Structure from case-sensitive mode (the default mode) to case-insensitive mode. Wiring Inputs and OutputsThe data at all Case Structure input terminals (tunnels and selector terminal) is available to all cases. Cases are not required to use input data or to supply output data, but if any one case outputs a value to a tunnel, all must output a value (unless Use Default If Unwired, which we will discuss in a moment, is enabled from the pop-up menu of the output tunnel). When you wire an output from one case, a little white tunnel appears in the same location on all cases. The run arrow will be broken until you wire data to this output tunnel from every case, at which time the tunnel will turn black and the run arrow will be whole again (provided you have no other errors). Make sure you wire directly to the existing output tunnel, or you might accidentally create more tunnels. Why must you always assign outputs for each case, you ask? Because the Case Structure must supply a value to the next node regardless of which case executes. LabVIEW forces you to select the value you want rather than selecting one for you, as a matter of good programming practice.
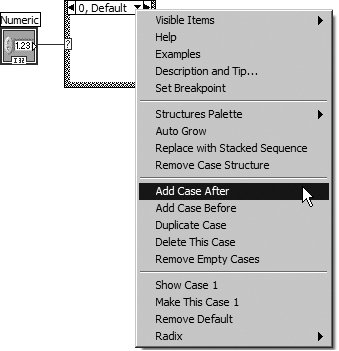
When an output tunnel is set to Use Default If Unwired from the pop-up menu, the tunnel will output default data if the executing frame is not wired to it. This can be a useful feature but be very careful that the default data will not cause you problems. Having LabVIEW force you to wire data to the terminal in every frame of the Case Structure forces you to decide what data flows out of the terminal. Adding CasesIf you pop up on the Case Structure border, the resulting menu gives you options to Add Case After and Add Case Before the current case (see Figure 6.27). You can also choose to copy the currently shown case by selecting Duplicate Case. You can delete the current case (and everything in it) by selecting Remove Case. Figure 6.27. Adding a case to a Case Structure from its pop-up menu
If you would like to see some examples of how to use various structures in LabVIEW, select the Examples option from the structure's pop-up menu. This will take you to the help page, where there is a link to examples. |


EAN: 2147483647
Pages: 294