| 
Run Button You can run a VI using the Run command from the Operate menu, the associated keyboard shortcut, or by clicking on the Run button. While the VI is executing, the Run button changes appearance. 
Run Button (Active) The VI is currently running at its top level if the Run button is black and looks like it's "moving." 
Run Button (subVI) The VI is executing as a subVI, called by another VI, if the Run button has a tiny arrow inside the larger arrow. 
Continuous Run Button If you want to run a VI continuously, press the Continuous Run button, but be carefulthis is not a good programming habit to get into. You can accidentally catch your program in an endless loop and have to reboot to get out. If you do get stuck, try hitting the keyboard shortcut for the Abort command: <control-.> under Windows, <command-.> on Macs, and <alt-.> under Linux. 
Abort Button Press the Abort button to abort execution of the top-level VI. If a VI is used by more than one running top-level VI, its Abort button is grayed out. Using the Abort button causes an immediate halt of execution and is not good programming practice, as your data may be invalid. You should code a "soft halt" into your programs that gracefully wraps up execution. You will learn how very soon. 
Pause Button The Pause button pauses execution when you press it, and then resumes execution when you press it again. You can run multiple VIs at the same time. After you start the first one, switch to the panel or diagram window of the next one and start it as previously described. Notice that if you run a subVI as a top-level VI, all VIs that call it as a subVI are broken until the subVI completes. You cannot run a subVI as a top-level VI and as a subVI at the same time. Activity 4-2: Building a Thermometer Now you're going to put together a VI that actually does something! You will build a simple program that simulates reading temperature in degrees Celsius, converts the value to degrees Fahrenheit, and displays both values. 
Make sure you save this activity, because you will be adding to it later. If you didn't save it, you can find our version of Thermometer.vi in EVERYONE\CH4 when you need it.
1. | Open a new front panel.

Operating Tool
| 2. | Drop a thermometer on the panel by selecting it from the Modern>>Numeric palette of the Controls menu. Label it Temperature___(degF) by typing inside the owned label box as soon as the thermometer appears on the panel.

Labeling Tool
| 3. | Make the exact value of the thermometer appear by right-clicking on the thermometer and choosing Visible Items>>Digital Display.

Positioning Tool
| 4. | Now drop a Numeric Indicator from Modern>>Numeric Palette onto the panel. Label this indicator Reading (degC).
| | | 5. | Remember, you can move controls and indicators with the Positioning tool to arrange them where you wish. Your front panel should look like the one in Figure 4.40.
Figure 4.40. Thermometer.vi front panel 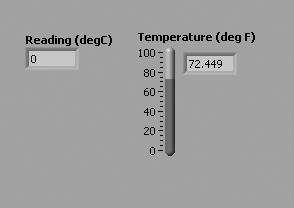
| 6. | Save your VI as Thermometer.vi.
| | | 7. | Build the block diagram shown in Figure 4.41. You might find it helpful to select Tile Left and Right from the Windows menu so that you can see both the front panel and the block diagram at the same time. We've provided you with a subVI in EVERYONE\CH04 called "Demo Read Temperature.vi." To put this subVI in your block diagram, choose Select a VI. . . from the Functions palette. Once you wire this, your block diagram should look like the one shown in Figure 4.41.
Figure 4.41. Block diagram of Thermometer.vi 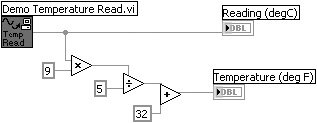
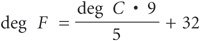
Remember, the subVI "Demo Temperature Read.vi" is in the EVERYONE\CH04 folder of the CD. This VI returns a temperature reading, different every time, in degrees Celsius. To convert to Fahrenheit, the formula is
To implement this formula, use the Multiply, Divide, and Add functions found on the Programming>>Numeric palette. To create the block diagram numeric constants (9, 5, 32), use the Numeric Constant, also found on the Programming>>Numeric palette, as shown in Figure 4.42. (You can also create constants on the block diagram by selecting Create>>Constant from the pop-up menu of a function's terminal.)
Figure 4.42. Numeric constant on the Numeric palette 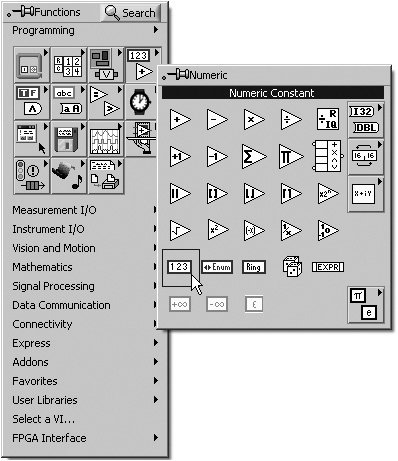
| 8. | Run the VI several times by clicking on the Run button. You will see the thermometer display the temperature brought in from the simulation function. If you can't get your VI to compile, read Chapter 5, "Yet More Foundations," which explains debugging techniques. Then try again.
Run Button
| | | 9. | Save the VI in your MYWORK directory by selecting Save from the File menu. Name it Thermometer.vi. You will be using this VI as a subVI later on in the book.
|
|