In this activity, you will practice some of the editing techniques you've just learned. Remember, just as the Controls palette is visible only when the front panel window is active, the Functions palette can only be seen when the block diagram window is up.
| |
1. | Open Editing Exercise.vi, found in the EVERYONE\CH4 directory or folder. The front panel of the Editing Exercise VI contains a number of LabVIEW objects. Your objective is to change the front panel of the VI shown in Figure 4.15.

Positioning Tool
Figure 4.15. Editing Exercise.vi front panel, which you will edit during this activity 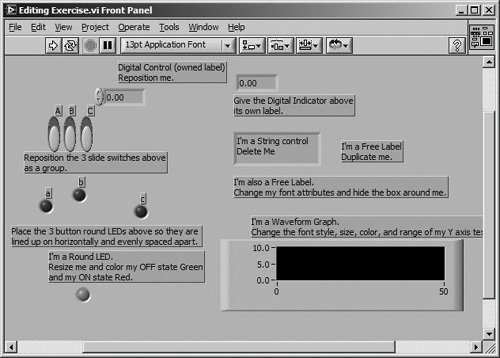
|
| |
2. | First, you will reposition the digital control. Using the Positioning tool, click on the digital control and drag it to another location. Notice that the label follows the controlthe control owns the label. Now, click on a blank space on the panel to deselect the control; then click on the label and drag it to another location. Notice that the control does not follow. An owned label can be positioned anywhere relative to the control, but when the control moves, the label will follow.
|
3. | Reposition the three slide switches as a group. Using the Positioning tool, click in an open area near the three switches, hold down the mouse button, and drag until all the switches lie within the selection rectangle. Click on the selected switches and drag them to a different location.
|
4. | Delete the string control by selecting it with the Positioning tool, and then pressing <delete> or selecting Delete from the Edit menu.
|
| |
5. | Duplicate the free label. Hold down the <control> key on a computer running Windows, the <option> key on Mac OS X, or the <alt> key under Linux; then click on the free label and drag the duplicate to a new location.

Labeling Tool
|
6. | Change the font style of the free label. Select the text by using the Labeling tool. You can double-click on the text, or click and drag the cursor across the text to select it. Modify the selected text using the options from the Text Settings ring. Then hide the box around the label by popping up on the box with the Color tool and selecting the "T" (for transparent) from the color palette. Remember, use the right mouse button on Windows, Sun, and Linux and <command>-click on Macintosh to pop up on an item. Or you can use the Pop-up tool from the Tools palette and simply click on the object to access its pop-up menu.

Color Tool

Pop-up Tool
|
7. | Now use the Font ring again to change the font style, size, and color of the Y-axis text on the Waveform Graph.

Enter Button
|
8. | Create an owned label for the digital indicator. Pop up on the digital indicator by clicking the right mouse button under Windows, Sun, and Linux, or by clicking the mouse button while holding down the <command> key on the Mac; then choose Visible Items>>Label from the pop-up menu. Type Digital Indicator inside the bordered box. Press <enter> on the numeric keypad, click the enter button on the Toolbar, or click the mouse button outside the label to enter the text.
Positioning Tool
|
9. | Resize the round LED. Place the Positioning tool over a corner of the LED until the tool becomes the resizing cursor. Click and drag the cursor outward to enlarge the LED. If you want to maintain the current ratio of horizontal to vertical size of the LED, hold down the <shift> key while you resize.
Color Tool
|
10. | Change the color of the round LED. Using the Color tool, pop up on the LED. While continuing to depress the mouse button, choose a color from the selection palette. When you release the mouse button, the object assumes the last color you selected. Now click with the Operating tool on the LED to change its state to ON, and then color the new state.

Vertical Centers Axis
|
11. | Place the three LED indicators so they are aligned horizontally and evenly spaced. Using the Positioning tool, click in an open area near the LEDs and drag a rectangle around them. Align them horizontally by choosing the Vertical Centers axis from the Align ring in the Toolbar. Then space the LEDs evenly by choosing Horizontal Centers axis from the Distribute ring.

Horizontal Centers Axis
|
| |
12. | Your panel should now look something like the one shown in Figure 4.16.
Figure 4.16. Editing Exercise.vi front panel, after you have completed this activity 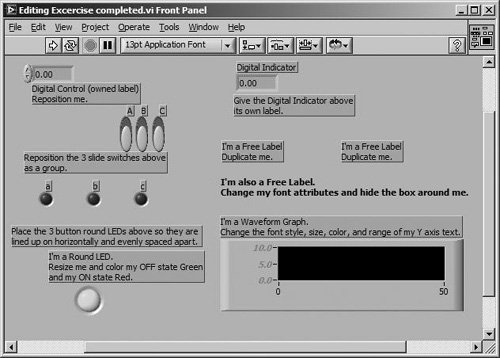
|
13. | Close the VI by selecting Close from the File menu. Do not save any changes. Pat yourself on the backyou've mastered LabVIEW's basic editing techniques!
|