Creating VIs: It s Your Turn Now
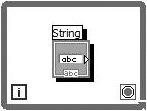
Creating VIs: It's Your Turn Now!We've gone over a few basics of the LabVIEW environment, and now we're going to show you exactly how to build your own VIs. Because people remember things better if they actually do them, you might step through these instructions on your computer as you read them so that you can learn the techniques more quickly. Placing Items on the Front PanelYou will usually want to start your programs by "dropping" controls and indicators on a front panel to define your user inputs and program outputs. You've done this once or twice before in activities, but we'll mention it here for reference (and as a good way to start this interactive section). As you run the cursor over the Controls palette, you will see the names of subpalettes and items appear in the mouse pointer's tip strip (as shown by the "String Control" text in Figure 4.1). Left-clicking on subpalette icons will navigate the palette tree into that subpalette. Figure 4.1. Placing an item on the front panel by dragging it from the Controls palette and dropping it on the front panel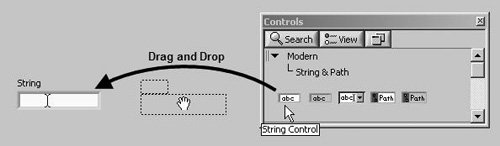 From the palette, you can drag and drop controls, indicators, and decorations onto your front panel, as shown in Figure 4.1.
You can also access the Controls palette by popping up in an empty area of the front panel. Now create a new VI and drop a digital control on your front panel. Remember, when you drop an item on the front panel, its corresponding terminal appears on the block diagram. You might find it helpful to select Tile Left and Right from the Windows menu so that you can see the front panel and block diagram windows at the same time. Labeling ItemsLabels are blocks of text that are the names of the specific components on front panels and block diagrams. An object first appears in the front panel window with a default name for a label (e.g., "Numeric," "String," etc.). Until you click somewhere else with the mouse, the label text will be selected and you can rename the label by entering text from the keyboard. If you click somewhere else with the mouse first, the default label will remain. After you enter text into a label, any one of the following actions completes the entry:
The label appears on the front panel object's corresponding block diagram terminal as well as the front panel object. LabVIEW has two kinds of labels: owned labels and free labels. Owned labels belong to and move with a particular object; they annotate that object only. When you create a control or indicator on the front panel, a default owned label accompanies it, awaiting input. A front panel object and corresponding block diagram terminal will have the same owned label. A free label is not associated with any particular object and can be created and deleted at will on either the front panel or block diagram. Owned "Object" Labels
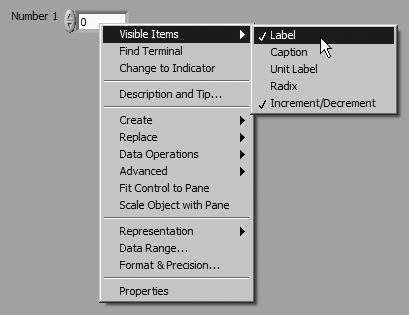
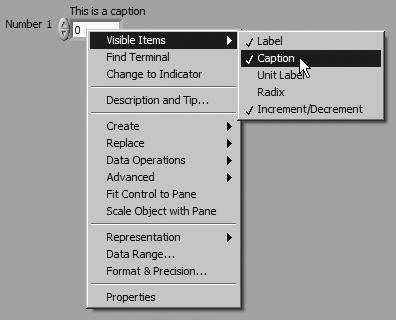
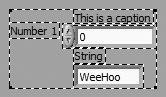
You can select Visible Items>> Label from the owning object's pop-up menu to create or change a label that isn't currently visible (see Figure 4.2). You can hide owned labels, but you cannot copy or delete them independently of their owners. Structures and functions on the block diagram come with a default label that is hidden until you show it. You may want to edit this label to reflect the object's function in your programthis is an excellent way to document your code. Figure 4.2. The Visible Items>> Label pop-up menu option You can also show labels of subVIs (which are really just their names), but you cannot edit them. Now label the digital control you just created Number 1. You may have to select Visible Items>>Label if the label is empty. CaptionsIn addition to labels, front panel objects can have a caption. A caption is very much like a labelsome text that describes the control or indicator. To enter a caption for a control or indicator, pop up on it and select Visible Items>>Caption (see Figure 4.3). Figure 4.3. The Visible Items>>Caption pop-up menu option
So why would you need or want a caption and a label? Most of the time, you probably don't. In certain advanced programming situations (which we'll touch on later), you need to use a control's label to reference it in the software, and you may want to have a separate caption that is more user friendly. Generally, you will want to keep your label short and concise; for example, using "Temperature" as a control's label but using a longer user-readable description for the caption ("This displays the current temperature in degrees Celsius"). Think of captions as a convenient way to link a comment to a front panel object. Also, it is worth mentioning that the caption can be changed programmatically (while your VI is running), but the label cannot.
Captions are a great way to localize your applicationdisplaying all the application's text in the specific language a user has selected. Using captions would allow you to programmatically change the language of all your front panel text!
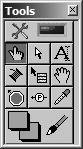
For the following practice activities in LabVIEW, it will be helpful if you have the Tools palette visible and accessible (see Figure 4.4). We'll be asking you to select different tools (cursors) from the palette. Figure 4.4. Tools palette If you don't see the Tools palette in LabVIEW, go to the View menu and select "Tools Palette." Creating Free LabelsFree labels are not attached to any object, and you can create, move, or dispose of them independently. Use them to annotate your panels and diagrams. Use the Labeling tool to create free labels and to edit virtually any visible text.
Labeling Tool To create a free label, select the Labeling tool from the Tools palette and click anywhere in empty space. A small, bordered box appears with a text cursor at the left margin ready to accept typed input. Type the text you want to appear in the label and enter it in one of the four ways previously described. If you do not type any text in the label, the label disappears as soon as you click somewhere else. Create a free label on the front panel that says hippopotamus.
Free labels are a great way to document your block diagram, which is very important. And this is one of the grading criteria for the LabVIEW Developer Certification exams. Generally speaking, you can't have too much documentation. However, don't be literal (don't state the obvious; for example, "1 + 1 = 2" is just silly), but do convey the intent, or purpose, of your code (for example, "add noise onto simulated signal"). Changing Font, Style, Size, and Color of TextYou can change text attributes in LabVIEW using the options in the Font ring on the Toolbar. Select objects with the Positioning tool or highlight text with the Labeling or Operating tools, then make a selection from the Text Settings ring (see Figure 4.5). The changes apply to everything selected or highlighted. If nothing is selected, the changes apply to the default font and will affect future instances of text. Figure 4.5. Text Settings ring Change your hippopotamus label so that it uses 18-point font. If you select Font Dialog . . . from the menu, a dialog box appears; you can change multiple font attributes at the same time using this dialog box. LabVIEW uses System, Application, and Dialog fonts for specific portions of its interface. These fonts are predefined by LabVIEW, and changes to them affect all controls that use them.
Placing Items on the Block DiagramA user interface isn't much good if there's no program to support it. You create the actual program by placing functions, subVIs, and structures on the block diagram. To do this, access the Functions palette just like you did the Controls palette. Then select the item you want from a subpalette, and click on the diagram to place it. Drop an Add function from the Programming>>Numeric subpalette of the Functions palette onto the block diagram. Editing TechniquesOnce you have objects in your windows, you will want to be able to move them around, copy them, delete them, and so on. Read on to learn how. Selecting Objects
Positioning Tool You must select an item before you can move it. To select something, click the mouse button while the Positioning tool is on the object. When you select an object, LabVIEW surrounds it with a moving dotted outline called a marquee, shown in Figure 4.6. Figure 4.6. Marquee To select more than one object, <shift>-click on each additional object. You can also deselect a selected object by <shift>-clicking on it. Another way to select single or multiple objects is to drag a selection rectangle around them. To do this, click in an open area with the Positioning tool and drag diagonally until all the objects you want to select lie within or are touched by the selection rectangle that appears. When you release the mouse button, the selection rectangle disappears and a marquee surrounds each selected object. The marquee is sometimes referred to as "marching ants," for obvious reasons. Once you have selected the desired objects, you can move, copy, or delete them at will. You cannot select a front panel object and a block diagram object at the same time. However, you can select multiple objects on the same front panel or block diagram. Clicking on an unselected object or clicking in an open area de-selects everything currently selected. <shift>-clicking on an object selects or deselects it without affecting other selected objects. Now select the digital control you created earlier. Moving ObjectsYou can move an object by selecting and dragging it to the desired location. If you hold down the <shift> key and then drag an object, LabVIEW restricts the direction of movement horizontally or vertically (depending on which direction you first move the object). You can also move selected objects in small, precise increments by pressing the appropriate arrow key; hold down the <shift> key at the same time to make the arrow keys move objects by a larger amount. If you change your mind about moving an object while you are dragging it, drag the cursor outside all open windows and the dotted outline will disappear. Then release the mouse button, and the object will remain in its original location. You can also press the Escape <esc> key to cancel a Move operation. While moving objects, if you move the object directly over the window edge, the window will auto-scroll. If you press the <shift> key while the window is auto-scrolling, it will move faster. Move your digital control to the other side of the screen. Duplicating Objects
Positioning Tool You can duplicate LabVIEW objects after you have selected them. From the Edit menu, select the Copy option, click the cursor where you want the new object, and then select the Paste option. You can also duplicate an object by using the Positioning tool to <control>-click on the object if you use Windows, <option>-click if you use Mac OS X, and <alt>-click on Linux machines. Then drag the cursor away while still holding down the mouse. You will drag away the new copy, displayed as a dotted line, while the original stays in place. You can also duplicate front panel and block diagram objects from one VI to another. For example, if you select a block of code on one diagram and drag it to another, the appropriate wires will stay in place and any necessary front panel objects will be created.
Unless you have set the Tools>>Options setting Block Diagram>>Delete/copy panel terminals from the diagram to TRUE, you cannot duplicate control and indicator terminals on the block diagramyou must copy the items on the front panel. Copy your digital control using both methods. You should now have three digital controls labeled Number 1, Number 2, and Number 3 on your front panel and three corresponding terminals on the block diagram. Notice how LabVIEW automatically changes the label numbers for you. To find out which one belongs to which, pop up on a control or on a terminal and select Find Terminal or Find Control (or simply double-click on it). LabVIEW will find and highlight the object's counterpart. Deleting ObjectsTo delete an object, select it and then choose Delete from the Edit menu or just press <delete>.
Unless you have set the Tools>>Options setting Block Diagram>>Delete/copy panel terminals from the diagram to TRUE, you can only delete controls and indicators from the front panel. If you try to delete their terminals on the block diagram, the deletions are ignored. Although you can delete most objects, you cannot delete control or indicator components such as labels and digital displays. Instead, you can hide these components by selecting Visible Items from the pop-up menu and then deselecting the appropriate option. Delete one of your digital controls. Resizing Objects
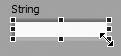
Positioning Tool You can change the size of most objects. When you move the Positioning tool over a resizable object, resizing handles appear at the corners and sides of the object, as in Figure 4.7. Figure 4.7. Resizing handles When you pass the Positioning tool over a resizing handle, the cursor changes to the Resizing tool. Click and drag this cursor until the dotted border outlines the size you want (see Figure 4.8). Figure 4.8. Using the resizing handles to resize an object To cancel a resizing operation, press the Escape <esc> key or continue dragging the frame corner outside the window until the dotted frame disappears. Then release the mouse button. The object maintains its original size. If you hold down the <shift> key while you resize, the object will change size only horizontally, vertically, or in the same proportions in both directions, depending on the object and in which direction you drag first. If you hold down the <ctrl> key in Windows, the <option> key in Mac OS X, or the <meta> key in Linux, while changing an object's size, it will resize equally from both sides, or from all four sides if you resize a corner. Resize one of your digital controls.
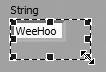
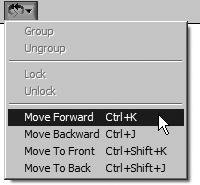
Some controls and indicators don't allow certain sizing operations. For example, digital controls can only grow horizontally (however, you can use a larger font to make the object bigger horizontally and vertically). Moving, Grouping, and Locking ObjectsObjects can sit on top of and often hide other objects, either because you placed them there or through some wicked twist of fate. LabVIEW has several commands in the Edit menu that move them relative to each other. You may find these commands very useful for finding "lost" objects in your programs. If you see an object surrounded by a shadow, chances are it's sitting on top of something. In Figure 4.9, the string control is not actually inside the loop; it is sitting on it. Figure 4.9. A terminal sitting (floating) on top of a While Loop, but not actually inside it You can use the following options found in the Reorder ring (shown in Figure 4.10) to reorder objects:
Figure 4.10. The Reorder ring menu options On the front panel, you can also group two or more objects together (see Figure 4.11). You do this by selecting the objects you want to group, and choosing Group from the Reorder ring. Grouping objects will make them behave as one object when you move them, resize them, or delete them. Figure 4.11. Two controls that are grouped Ungroup will "break up" the group back into the individual objects. Lock objects will fix an object's size and position so it cannot be resized, moved, or deleted. This is handy if you are editing a front panel with a lot of objects and don't want to accidentally edit certain controls. Coloring ObjectsYou can change the color of most LabVIEW objects, including controls, indicators, the front panel background, labels, and some block diagram elements. Not all elements can have their color changed. For example, block diagram terminals of front panel objects and wires use color codes for the type of data they carry, so you cannot change them.
Color Tool To change the color of an object or the background window, pop up on it with the Color tool. The palette in Figure 4.12 appears in color. Figure 4.12. Color tool pop-up window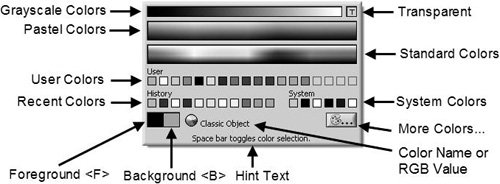 As you move through the palette while depressing the mouse button, the object or background you are coloring redraws with the color currently touched by the cursor. This gives you a preview of the object in the new color. If you release the mouse button on a color, the object retains the selected color. To cancel the coloring operation, move the cursor out of the color palette before releasing the mouse button. Selecting the More Colors . . . button (
Many objects have both a foreground and a background color. The Color tool pop-up window allows you to specify both the Foreground and Background colorsthe selected colors are shown in the Foreground and Background color boxes in the lower-left corner of the window. You can choose which color you are adjusting by toggling between Foreground and Background using the spacebar key, or by pressing the <F> or <B> key for Foreground or Background (respectively). Color one of your digital controls by popping up and selecting the color. Then color another control using the Tools palette method. Matching Colors
Color Copy Tool Sometimes it's hard to match a shade you've used, so you can also duplicate the color of one object and transfer it to a second object without going through the color palette. You can use the Color Copy tool on the Tools palette, which looks like an eye dropper (some call it the "sucker" tool), to set the active colors. Simply click with it on an object displaying the colors you want to pick up, and then switch to the Color tool to color other things. You can also access the Color Copy tool by <control>-clicking under Windows, <option>-clicking on Mac OS X, and <alt>-clicking on Linux machines with the Color tool on the object whose color you want to duplicate. Then you can release the keystroke and click on another object with the Color tool; that object assumes the color you chose. TransparencyIf you select the box with a "T" in it from the color palette (located in the box in the upper-right corner) and color an item, LabVIEW makes the object transparent. You can use this feature to layer objects. For instance, you can place invisible controls on top of indicators, or you can create numeric controls without the standard three-dimensional container. Transparency affects only the appearance of an object. The object responds to mouse and key operations as usual. Some objects cannot be made transparent, such as a front panel or block diagram. The box that usually contains the "T" will be replaced with an "X" if transparency is not allowed for the selected object. Object Alignment and DistributionSometimes you want to make your VIs look just perfect, and you need a way to evenly line up and space your objects. LabVIEW's alignment and distribution functions make this easy. To align objects, select them with the Positioning tool (it's usually easiest just to drag a rectangle around them all, rather than <shift>-clicking on each one individually), then go to the Align ring, located in the Toolbar right next to the Text Settings ring, and choose how you want them lined up (see Figure 4.13). The Distribute ring works similarly to space objects evenly (see Figure 4.14). Figure 4.13. Align ring Figure 4.14. Distribute ring Be careful when you use these functions, because sometimes you'll end up with all of your objects on top of each other and you'll wonder what happened. For example, if you have three buttons in a row, and you align by left edges, all left edges will be flush, and all the objects will be stacked on top of each other. If this happens, hit <ctrl>-Z to undo, or use the Positioning tool to pick them off one by one. |


EAN: 2147483647
Pages: 294