Instrument Control in LabVIEW
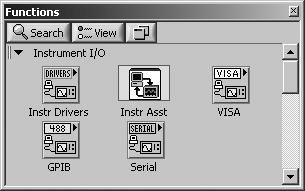
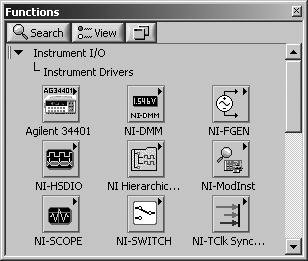
| One of LabVIEW's great strengths is its ability to easily communicate with external instruments. The VIs on the Instrument I/O palette provide you with access to instrument drivers (libraries of VIs for communicating with specific instruments) that are installed, as well as the tools to create your own VIs that communicate with instruments directly (see Figure 12.8). Figure 12.8. Instrument I/O palette Before we get into the details of how to create VIs that communicate directly with instruments using command and response strings, let's first see how easy it is to communicate with instruments using the Instrument I/O Assistant. Using the Instrument I/O Assistant
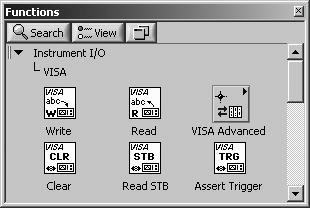
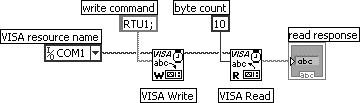
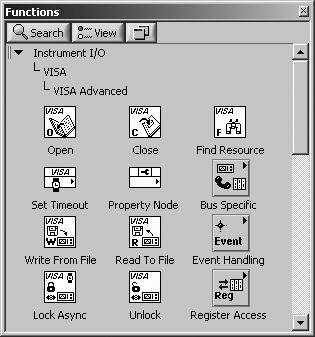
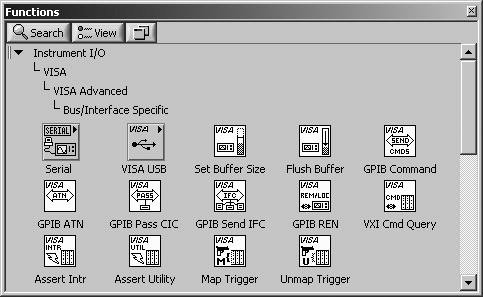
The Instrument I/O Assistant (shown in Figure 12.9) is an Express VI that allows you to very easily define a communication session with an instrument that is accessible via a VISA Resource. You can send commands, parse responses, and output the parsed data, all using the configuration dialog of the Instrument I/O Assistant Express VI. Figure 12.9. Instrument I/O Assistant express VI The Instrument I/O Assistant VI's configuration dialog (see Figure 12.10) allows you to select an instrument, by its VISA resource name, as well as communication timeout value and the termination character. Figure 12.10. Configuration dialog of Instrument I/O Assistant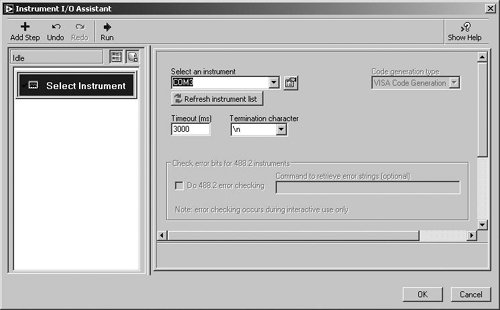 From the configuration dialog, you can add steps that write commands, read and parse responses, and output the parsed data! When you are done configuring the Instrument I/O Assistant, you can use it in your VI, as is, or you can convert it into a regular subVI (for viewing and modifying its code) by selecting Open Front Panel from the Instrument I/O Assistant Express VI's pop-up menu. If you remember the DAQ Assistant Express VI from Chapter 11, "Data Acquisition in LabVIEW," you'll see that this Instrument I/O Assistant is a similar high-level Express VI that will help you easily set up communication with your instrument. Instrument DriversYour instrument is now connected to your computer and you are ready to start sending it commands and analyzing the data that it sends back to you. One of the easiest solutions to the problem of how to communicate with your instrument is to find an instrument driver. An instrument driver is a collection of LabVIEW VIs that hide the hard work of how the instrument communicates. LabVIEW instrument drivers simplify instrument programming to high-level commands, so you do not need to learn the mysterious, hard-to-remember, low-level, instrument-specific syntax needed to control your instruments. That way, instead of writing your own VIs that send commands like :TRIG:SOUR IMM;:SAMP:COUN 10; READ? :SYST:ERR? you can just use a "Read.vi" subVI, with the appropriate inputs, for your particular instrument (see Figure 12.11). Figure 12.11. Sample Read VI from an instrument driver Instrument drivers are not necessary to use your instrument, of course (you can always use the low-level instrument commands if you wish), but they are merely time savers to help you develop your project so you do not need to study the instrument manual before writing a program. Instrument drivers create the instrument commands and communicate with the instrument over Ethernet, serial, GPIB, or VXI. In addition, instrument drivers receive, parse, and scale the response strings from instruments into scaled data that can be used in your test programs. With all of this work already done for you in the driver, instrument drivers can significantly reduce development time. With LabVIEW's ubiquitous presence in labs everywhere, most instrument manufacturers provide LabVIEW drivers that can either be found on their web sites or included on a software CD that comes with the instrument, if they aren't already on the NI web site or CD. LabVIEW includes a couple of sample instrument driversfor example, the instrument driver for the Agilent 34401A Multimeter. If you look at the Instrument Driver palette (in the Instrument I/O palette), you can see what instrument driver functions look like (see Figure 12.12). Figure 12.12. Instrument I/O>>Instrument Drivers palette Although generally you'll need the instrument driver that is specifically for your instrument model, your odds are fairly good: LabVIEW provides more than 4000 LabVIEW instrument drivers from more than 200 vendors. A list is available on the Instrument Driver Network section of the National Instruments Developer Zone site: http://ni.com/devzone/idnet/. You can use these instrument drivers to build complete systems quickly. Instrument drivers will drastically reduce your software development time because you can practically just start using your instrument from LabVIEW. But, you don't have to go looking for instrument driversLabVIEW can find them for you, as you'll see in the next section! Find Instrument Drivers from LabVIEWWhy spend your time searching the Web for instrument drivers, when you can have LabVIEW find and install them for you? The Find Instrument Drivers dialog (available from the Tools>>Instrumentation>>Find Instrument Drivers . . . menu) allows you to search for instrument drivers by manufacturer and keywords, as shown in Figure 12.13. Figure 12.13. Find Instrument Drivers dialog showing installed instrument drivers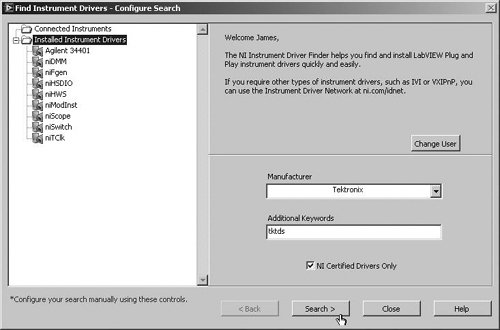 The NI Instrument Driver Finder is the industry's largest source of instrument drivers. It provides access to instrument drivers for more than 4,000 instruments from over 200 different vendors. Just enter the instrument manufacturer name, model name, or other keywords, and press the Search button. Select the instrument model and LabVIEW version that you want to install and press the Install button, as shown in Figure 12.14. Figure 12.14. Installing an instrument driver using the Find Instrument Drivers dialog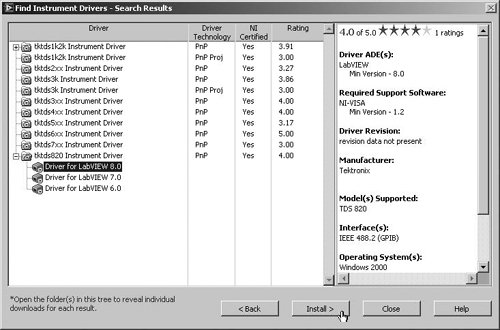 LabVIEW will download the instrument driver directly into your Instrument Drivers palette (see Figure 12.15), and you will be controlling your instrument in minutesliterally! Figure 12.15. A newly installed instrument driver, appearing in the palettes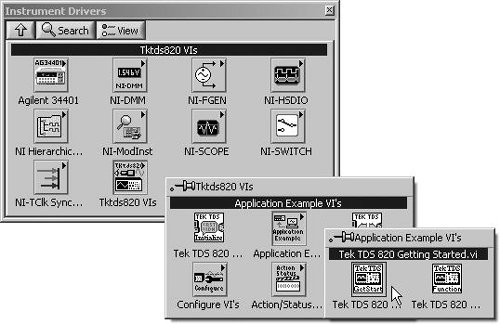 VISA FunctionsAs we mentioned earlier, VISA is a standard I/O Application Programming Interface (API) for instrumentation programming. Almost all instrument drivers for LabVIEW use VISA functions in their block diagrams. VISA can control VXI, GPIB, PXI, or serial instruments, making the appropriate driver calls depending on the type of instrument being used. LabVIEW provides VISA functions in the Instrument Control>>VISA palette, shown in Figure 12.16. Figure 12.16. Instrument I/O>>VISA palette The VISA palette provides functions like VISA Write, VISA Read, CLR (clear), STB (status byte), and TRG (trigger). These last three are standard functions on most instruments. VISA Write (Instrument I/O>>VISA palette) writes data to the device specified by the VISA Resource name (see Figure 12.17). Figure 12.17. VISA Write VISA Read (Instrument I/O>>VISA palette) reads data from the device (see Figure 12.18). Figure 12.18. VISA Read VISA Clear (Instrument I/O>>VISA palette) clears the device (see Figure 12.19). Figure 12.19. VISA Clear VISA Read STB (Instrument I/O>>VISA palette) reads the status byte of the device (see Figure 12.20). Figure 12.20. VISA Read STB VISA Assert Trigger (Instrument I/O>>VISA palette) asserts software or hardware trigger on the device (see Figure 12.21). Figure 12.21. VISA Assert Trigger The VISA resource name control is similar to a DAQmx name control; it tells the VISA functions what instrument (or "resource") you are communicating with. You can set up VISA resource names in your Devices and Interfaces in the MAX utility. Then you can use a VISA Resource Name constant from the Modern>>I/O palette to specify the instrument. For example, if you had a serial device connected on port 1 (COM1), and you wanted to write a command specific to that device and read the 10 bytes that it returns, your block diagram might look like Figure 12.22. Figure 12.22. Using a Visa Resource Name constant to address a device on COM1 Of course, the command strings and lengths depend on the instrument's own particular protocol. Occasionally, instruments don't work very well with VISA communication, or you may have your own reason for not using VISAin any case, LabVIEW gives you the lower-level tools to communicate directly using serial or GPIB protocols. Advanced VISA FunctionsVISA has many advanced functions and settings, which are available from the Instrument I/O>>VISA>>VISA Advanced palette, shown in Figure 12.23. Figure 12.23. VISA Advanced palette For example, there are functions for opening and closing VISA resources (those that are not persistently configured in MAX). There is a function called Find Resource (see Figure 12.24) that outputs a list of all VISA resources available on your system. This is useful for creating VIs that dynamically discover instruments that are connected to your computer! Figure 12.24. Find Resource function Another very useful feature of VISA is that you can use a Property Node to read and write properties of a VISA session. You can find the Property Node conveniently located in the Instrument I/O>>VISA>>VISA Advanced palette. Use the Operating tool to select the property you wish to read or write. Pop up on the node to select whether you wish to read or write the property. There are many properties to choose from. Many of the properties are bus (physical connection) specific, but the General Settings>> are applicable to all VISA sessions, such as the communication Timeout Value, shown in Figure 12.25. Figure 12.25. Configuring a property node to read a VISA session's Timeout Value Bus/Interface Specific VISA FunctionsVISA is a communication interface that supports instrument communication on a wide variety of physical connection typesfor a list, see Table 12.1 in the section, "VISA Resource Strings." The functions that you just learned about will work for all of them. However, there are some operations that are specific to the physical connection type, and these are located in the Instrument I/O>>VISA>>VISA Advanced>>Bus/Interface Specific palette, shown in Figure 12.26. Figure 12.26. Bus/Interface Specific palette Note that there are several GPIB functions, a Serial subpalette, and a VISA USB subpalette. We will see some of these discussed next. VISA GPIB Versus Traditional GPIB FunctionsFor communicating with GPIB instruments, you have two choices: You can use VISA or you can use the traditional GPIB functions found beneath the Instrument I/O>>GPIB palette, which predate the VISA standard. Unless you have a specific reason to use the traditional (non-VISA) functions for communicating with your GPIB-enabled instrument, use VISA! It will make setup and communication with your device a lot simpler. You should also note that there are some GPIB-specific VISA functions located in the Instrument I/O>>VISA>>VISA Advanced>>Bus/Interface Specific palette. VISA Serial FunctionsThe Serial palette (see Figure 12.27) may be found in the Functions palette at the following two locations:
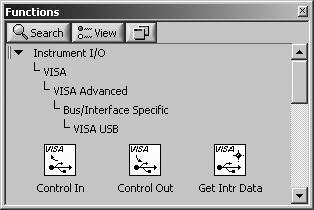
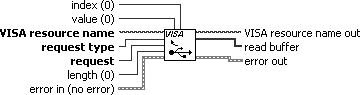
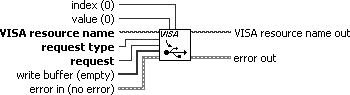
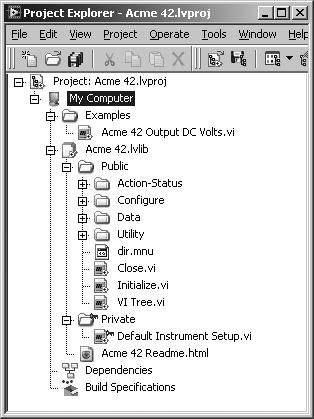
Figure 12.27. Serial palette Certainly, the former is easier to find. Notice that these functions are actually just specialized VISA functions (and VIs with VISA functions inside them) for serial ports. There are functions for reading and writing and, more specific to the serial port, you can do things like find out how many bytes are waiting to be read at the serial port, or configure the serial port (e.g., baud rate). In one sense, serial communication is the simplest to program. On the other hand, serial communication suffers from abused and ignored hardware standards, obscure and complex programming protocols, and relatively slow data transfer speeds. The difficulties people encounter with writing an application for a serial instrument are rarely LabVIEW-related! We'll take a quick look at how to use the serial port VIs to communicate with a serial device. You should become familiar with some basic concepts of how serial communication works if you've never used it before. If you have used a modem and know what things like baud rate, stop bits, and parity roughly mean, then you should know enough to get started. Otherwise, it might be a good idea to read some documentation about the serial port (any good book on RS-232). A good place to get started, if you are talking to a serial instrument, is to use the Basic Serial Write and Read.vi example (see Figure 12.28) included with the LabVIEW examples. This VI, and other excellent serial port communication example VIs, may be found in the LabVIEW examples at examples\instr\smplserl.llb. Figure 12.28. Basic Serial Write and Read.vi front panel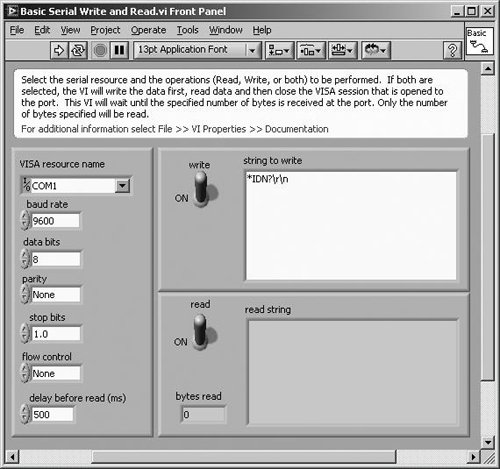 VISA USB FunctionsIf you've haven't been hiding in a cave for the past few years, you already know that USB is quickly becoming the most popular communication bus for connecting devices to a PC. The VISA USB VIs and functions, found on the Instrument I/O>>VISA>>VISA Advanced>>Bus/Interface Specific>>VISA USB palette (see Figure 12.29), allow you to control USB devices. Figure 12.29. VISA USB palette Here are descriptions of the VISA USB VI and functions. VISA USB Control In (Instrument I/O>>VISA>>VISA Advanced>>Bus/Interface Specific palette) performs a USB control pipe transfer from a USB device (see Figure 12.30). This function takes the values of the data payload in the setup stage of the control transfer as parameters. The function reads the optional data buffer read buffer if you require a data stage for this transfer. Figure 12.30. VISA USB Control In VISA USB Control Out (Instrument I/O>>VISA>>VISA Advanced>>Bus/Interface Specific palette) Performs a USB control pipe transfer to the device (see Figure 12.31). This function takes the values of the data payload in the setup stage of the control transfer as parameters. The function sends an optional data buffer write buffer if you require a data stage for this transfer. Figure 12.31. VISA USB Control Out VISA Get USB Interrupt Data (Instrument I/O>>VISA>> VISA Advanced>> Bus/Interface Specific palette) Retrieves the interrupt data that is stored in a VISA USB interrupt event (see Figure 12.32). Figure 12.32. VISA Get USB Interrupt Data Create Your Own Instrument Driver: The Instrument Driver WizardIf you would like to create your own instrument driver (because some instruments might not have an instrument driver already, or maybe you work for an instrument vendor), you can launch the Instrument Driver Wizard by selecting File>>New from the menu, selecting Project>>Project From Wizard>>Instrument Driver Project from the tree, and pressing the OK button. You will be presented with a dialog (see Figure 12.33) that prompts you to answer several questions about the type of instrument driver you wish to create and allows you to specify several options. Figure 12.33. Selecting an instrument driver type in the Instrument Driver Wizard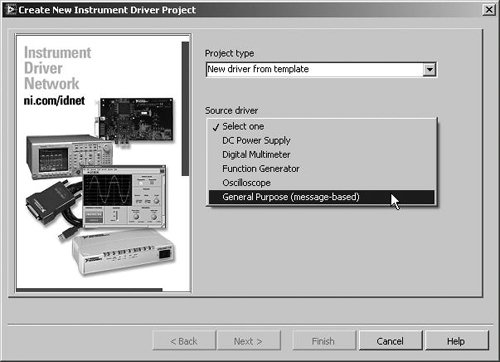 You will be asked to give your instrument driver a name, and also to edit the VI Icon Banner Template and palette menu icon, as shown in Figure 12.34. Figure 12.34. Editing the instrument driver icon in the Instrument Driver Wizard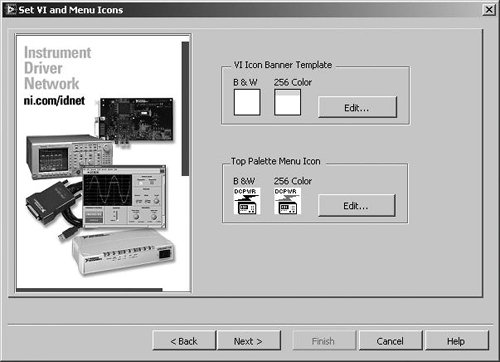 Once you have provided the Instrument Driver Wizard with all the necessary information, press the Finish button and a new LabVIEW Project will be created for your instrument driver, as shown in Figure 12.35. Figure 12.35. Project Explorer window showing the newly created instrument driver At the same time your new project is created, the LabVIEW Help documentation will be opened to the Controlling Instruments>>Using Instrument Drivers>>Instrument Driver Modification Instructions section, which provides instructions for modifying your instrument driver project. Make sure to read this documentation and follow the instructions provided. |


EAN: 2147483647
Pages: 294