7.4 HomePage Styles and Themes
| < Day Day Up > |
| The HomePage site (http://www.mac.com/homepage), shown in Figure 7-1, is divided into two parts . The top portion of the page is devoted to managing your .Mac Home-Page, while the bottom half lets you select different page styles and themes to use for creating your .Mac HomePage. Figure 7-1. The .Mac HomePage site.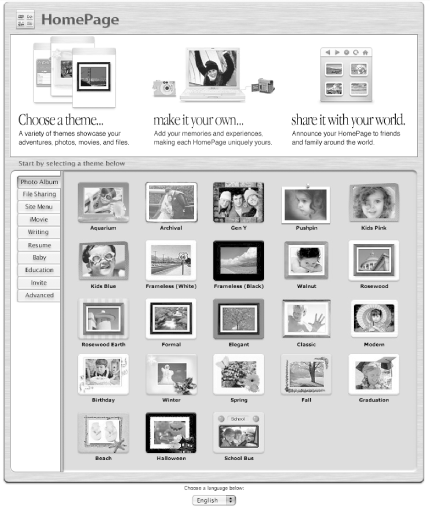 If you've used iPhoto, iMovie, or iDVD, you'll instantly recognize some of the page themes, since some are part of the theme set you can use from those applications. Once again, it's this level of integration between the iApps and .Mac that make it easy for you to build up your HomePage in a familiar environment. While web site management is important, we'll skip over that for right now and take a look at the different styles and themes offered in the Create a Page section. To help jump-start your .Mac HomePage, Apple provides 10 different page styles, each of which has a few different themes you can choose from, as described in the following sections. 7.4.1 Photo AlbumPhoto Album pages can be created with either the HomePage tools or directly from iPhoto. The HomePage tools offer 23 different page themes, as shown in Figure 7-2. However, if you create a Photo Album with iPhoto, you can change its theme to one of the themes offered online. For information on how to create a Photo Album using iPhoto and changing its theme, Section 7.6. Figure 7-2. The Photo Album themes.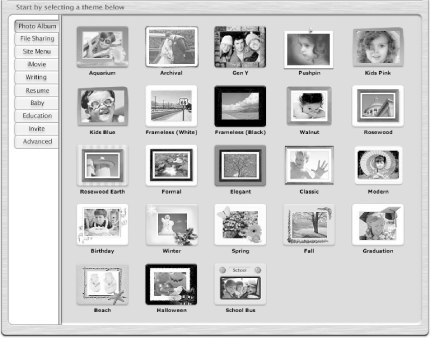 When you create a Photo Album, the images are stored on your iDisk (in /Pictures/Photo Album Pictures ) in folders whose name corresponds to the date and time the Photo Album was created. For example, the images used for one of my Photo Album's are stored in a folder named 2003-12-29 02.53.53 -0800 . While this may look cryptic, it tells us that the Photo Album was created at 2:53:53 a.m. on December 29, 2003. The - 0800 part of the folder name is a timestamp that relates to Greenwich Mean Time (or GMT). The actual page that gets served is stored in the Sites folder and is named something like PhotoAlbum1.html . If you have more than one Photo Album, the others will follow along in the numbered sequence; for example, PhotoAlbum2.html , PhotoAlbum3.html , and so on. So, to direct someone to one of your Photo Albums, you would pass along a link similar to the following:
If the page exists, they will be able to view your pictures or view a slide show of them in larger form. If the page doesn't exist, they will see an error page that tells them the page isn't there. If you look at the page source for a Photo Album (in Safari, use View <A HREF="javascript:openSlideShow(0)" onClick="openSlideShow(0)" onFocus="this.blur();"><IMG BORDER=0 SRC= /chuckdude/.cv/chuckdude/Sites/.Pictures/Photo%20Album%20Pictures/ 2003-08-26%2006.11.49%20-0700/Image-D0FB4936D7C411D7.jpg-thumb_140_105.jpg WIDTH=140 HEIGHT=105></A> The first part of the link (the <A HREF="..."> part) uses JavaScript to control what happens when somebody clicks on one of the images in the Photo Album. This tag uses the JavaScript method onClick to open the image in a Slide Show window so you can see a larger version of the picture. The next part of the link, what's inside the image ( <IMG/> ) tag, is what the web browser uses to display the image on the web page. However, if you look at this a little closer, you can see the .cv script (mentioned in Chapter 2), which is used to convert the image file (named Image-D0FB4936D7C411D7.jpg ) and displays it as a 140 105 pixel thumbnail (as noted by the - thumb 140 105.jpg extension to the original image's filename).
If you try to load the - thumb extension into a web browser, you'll see a page error. But if you load the direct link to the image: http://homepage.mac.com/chuckdude/.Pictures/Photo%20Album%20Pictures/ 2003-08-26%2006.11.49%20-0700/Image-D0FB4936D7C411D7.jpg the picture is displayed in the web browser, as expected.
7.4.2 File SharingIf you want to add a web interface to your iDisk's Public folder, you can use the File Sharing page style. As Figure 7-3 shows, there are two themes for the File Sharing page: graphite (gray) or magenta (hot pink). And with the latest revision of the .Mac services, a new theme has been added, called My Downloads. Figure 7-3. The File Sharing HomePage themes.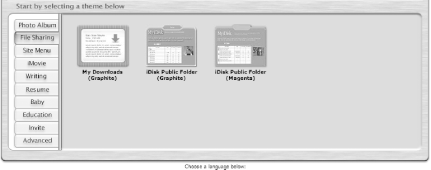 Section 7.7, later in this chapter for details on how to build pages for File Sharing and My Downloads.
7.4.3 Site MenuThe Site Menu page style (shown in Figure 7-4) is used to create the main page for your .Mac HomePage that people will see when they go to http://homepage.mac.com/ membername (where membername is your .Mac member name). Figure 7-4. Page styles for the Site Menu page.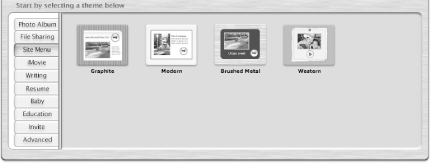 Until you create the Site Menu page, the lowest numbered page in your Sites folder will be used as the main page for your .Mac HomePage. For example, if you have created two Photo Album pages and a File Sharing page, they could be named as follows :
In this case, the person who's trying to find your main page would end up being redirected to http://homepage.mac.com/ membername /PhotoAlbum2.html , since there's no main page to see. When you create the Site Menu page, however, that page will be named Menu # .html and placed in the Sites folder. For example, if the tenth page you create for your .Mac site is the Site Menu, the name of that file will be Menu10.html . After the Menu # .html page has been saved to your Sites folder, the index.html file (also in the Sites folder) will be updated to redirect people who come to your web site so that the first page they see is the Site Menu page. Actually, the entire index.html file is nothing more than a few simple HTML tags and the redirect itself, as shown in Chapter 7. A .Mac HomePage's index.html file <HTML><HEAD><meta http-equiv="refresh" content="0;url= http://homepage.mac.com/ chuckdude/Menu10.html"></HEAD><BODY></BODY></HTML> Here you can see that the <meta/> tag is used to supply the redirect using http-equiv="refresh ". The rest of the information in the <meta/> tag, content="0;url=http://homepage.mac.com/chuckdude/Menu10.html " tells the browser to instantly take the viewer to the Site Menu page ( Menu10.html ). See the later section Section 7.5 for details on how to use the HomePage tools to build the Site Menu page for your site. 7.4.4 iMovieRegardless of whether you've just dabbled with iMovie or if you consider yourself the next Alfred Hitchcock, you might want to consider adding a special page to show off that iMovie of yours. When you do, you'll have plenty of themes to select from, as shown in Figure 7-5. Figure 7-5. iMovie Themes.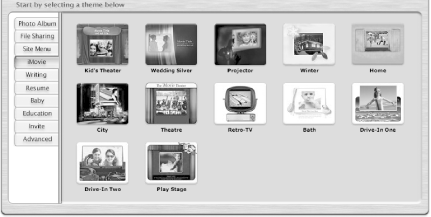 If you're using iMovie 4 to create your movies, you can quickly create a movie page by selecting File
Section 7.8 later in this chapter for details on how to create this page. 7.4.5 WritingThis page style can be used as a place to write and publish your random thoughts, or to produce an online newsletter to keep your friends and family informed on what you're up to. The themes included in the Writing style are shown in Figure 7-6. Figure 7-6. Themes for the Writing style pages. As you can see from looking at the different themes, there are quite a few here for use by teachers or people who work with schools or sports teams . These include the Events, Classroom, Homework, School, and Teacher themes. Students can also use the Paper theme for writing stories, book reports , etc., before submitting them to their teachers. There is also a separate Education style (described later) that includes the themes mentioned here.
7.4.6 ResumeIt's always a good idea to keep your rsum up to date, and the Resume style is a great way to do that. This style, shown in Figure 7-7, has four different themes to choose from. Figure 7-7. Themes for building an online Resume.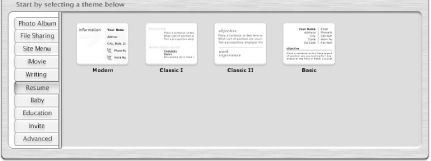 If you create your rsum using the .Mac HomePage tools, you can direct prospective employers to your web page, and also use this page to print a copy of your resume to submit with your cover letter.
7.4.7 BabyOne of the proudest moments for most adults is when they get to introduce their newborn child to their friends and family. More often than not, it takes a while to circulate the pictures or get the word out. But with your .Mac HomePage and iPhoto, you can quickly create a photo page to announce the new addition to your family using the Baby styles, shown in Figure 7-8. Figure 7-8. Themes for the Baby page style.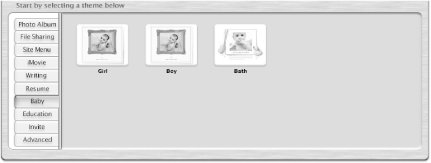 There are three themes available: Girl and Boy are for creating birth announcements, and Bath can be used for hosting a movie of your child. When creating the birth announcement pages, make sure that the picture of your child is stored in the Pictures folder of your iDisk. With the Bath page, ensure that your movie has been saved in the Movies folder of your iDisk. 7.4.8 EducationAs mentioned earlier, the Writing page styles offer some themes for students, teachers, and administrators of schools. Those themes have been combined with a few more and are grouped together in the Education styles, shown in Figure 7-9. Figure 7-9. Themes for Education- related pages.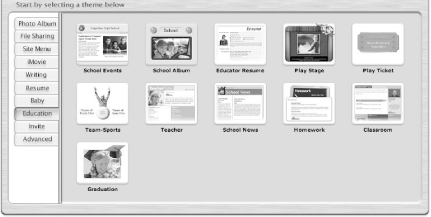 There are 11 different themes to choose from, including special ones for promoting a school play, sporting events, and a special rsum-building theme for teachers. 7.4.9 InviteIf you're planning to have an eventbe it a birthday party, New Year's bash, or just a chance to gather some friends around the tube to watch Survivor you can use one of the themes from the Invite styles (shown in Figure 7-10) to extend your invitation . Figure 7-10. Themes for creating custom Invites.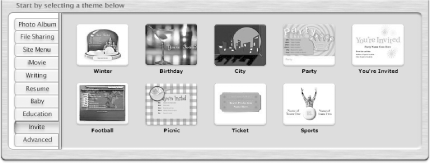 Keep in mind that any Invite pages you create will be added to the listing of Pages for your site, which means that anyone who comes to your .Mac site will see the invite as well. If you don't want certain people to attend a private affair, you might consider hiding this page from view. To see how to do that, Section 7.7 , " later in this chapter. 7.4.10 AdvancedThis new option, shown in Figure 7-11, allows you to integrate the HTML-based web pages you create with tools such as BBEdit, Macromedia Dreamweaver or Contribute, or Adobe GoLive into your .Mac HomePage. When you add an External HTML page to your HomePage, you can create a link to the page that gets added to your HomePage's navigation area at the top, as seen later in Figure 7-13. Figure 7-11. Use the External HTML theme to integrate the web pages you build with your .Mac HomePage.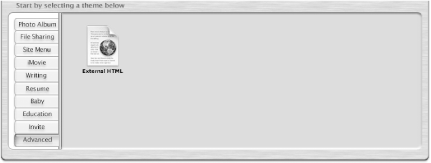 To add an External HTML page to your .Mac HomePage, just save your HTML files (and any associated graphics) to the Sites folder on your iDisk. When you select the External HTML theme, you will be taken to the page shown in Figure 7-12, which displays any HTML files it sees in your Sites folder. Just select the file you want to use and click on the Choose button to add the page to your .Mac HomePage site. Figure 7-12. Select an HTML file to add to your .Mac HomePage.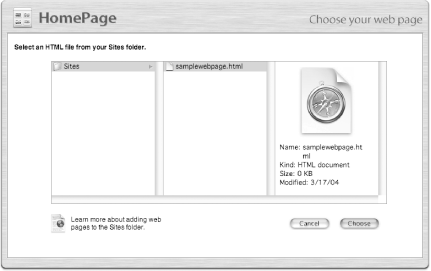 This is a great new feature since it allows you to mix how you create your HomePage, letting you build custom pages to suit your style and needs while at the same time adding those to your HomePage site. In addition, when you add an External HTML page, you also have the option of announcing that new page (by sending an iCard), just as you can with any of the other .Mac HomePages you build. |
 View Source, or Option-
| < Day Day Up > |