Add Enhancements
| Once you've made a rough cut of your movie that includes all the clips you want and you've arranged them in the order you want, you can start adding enhancements to make the movie look more professional. Add transitions between scenes, titles, effects, still photos with a pan-and-zoom effect, additional audio, and chapter markers that can be used later if you create a DVD. TransitionsA transition is a visual effect that creates a bridge from one scene to the next. It could be a cross-dissolve, fade-out, spinning image, or any of the other transitions that are included with iMovie. To add a transition effect between two clips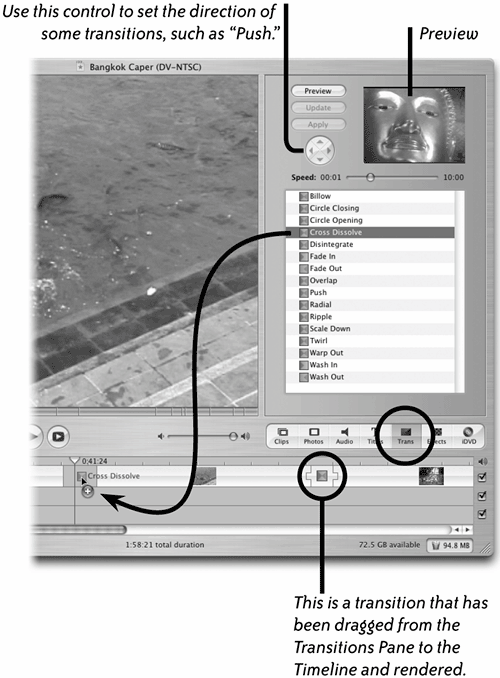
To apply a transition to multiple clips: Select multiple clips in the Timeline to which you want to apply a transition, then click the "Apply" button. To delete a transition: Click on the transition in the Timeline, then hit the Delete key. To change a transition: Select it in the Timeline, change the settings in the Transitions Pane, then click "Update." In the Transitions Pane, choose another transition or modify existing transition settings, then click "Apply." A red progress bar shows a transition being rendered.
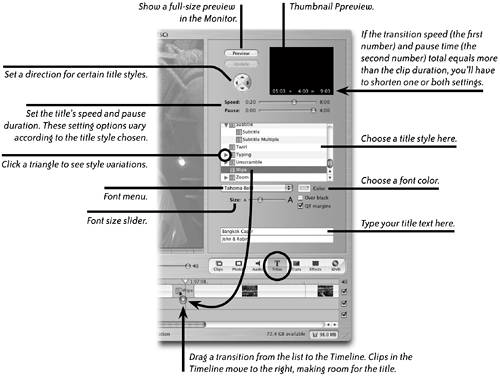
Add titles to your movieA title is text that you place in its own frame or on top of a clip. A title can show credits, act as a caption, or add comments. There are many styles of titles to choose from and you can use different typefaces, sizes, and colors. To add titles to your movie
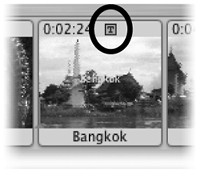
This title was set to render on top of an existing clip ("Over black" was not selected in the Titles pane).
This title was set to render as a new clip ("Over black" was selected in the Titles pane).
To delete a title
To modify and update a title
Place still photos in the TimelineThere are several ways to place photos in iMovie. The easiest and most convenient method is to click the "Photos" button. The Photos Pane replaces the current pane to the right of the Monitor and shows the tools you'll use for selecting photos, setting a duration, and adding motion to photos. The Photos Pane is divided into the "Ken Burns Effect" section and the iPhoto section. The iPhoto section contains all the photos that are currently stored in iPhoto. From the pop-up menu you can select the iPhoto Library or any album in iPhoto. The scrolling pane displays thumbnails of your photos.
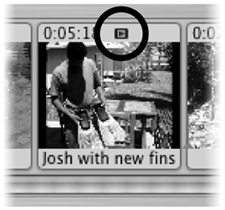
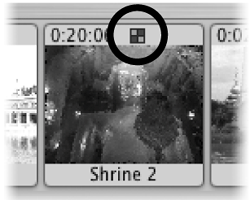
To identify photos that have a Ken Burns Effect applied, switch to the Clip View of the Timeline and look for a "Play" symbol at the top of a photo clip.
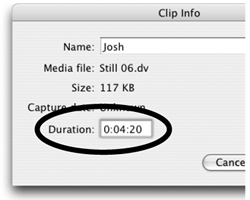
You can also drag photos from the Photos Pane to a precise point in the Timeline that you choose (shown below). The current Ken Burns Effect settings, such as duration, are automatically applied to photos unless you uncheck the "Ken Burns Effect" checkbox before you add photos to the Timeline. Another method for placing photos in the Timeline is to simply drag a photo from anywhere on your computer straight to the Timeline. The current Ken Burns Effect settings will be applied to the photo. You can also import photos into iMovie, as explained on the next page. When you drag a photo to a position in the Timeline, existing clips move over to the right to make room for the new content. 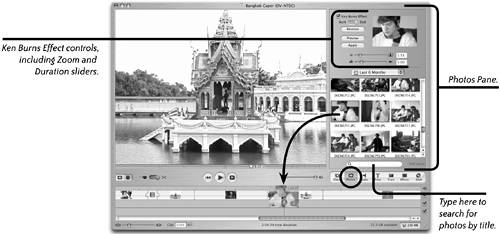 Import still photosYou may want to use photos in your movie that are not in iPhoto. Perhaps you have a collection of scans in some other folder, or a CD of photos from someone else. You could import those photos into iPhoto to make them accessible from the Photos Pane, but you don't have to. Instead, just import them from wherever they're stored on your computer.
To import from a CD or from any location on your computer
The Ken Burns Effect: pan-and-zoom still photosKen Burns is a documentary filmmaker who popularized the technique of slowly panning across and zooming in or out of still photos to add motion and drama. Click the "Photos" button in the button bar to show the Photos Pane and the "Ken Burns Effect" controls. To apply a Ken Burns effect to a still photo
EffectsAn effect is a visual distortion or alteration that is applied to a clip. The effect may be used for aesthetic reasons or for visual impact. A limited number of effects come with iMovie, but many more are available from third-party vendors such as Gee Three (www.GeeThree.com). To add effects to a clip in your movie
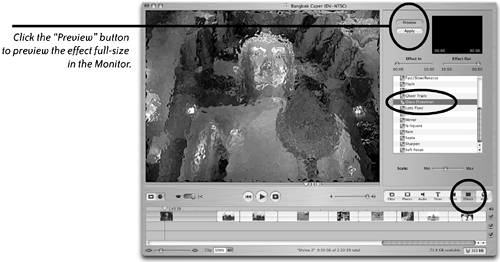 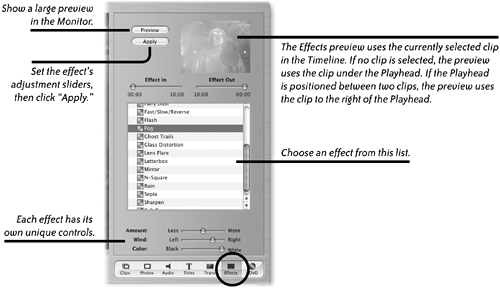
Some effects, such as Electricity (shown below) and Fairy Dust, let you grab the effect in the thumbnail Preview window and drag it to a new position. 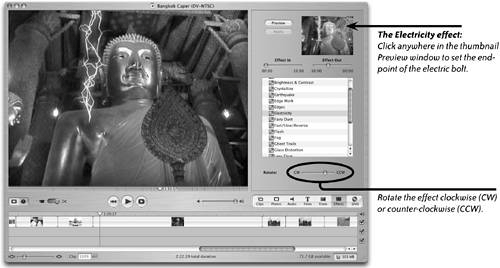 AudioAudio editing is critically important to the perceived professionalism of your movie. When you shoot a scene, the background noise often is distracting or even unbearable. Audio editing lets you lower or mute the volume of problem clips and add a background music track or a narrative voice-over. Even if the existing audio is fine, you can enhance the aesthetic and emotional impact of your movie just by having fun with additional soundtracks and narration clips. If you're making an instructional video, narrative voice-overs can add clarity and comprehension to your project. Place as many audio clips in iMovie's two audio tracks as you need. When you record narration directly into iMovie, it's automatically placed in track 1, but you can choose to put additional imported soundtracks there also. You can drag imported audio clips to any position in an audio track. You can also drag audio clips from one audio track to another. Audio clips can overlap on the same track or in separate tracks. When two audio clips in two different audio tracks overlap, both are audible. iMovie's advanced audio-editing features allow you to adjust and control the volume in overlapping tracks. For instance, you can lower the volume of a background music clip while someone in a video clip is talking. Or you can fade-out the audio of a video clip as you raise the volume of a background soundtrack. The volume of each individual audio and video clip is editable. In fact, you can make multiple volume adjustments to a single clip. See "Advanced audio editing" on pages 162163 to learn more about adjusting the volume of audio and video clips. 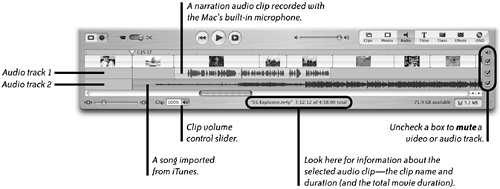 Add audio files to your movie
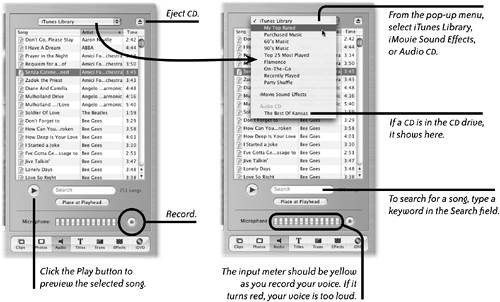
To record a narration clipNarrative voice-overs are a great way to add interest to your movie. If your computer has a built-in microphone or if you've connected an external mic, click the Record button to begin recording your voice; the button's outer ring is red when recording. Click the button again to stop recording. (If the Record button is dimmed, you don't have a microphone.) The voice clip automatically appears in the audio track 1 in the Timeline when you start talking, starting at the current Playhead position. After you finish recording, you can move the audio clip to any position in the Timeline. To import an audio track from anywhere on your computerYou might have audio files in various formats stored on your Mac, but not in iTunes, and therefore not accessible from the Audio Pane. You can import audio files from anywhere on your computer straight into an audio track.
Click the "Open" button to import the selected audio file and place it at the position of the Playhead in the bottom audio track (below-left). This example shows a song on a CD being imported to the Timeline. To show the audio waveform of an audio clip (as seen here), from the View menu select "Show Audio Waveforms." To turn off the waveform display, select the item again. 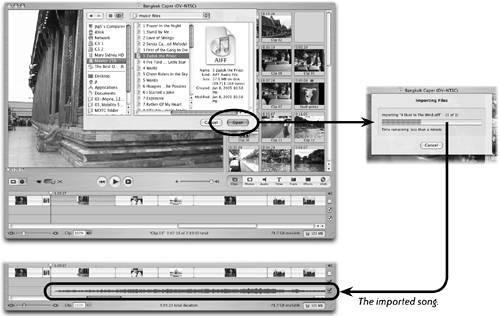 When the waveform is not shown, the audio file's name shows on the clip (shown above).
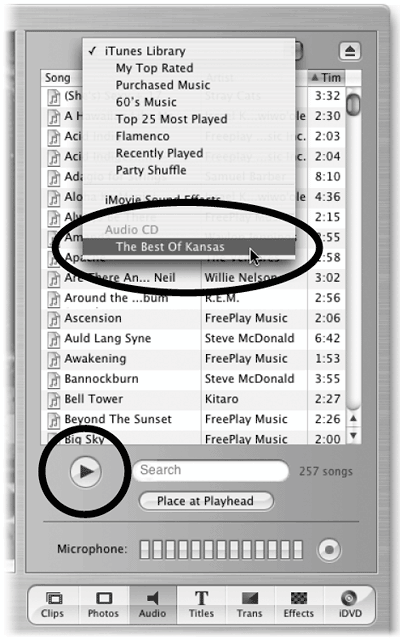
To review and import a CD soundtrackThe CD title appears in the Audio Pane's pop-up menu.
If you want to use music from a CD, follow these steps:
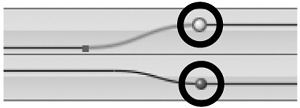
To adjust the position of an audio file in the Timeline, drag the entire clip left or right. To trim the start and stop points of an audio clip, drag either edge of the audio clip toward the center of the clip. When you hover your pointer over a clip edge, it turns into a double-arrow icon, as shown below. To fine-tune the trimming of an audio clip, select it, then use the left and right arrow keys on your keyboard: Tap an arrow key to crop the audio clip one frame for each tap. Shift-tap an arrow key to trim ten frames at a tap. To recover cropped audio, or use the arrow keys or just press-and-drag the clip edge outward (away from the center). You can drag an audio clip from one audio track to another. This helps keep clips organized and accessible when you need to overlap audio files, such as a music track and a sound effect (shown on the next page). You can even lay multiple audio tracks on top of each other in the same audio track and they all will be audible. Depending on the nature of the audio, you may need to adjust the individual volume levels of each clip. As with video clips, a trimmed audio clip has square corners on the edge that has been trimmed. Untrimmed clips have round-cornered edges. Drag an audio clip edge towards the center of the clip to trim audio from the beginning or end of the clip.  Advanced audio editingiMovie's advanced audio-editing features are similar to those used in Final Cut Pro and other professional-level editing software. These features give you control over the placement and the duration of audio fade-ins and fade-outs. They let you create professional effects, such as lowering the volume of a background music track while a voice-over narrates the video, then lowering the video volume so the background music is emphasized. Very cool stuff. And easy. From the View menu, choose "Show Clip Volume Levels." Black horizontal lines appear in every audio and video clip, indicating volume levels. To adjust the volume of an entire clip (audio or video), select the clip, then move the clip volume control slider up or down. In the example below, the audio clip in the bottom track is selected and the volume control slider is set to 40% of the original volume. The volume slider will only affect clips (audio or video) that are selected (highlighted). The clip in the bottom audio track is selected and the volume set to 40%.  To adjust the volume of multiple clips, select two or more clips, then move the clip volume control slider left or right to adjust the volume of all selected clips at once. To set multiple volumes in a single clip, first make sure to select "Show Clip Volume Levels" in the View menu. Click anywhere on the volume level line in a clip. A volume marker appears on the volume level line. When the marker is selected, it is slightly larger and yellow. When it's not selected, it's purple. Drag markers up or down to raise or lower the volume. The percentage number (volume) next to the clip volume control slider changes as you drag. Create as many markers on the volume level line as necessary to make the changesyou want. The volume in the top audio clip is set to increase as the volume in the bottom clip goes down.  When you click on or drag a volume marker, a purple square appears to the left, marking the start point of volume change. The round marker identifies the end point of volume change. Grab the purple square and move it away from the round marker to increase the duration of the volume change, making it more gradual. Or move it closer to the round marker to make the volume transition happen faster. A selected marker is yellow. Other markers are purple.
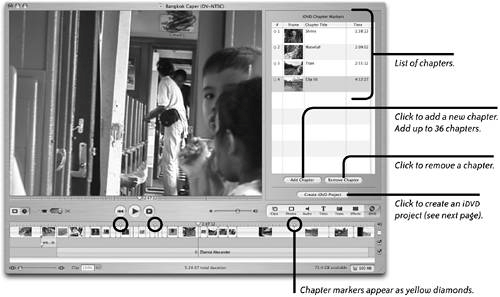
In the example below, two audio clips are sharing the same track. The short volume line represents a short clip of sound effects ("Thunder") on top of a longer music clip ("Foreboding"). Since they are both audible, we adjusted the volume of the "Foreboding" clip to zero just in the area where the "-Thunder" clip plays. We could drag the "Thunder" clip to the upper audio track to avoid confusion, but it works this way too. If you drag an audio clip on top of another audio clip in the same audio track, both clips are audible.  To extract audio from a video clip: You might want to use the audio from a video clipwithout the video. Select a clip in the Timeline. From the "Advanced" menu, choose "Extract Audio." The extracted audio is automatically placed in audio track 1 (the top audio track in the Timeline). You can delete the video clip and use just the audio clip. The audio remains in the source video clip, but is muted; see below if you want to restore it. To restore the video clip's audio, select the clip, click "Clip" volume control, then move the volume control slider from 0% to the desired volume. A volume setting of 100% restores the volume to its original state. Yellow pins are placed in the audio and video clips (on the left edges) to lock the extracted audio in sync with the video.  Dragging the Playhead through a movie to preview it is called "scrubbing." To hear audio as you scrub through your movie, hold down the Option key as you drag the Playhead in the Timeline. This could be helpful when you need to locate a specific section of music or dialog that you want to synchronize with another clip, such as a loud musical accent or a shout. Create chapter markers in a movieOne of the best ways to share movies is to create a DVD using Apple's iDVD software. And one of the biggest advantages of DVD is the ability to jump directly to pre-designated points in a movie, called "chapters." Chapter markers that you create in iMovie are automatically exported with your movie when you create an iDVD project (see the next page). See Chapter 4 to learn all about the amazing iDVD application. To add chapter markers
|
EAN: N/A
Pages: 277

