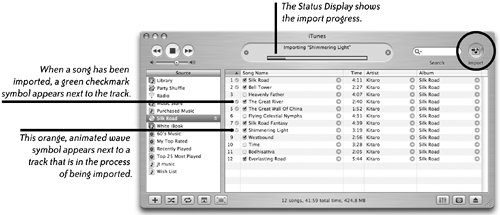
| To rip a file is to encode it (convert it) from one format to another. To copy a CD music track to your computer, you'll convert it (rip it) from the CD-DA format on the CD to the AAC format, or to whatever file format you choose in the Importing preferences pane. To rip music files 1. | Insert a music CD; the CD tracks appear in the iTunes Detail window, as shown below.
If iTunes does not automatically go to the Internet and get the title names and other track information, go to the Advanced menu and choose "Get CD Track Names." This will open your Internet connection if you're not already online. After a few moments, the CD database will fill in the track titles, artist, album, and genre, if they're available online.
| 2. | Select the tracks in the list you want to rip. By default all tracks in the list are checked when you first open a music CD. Uncheck any track that you don't want to save on your computer.
| 3. | Click the "Import" button in the upper-right corner of the iTunes window. The selected (checked) tracks will be ripped (encoded) and added to the iTunes Library.
|
 Rip multiple music files from a CD as one track If you want to rip (import) two or more adjacent songs from a CD "Song Name" column so they will play as one track without a pause between the songs, use the "Join CD Tracks" command. | If you have a CD with two tracks that have a cool transition between them, the transition might get lost if the songs import as two separate tracks. To keep the transition, use the "Join CD Tracks" command described here. |
1. | Insert a CD, then select the songs you want to join.
| 2. | From the Advanced menu, choose "Join CD Tracks."

| 3. | Click "Import" in the top-right corner of the iTunes window.
|
Rip music files to other formats When you import music from a CD, you may want to encode the music files to some other file format. You can change the Importing preferences so that imported files are encoded as AAC, AIFF, Apple Lossless, MP3, or WAV formats. 1. | From the iTunes menu, choose "Preferences…," then click the "Importing" button.
| 2. | Change the "Import Using" setting to one of the supported file formats in the pop-up menu.
| 3. | In the CD Song list, put a checkmark next to the song (or songs) you want to encode. If you plan to encode just a few songs, you can Command-click on an existing checkmark to clear all checkmarks, then select (checkmark) just the songs you want.
| 4. | Click the "Import" button (shown on the previous page).
|
The song appears in the Library. If you already have a copy of this song in another format, you can determine which song is the newly formatted one:Control-click one of the copies and choose "Get Info," then look for the "Kind" info. Or set "View Options" to show the "Kind" column (page 89). | To convert songs to another format and save them in a folder of your choice, hold down the Option key as you select "Convert selection to" from the Advanced menu. |
| Songs you buy from the iTunes Music Store use a "Protected AAC" format that prevents them from being converted to other formats. |
You can also encode a copy of a song that's already in your iTunes Library into another file format. 1. | Set the "Importing" preference to the desired format, as explained above (AIFF, for example). Close the Preferences window.
| 2. | Select a song (or songs) you want to encode to another format.
| 3. | From the "Advanced" menu at the top of your screen, choose "Convert Selection to MP3." iTunes substitutes "MP3" with whatever format you chose in the Importing preferences (Step 1).
|
|

