| There are still more ways to share your photos with iPhoto. You can save photos into various file formats, export them as a web page, or use them to create a QuickTime slideshow. Export copies or convert photos to other file formats You might want to export photos to a different project folder or convert them to another file format. This does not remove the photos from the Library. The converted or exported photos will be copies of the originals; any changes you make to those copies will not affect the originals. To export or convert photos 1. | Select a single photo, an album, or a group of photos within an album or the Library.
| 2. | From the Share menu, choose "Export…."
| 3. | In the "Export Photos" window click the "File Export" button.
| 4. | From the Format pop-up menu, select a file format in which to save photos: "Original" saves photos in whatever format they currently use. The other options are "JPG," TIF," and "PNG."
If you're not familiar with file formats, JPG is a safe choice that anyone can use. Most digital cameras create photos in this format, and it's the most common format for photos destined for web pages.
If you plan to print the exported image, choose the TIF format.
If you have a reason to use PNG, choose it.
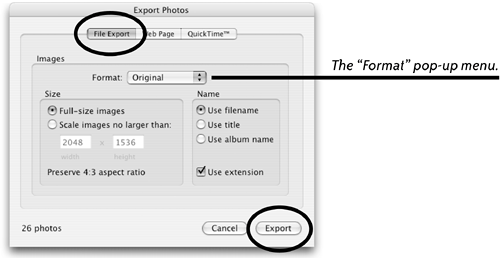 | 5. | Size: "Full-size images" exports photos the same size as the original. Or you can enter specific dimensions in pixels.
| 6. | Name:
Use filename: The exported photos will retain the default names your digital camera assigned (such as "DSCN0715.jpg"), unless you've renamed them.
Use title: The photos will display the titles you gave them in iPhoto.
Use album name: The photos will display the album name and a number for each image ("Kauai-07," for example).
Use extension: The file format extension will appear at the end of the file name ("Kauai beach.jpg," for example).
| 7. | Click the "Export" button. In the sheet that drops down, choose a location on your computer in which to save the exported files.
If you want to put your exported photos into a new folder, click the "New Folder" button and name the folder.
| 8. | Click OK to export the photos.
|
Save exported files into any folder on your computer or create a new folder in any location. 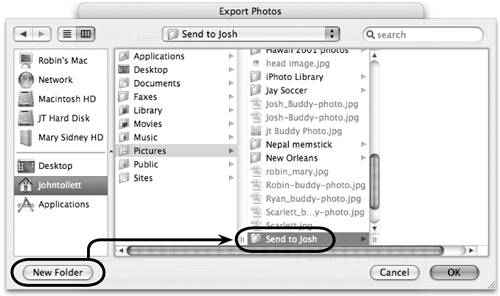 Export your photos as a web site The "Web Page" option of the "Export Photos" window is very different from the Home-Page feature as explained on pages 5051. This web page tool creates a simpler web site and saves it on your computerit does not post this site on Apple's server. You can upload this site yourself to a server of your choice, or you may want to burn the site to a CD to share with others. To export your photos as a web site 1. | Select an album or a group of photos within an album. The order the photos appear in an album is the order they will appear in the web page you create.
| 2. | From the File menu, choose "Export…."
| 3. | In the "Export Photos" window that opens, click the "Web Page" button.
| 4. | Make the following choices:
Title: Enter a title for the web page.
Columns and Rows: Choose how many columns and rows of thumbnail photographs to create on the start page (the first page of the web site).
Background: To choose a background color, click the Color radio button, then click the color box for the palette. To choose a background image for the page, click the Image radio button, click "Set…," then from the Open dialog box, choose an image.
Text Color: Click the box to choose a color for the text on the page.
See the sidebar and Step 6 on the next page to learn why we named our new folder "index" (above). 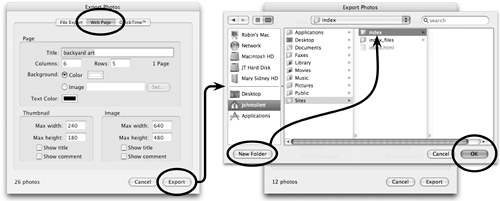 Thumbnail: Set the maximum width and height for thumbnail images (the small photos on the "start page" or first page).
| If the folder we export into is named "flamenco," iPhoto names the start page (the page with all the thumbnails on it) "flamenco.html." An HTML start page needs to be named "index" to work on the Internet, but if we manually change the name of the start page (after it has been created by iPhoto) to "index," the "Up" link on the secondary pages (the link that takes you back to the start page) will not work because it's programmed to link to a page named "flamenco.html." So, to make your web pages actually work on the Internet, export them to a folder named "index." |
Show title: Place the title you assigned to photos under the thumbnail version on the start page.
Show comment: Show comments associated with photos.
Image: Same as "Thumbnail" settings, but this applies to the large photo pages to which the thumbnail images are linked.
| 5. | Click "Export," shown on the previous page.
| 6. | In the sheet that drops down, iPhoto may automatically choose the "Sites" folder in which to store your web page. You can choose any location, but you need to create a new folder within the selected folder to hold all the files that will be created during this export.
So click the "New Folder" button (previous page) and name it index. Why? Because, unfortunately, the Web Page feature names the start page the same as the folder into which it's saved. For a web page to work correctly on the Internet, the start page needs to be named "index.html." After the photos are exported to the new folder, you can manually change the name of the folder to something unique.
Click OK (shown on the previous page). Your new web page and all its related files will be stored in this new folder.
|
To see your new web page (which is really a web site, not an individual web page), find the new folder you just made and open it (it's in the Sites folder in your Home folder, unless you put it somewhere else). This is a finished web page shown in a browser. Web Page creates a "start page" that contains thumbnail versions of your selected photos. Single-click any thumbnail to open a page that displays a full-sized version of that photo and navigation links for "Previous," "Up," and "Next" ("Up" means back to the start page). 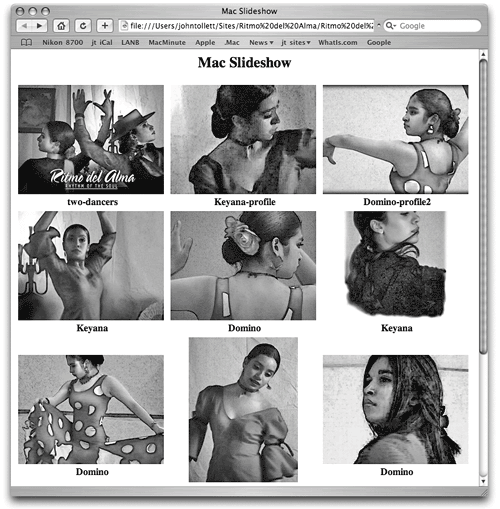 Double-click the file named index.html. The site will open in your default web browser, but it's not online! You're actually just opening files on your own hard disk. This Web Page feature just builds the site for youit's your responsibility to upload it to a web server if you want it online. Export photos as a QuickTime slideshow You can export photos as a QuickTime slideshow that plays in the QuickTime player or in a program that supports QuickTime, such as a web browser. The QuickTime slideshow can be put on a CD and sent to friends, posted on a web page, inserted into a PDF, or placed in other software that recognizes QuickTime (such as the presentation module in AppleWorks or Pages). To export as a QuickTime slideshow 1. | Select an album, a group of photos within an album, or photos in the Library. (The order that photos appear in an album is the order they will appear in the QuickTime movie.)
| 2. | From the Share menu, choose "Export…."
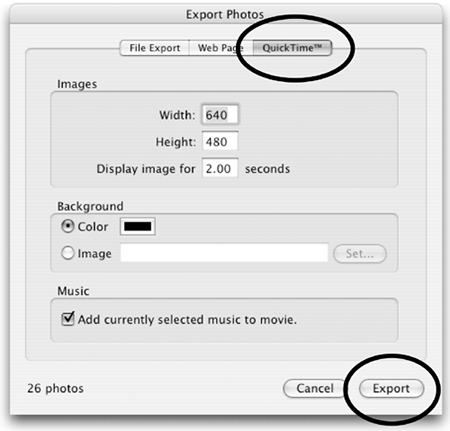
| 3. | In the "Export Photos" window, click the "QuickTime" button.
| 4. | Images: Set the maximum width and height for the slideshow images; 640 by 480 pixels is a standard measurement that works well. In the "Display image for" box, set the amount of time that each image will stay on the screen.
| 5. | Background: Choose a background color or a background image. If some of your photos have unusual dimensions, the empty background area will be filled with the color or image you choose.
| 6. | Music: Click "Add currently selected music to movie." The slideshow will play the song you previously chose in the slideshow settings window, shown on page 43.
| 7. | Click "Export."
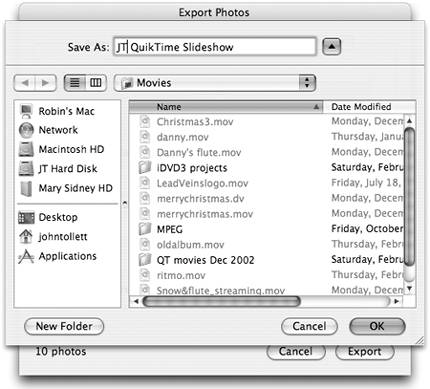
| 8. | In the sheet that drops down, name the file and choose a location in which to save the file (shown below). iPhoto automatically selects the "Movies" folder to save the slideshow in, but you can choose any folder or disk. Click OK.
|
To open your QuickTime slideshow, locate the QuickTime movie file wherever you saved it on your hard disk, then double-click it to open it in the QuickTime Player. To play your QuickTime slideshow, click the Play button on the QuickTime Player. This is an exported slideshow, shown in the QuickTime Player. 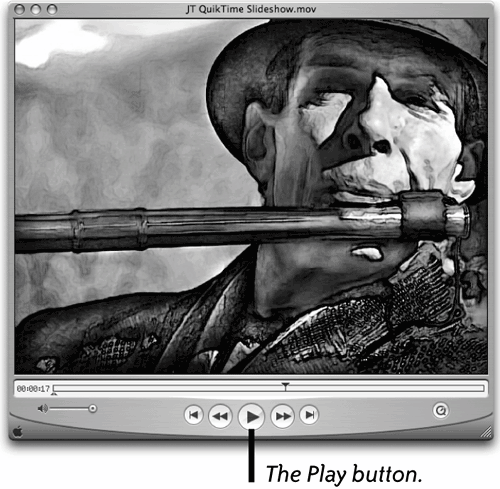 |