Desktop Security Options
There are two main areas of the policy editor that are important to desktop security:
-
The Desktop Security policy
-
The Remote Access global properties.
Both of these enable you to control various aspects of what is transmitted to the SecureClient users by the policy server.
Desktop Security Policy
Located on the main screen of the policy editor, the Desktop Security tab enables you to specify what access your users have. The Desktop Security Rulebase is similar to the standard Security Policy Rulebase, with some important distinctions.
The Desktop Policy is installed just like a standard Security Policy. When you select Install from the Policy Menu, you have the option of installing an Advanced Security policy and/or a Desktop Security policy. Both are selected by default (per the global properties SmartDashboard Customization), and once you install the desktop policy onto the policy servers, they get distributed to the SecureClients as they log in. Only the rules that apply to the user who belongs to the SecureClient desktop will be applied. See Figure 11.4 for an example of a basic Desktop Security Rulebase. If you do not see the Desktop Security tab in SmartDashboard, simply select File Add Policy to Package and check Desktop Security to show a Desktop Security policy as part of this policy package. To remove the Desktop Security policy from a package, open the package and select File Delete Policy from Package .
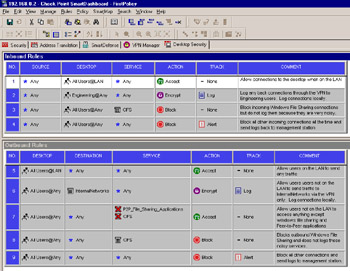
Figure 11.4: Desktop Security Rulebase
Notice that unlike the normal security policy, there are Inbound Rules and Outbound Rules. These are inbound and outbound in relation to the desktop system, which will be doing the policy enforcement, not the policy server you are pushing your policy to. In the initial release of Check Point NG, this was one single rulebase, but due to the confusion of many administrators, in NG FP1 and later it has been separated into two sections. Also, even though there are inbound and outbound sections, you do not need to enter each piece of a connection (one in the outbound and a returning packet in the inbound) because all of this functions on connections, not packets. This is because the desktop firewall also utilizes stateful inspection, which keeps track of each session and only permits packets that are known to be part of that session. As a result, you only need to explicitly permit packets in the direction that the connection is initiated.
In Figure 11.4, Rule 1 allows traffic from anywhere to the users workstations for any service, but only while they are on the local area network (LAN). Rule 2 allows connections to a desktop when a user in the Engineering group is logged into the VPN and authenticated by the policy server. These connections will be logged locally, but not sent consolidated with the logs seen in SmartView Tracker. Note that because Encrypt is selected as the action, only connections via the VPN are allowed by this rule; cleartext connections from across the Internet are not allowed. Rule 3 then drops any incoming Windows file sharing connections and broadcasts, and does not log them. The final Inbound rule, Rule 4, is similar in functionality to the Stealth Rule found in a typical security policy ”if not explicitly allowed, block the connection, log it, and the next time that user logs into the policy server, send the logs to be consolidated with the rest of the logs to be viewed via SmartView Tracker or reported on by SmartView Reporter.
| |
SecureClient Logging
Unlike other firewall logs, when you set Track to Log in the Desktop Security policy, logs are kept on the local SecureClient workstation. These logs can be viewed with the SecureClient Diagnostics Log page, which is included as part of SecureClient installation.
If you set Track to Alert , the SecureClient workstation will send these log entries back to the policy server, which are then consolidated with the normal FireWall-1 log and viewable via SmartView Tracker.
| |
The Outbound Rules section contains rules to be applied for connections originating from the desktop system itself. As you can see from the rule numberings, this is a continuation of the same policy. Rule 5 allows users on the LAN to communicate with anything. The assumption here is that the security on the LAN will take care of providing access controls. Rule 6 is for users that are not on the LAN allowing access to anything on the internal network as long as it is over the VPN (due to the Encrypt action). While users are not on the LAN, they still require access to systems on the Internet for Web browsing and other functions. Rule 7 allows them to establish connections to anything on the Internet unless it is a Windows file sharing or peer-to-peer application. Rule 8 blocks connection attempts using Windows file sharing, and does not log them, and Rule 9 blocks all other outbound connections similar to a Cleanup rule in a typical security policy. Because of what is defined before this rule, it will likely only block access to peer-to-peer applications and log them. This will, however, show which users are attempting to use peer-to-peer applications in SmartView Tracker as well as create reports in SmartView Reporter of which users are attempting to use peer-to-peer applications.
The Desktop Security Rulebase adds an implicit rule to the bottom of the rulebase that denies all inbound communication. This means that anything not explicitly allowed in the Desktop Security Rulebase is blocked. Note that packets that are dropped due to the implicit drop rule are not logged; if you want to log drop packets, you can add your own explicit drop rule at the bottom of this rulebase. The Desktop Security Rulebase also has an implicit rule, which allows all outgoing traffic and does not log it. If you plan on restricting what a user is able to access outbound, it is imperative to add a rule similar to Rule 9.
Remote Access Global Properties
The Remote Access Global Properties screen enables you to configure various additional aspects of the SecuRemote and SecureClient desktop environment. Keep in mind that SecureClient uses the same Client Encryption software as SecuRemote, and therefore some of the settings shown in Figure 11.5 apply to both sets of users and some only apply to users of SecureClient.
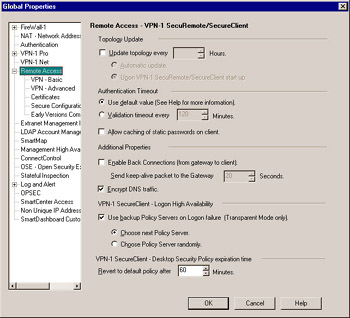
Figure 11.5: Remote Access Global Properties
The Topology Update section defines how topology updates will be handled. By default, the client will update its site once a week, but this can be changed to a specific number of hours by checking the Update topology every n Hours checkbox and setting the number of hours. There are also two options:
-
Automatic Update This tells the client to do the updates automatically when the user connects to the VPN. This is the default.
-
Upon VPN-1 SecuRemote/SecureClient start up This selection tells the client to automatically prompt the user to connect to the VPN every time the client is started, which is typically whenever they boot the system logs into the operating system (OS) to use it.
Next are the Authentication Timeout settings. You may choose Use default values , which allows an Internet Key Exchange (IKE) Phase 1 authentication to be valid for one day. You can choose to lower this value by selecting Validation timeout every n Minutes and selecting the number of minutes. If you select Allow Caching of static passwords on client , users with authentication methods of OS or VPN-1/FireWall-1 password will only have to authenticate when SecureClient connects initially.
The Additional Properties section allows an administrator to define whether to allow back connections (connections originating from the LAN directed to the desktop) and if so, how often to send a keep- alive packet to the gateway. This is necessary because connections may time out or fail incoming to the VPN client due to firewall or Network Address Translation (NAT) limitations on devices between the client and the gateway. This ensures that the VPN tunnel is always available. Encrypt DNS traffic determines whether Domain Name System (DNS) queries sent by the desktop to a DNS server located on the corporate LAN are to be sent through the VPN tunnel or in the clear.
When logging on to a policy server using SecureClient, one may not always be available. This setting defines what action to take if a policy server is unreachable from the client and the client is using Transparent Mode to connect. (If the client is using Connect Mode, the action to be taken is defined in the Connection Profile.) The two options are fairly self explanatory. Choose next Policy Server tells the client to connect in a predefined pattern. Choose Policy Server randomly attempts to connect to any of the policy servers in a random method, whereby allowing the administrator to disperse the load on other policy servers in the event that one is down.
The final option on this page (VPN-1 SecureClient “ Desktop Security Policy expiration time) deals with how long a policy downloaded from a policy server is valid before the client seeks to update itself and receive a new Desktop Security policy. When half of the time defined here has elapsed, the client will connect to the policy server to retrieve an updated version (if necessary) and start the timer over again. If this renewal fails, after half of the remaining time, a connection will be attempted again. If the client reaches the amount of time set in Revert to default policy after n minutes , it will revert back to its default policy. The number of minutes a policy will be valid for can be set by changing the value from 60 (default) to the length of time desired. This means that after 30 minutes it will attempt to renew the policy, then if that fails, after 15 minutes (of the remaining 30 minutes) it will attempt to renew again and so on.
VPN - Basic
Figure 11.6 presents options that deal with the basics of the VPN connection, how users are allowed to authenticate, what connectivity enhancements are enabled, and if they are required to integrate with legacy Nokia VPN clients .
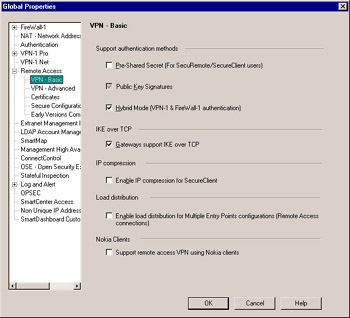
Figure 11.6: Remote Access “ VPN Basic Global Properties
The setting fields are as follows :
-
Support Authentication Methods IKE itself has two methods for authenticating VPN connections; Pre-Shared Secret and Public Key Signatures The final option, Hybrid Mode (VPN-1 & FireWall-1 Authentication) , is used to authenticate users using other methods (such as SecurID, Radius, and internally managed passwords) as defined on the user s Authentication tab.
-
IKE over TCP Eventually, one of your users will end up connecting from behind a device that does not support fragmented User Datagram Protocol (UDP) packets correctly, and you will be required to check the Gateways support IKE over TCP option. Gateways will always support the standard IKE implementation, which happens over UDP. This allows clients to connect using TCP if it detects a problem using UDP. It should be noted that this option only allows the gateways to use IKE over TCP, this does not tell the clients to use IKE over TCP. The client s setting must be done from the client for Transparent Mode ( Tools Global IKE Settings ) or using Connection Profiles if using Connect Mode.
-
IP Compression By selecting Enable IP compression for SecureClient , you allow the client to negotiate Internet Protocol (IP) compression parameters during key exchange, which allows the effective throughput to be higher than the actual bandwidth. By setting this, all clients running SecureClient (not available with SecuRemote) will negotiate IPCOMP along with the encryption parameters, which will be reflected in the logs in SmartView Tracker.
-
Load Distribution The Enable load distribution for Multiple Entry Points configurations (Remote Access Connections) selection allows administrators to spread the load (bandwidth and CPU) of client connections across gateways in different locations. Multiple entry points will be discussed further in the Chapter 12.
-
Nokia Clients For a brief period of time, Nokia was distributing its own VPN solution. It was eventually phased out, but for legacy purposes, checking the Supply remote access VPN using Nokia clients will allow Nokia VPN clients to establish a VPN tunnel to a Check Point gateway.
VPN - Advanced
The VPN - Advanced page (as seen in Figure 11.7) presents more options that are typically only changed if you are configuring your VPN in a more specific or advanced fashion.
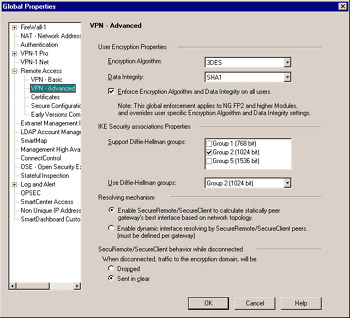
Figure 11.7: Remote Access “ VPN Basic Global Properties
The settings fields are as follows:
-
User Encryption Properties By default, Enforce Encryption Algorithm and Data Integrity on all users is enabled. This allows you to define the Phase 2 encryption properties for all users using SecuRemote or SecureClient.
Note The Enforce Encryption Algorithm and Data Integrity on all users option is only available for NG FP2 modules or later. Disable this option if using earlier versions on your gateway(s). If disabled, it can be set on a per-user basis in the Encryption tab of each user s object. For performance reasons, you may wish to select AES-128 instead of 3DES, as it is a less CPU- intensive algorithm for both the gateway and client and has a slightly higher effective key length (AES 128 bits vs. 3DES s 112 bits). AES-256 is also an option for enforcing the highest levels of security and DES is available for operating in countries where high encryption is not allowed.
-
IKE Security associations Properties The Diffie-Hellman (DH) group determines the level of encryption used in IKE Phase 1 to exchange keys during IKE Phase 2. This information is downloaded by the client as part of the topology. By default, a new client (no topology yet defined) will use Group 2, so keeping Group 2 enabled is necessary to support the addition of new clients. If using Traditional Mode policies, ensure that the gateway will support the DH groups you specify here.
-
Resolving Mechanism SecuRemote and SecureClient have the ability to find the interface on the gateway best to communicate with. This is important if you have more than one interface which you want the client to establish a VPN to. For example, if you have one interface for the wireless network and another interface for connections across the Internet, you would want to allow the VPN client to find which one to speak directly with. Enable SecuRemote/SecureClient to calculate statically peer gateway s best interface based on network topology will use the primary (external) address of the gateway (on the object s General Properties page) to VPN to only. By selecting
-
Enable dynamic interface resolving by SecuRemote/_SecureClient peers , you are not enabling the client to try to connect to each interface, you are only allowing a new option in each VPN Gateway object s VPN Advanced page called Dynamic Interface resolving configuration. There you can define whether you wish for an individual gateway to be resolved statically or dynamically.
-
SecuRemote/SecureClient behavior while disconnected In the beginning, Check Point s VPN clients would simply drop all traffic destined for addresses contained in VPN domains unless it was connected to the VPN or it recognized that it was on the LAN. This was not always the ideal option for companies, so Check Point added the option to simply send traffic in the clear when not connected to the VPN.
Note This option is only valid when the client is in Connect Mode.
Certificates
When users are authenticating themselves to the VPN gateway using Certificates, there are two options (as seen in Figure 11.8) that become relevant; how to handle whether the client will check the gateway s certificate and how to handle the expiration of certificates:
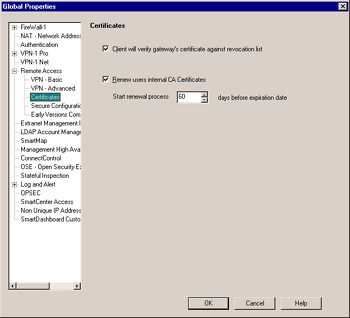
Figure 11.8: Remote Access “ Certificates Global Properties
The settings fields are as follows:
-
Client will verify gateway s certificate against revocation list This option tells the VPN client to verify the digital certificate the gateway is presenting against the Certificate Authority s Certificate Revocation List, to ensure that the gateway s certificate is still valid. This is part of any good PKI infrastructure in that digital certificates are continually being compared against published lists of revoked certificates.
-
Renew users internal CA Certificates This option allows an individual user s certificate to be renewed starting at a specific period of time (60 days by default) before it expires , to ensure that the user will continue to have access to the VPN without interruption. Certificates are valid for two years from the date they are issued by default.
SCV
SCV enables you to control other important aspects of the SecureClient desktop.
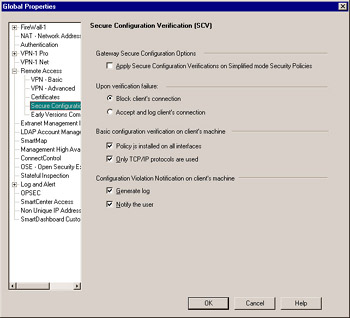
Figure 11.9: Remote Access “ SCV Global Properties
The settings fields are as follows:
-
Gateway Secure Configuration Options Check the box next to Apply Secure Configuration Verification on Simplified mode Security Policies to enable the SCV desktop security mechanisms for all VPN connections to gateways using Simplified Mode VPN policies. Note that SCV is a SecureClient option only. By enforcing desktop policies, you may be blocking SecuRemote sessions.
-
Upon Verification failure When a desktop does not pass the SCV checks as defined in this pane and in the local.scv file, you may choose to block connections from that system by selecting Block client s connection or simply notify the user (the final option on this page), log that it failed, and allow connections by selecting Accept and log client s connection . It is best to simply block the connection; however, when you are beginning to enforce SCV on your user community you may wish to allow the connections, inform the users directly on how to fix their systems (install anti-virus, install Windows patches, and so on), and then after the users have had ample time to update their systems, start blocking connections.
-
Basic configuration verification on client s machine These basic options have been available since the beginning of SecureClient. During the installation of SecureClient, the user has the option to only install the client on dial-up interfaces, in which case Policy is installed on all interfaces becomes relevant. If all interfaces are not protected, the machine may be at risk via the unprotected interface and it will fail SCV. Only TCP/IP Protocols are used is also a basic method of checking if non-TCP/IP are in use (such as Internetwork Packet Exchange/Sequenced Packet Exchange [IPX/SPX] or NETBIOS Extended User Interface [NetBEUI]). SecureClient cannot protect these protocols and again, the system is at risk and will fail SCV.
-
Configuration Violation Notification on client s machine If the desktop fails SCV, you can elect to generate a log locally ( Generate log ) and also Notify the user about the failure. If you are going to be blocking connections when verification fails, it is a good idea to notify the user that they are not configured securely and also teach the user how to correct the problem. The error message to display to the user is defined in the local.scv file in the :mismatchmessage section.
| |
SCV and the $FWDIR/conf/local.scv file
SCV options are much more extensive than what is shown in this pane. The local.scv file in the $FWDIR/conf/ directory is used to define very granularly how to define a system to be secure enough to access the VPN and pass SCV verification. The options inside the file include IE Browser configuration, Registry Checks, executing custom scripts, checking Anti-Virus DAT file versions, checking OS Patch levels and hot fixes, checking for the existence (or non-existence) of particular processes, checking the local windows user s group, checking the CPU type, and more. The local.scv file that is distributed with NG AI has many examples, but is typically not exactly what an organization wants to deploy. You should customize the local.scv file before enforcing SCV across your enterprise. A detailed discussion of the SCV policy syntax is available in the VPN-1 Users Guide for NG AI .
There is also a graphical user interface (GUI) SCV editor available at www.opsec.com to ease the configuration of SCV options. In addition, multiple vendors such as Trend Micro and Pest Patrol have developed their own additions to SCV to more extensively check their applications. OPSWAT has also developed a number of SCV checks to integrate with Shavlik s HFNetChk/HFNetChkPro, Norton, McAfee, and Internet Explorer as well as validating the hardware identity of client systems. Information on OPSWAT s products can be found at www.opswat.com
| |
Early Versions Compatibility
This section of the Global Properties window, as shown in Figure 11.10, enables you to configure policies for versions of SecureClient prior to NG.
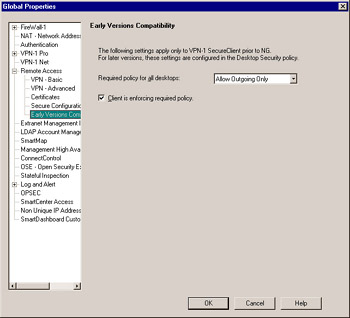
Figure 11.10: Remote Access “ Early Versions Compatibility Global Properties
Following are the four policy options in the Required Policy for all desktops pull-down window:
-
No Policy
-
Allow Outgoing & Encrypted
-
Allow Outgoing Only
-
Allow Encrypted Only
You can see from this list how much more granular the new Desktop Security rulebase is. You can only select one of these policies for all pre-NG SecureClient users, which will work in conjunction with the other Security Configuration Verification options set in the global properties.
-
If No Policy is selected, there will be no policy loaded on the SecureClient when users log in to their policy server, hence no protection.
-
If Allow Outgoing Only is selected, only non-encrypted traffic originating from the SecureClient PC will be allowed, and all inbound connection attempts to the SecureClient will be dropped.
-
If Allow Encrypted Only is selected, only connections to and from the VPN domain will be permitted. For example, with the encrypted policy, mobile users cannot browse Internet sites, but they can download their e-mail from the office while the SecureClient software is running.
-
If Allow Outgoing & Encrypted is selected, the users can initiate any connections to either the Internet or to the VPN domain, and only encrypted traffic is allowed inbound to the SecureClient.
The Client is enforcing required policy option defines whether or not to allow users not configured securely to be able to connect to the VPN and access the LAN.
Traditional Mode (Client Encrypt) Rules
The final step to allowing remote users to use SecureClient when using a Traditional Mode policy securely to a VPN is to set up a client encrypt rule in the standard Security rulebase. This is where the firewall administrator defines the policies that will be installed on the firewall module that will be enforcing the policy and allowing SecuRemote and/or SecureClient users into the VPN domain. (See Figure 11.11.) To do this, open the Policy Editor and add a new rule to the rulebase, similar to the rule used in Chapter 10 for SecuRemote.
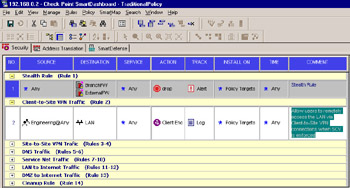
Figure 11.11: Client Encrypt Rule
For this example, choose Engineering and set Location to No restriction . The Destination field specifies what objects these users will have access to via the encrypted connection, and Service enables you to further restrict the connection to particular services. Set Action to Client Encrypt , Track to Log , and ensure that Install On includes the appropriate firewalls.
Now that the rule is configured, there are some additional action properties to consider for SecureClient. To access them, right-click on Client Encrypt , and choose Edit properties , as shown in Figure 11.12.
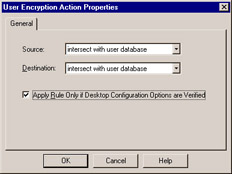
Figure 11.12: User Encryption Action Properties
The Source and Destination options discussed in Chapter 10 have not changed. The selection you need to be concerned with is the Apply Rule only if desktop configuration options are verified , which relates to the desktop configuration verification options you configured earlier in the global properties and the local.scv file. If any of the desktop verifications fail for a particular user, the firewall will not allow the encrypted connection via this rule. This is an effective way to ensure that only properly secured SecureClient desktop users are authenticating and connecting to particular parts of your network. If a user does not have the appropriate desktop policy loaded on their client, they will not have access via this rule. In Traditional Mode, you can have rules that allow SecuRemote users and users that do not pass SCV to connect by not checking the Apply Rule only if desktop options are verified option on a per-rule basis. Traditional Mode is necessary to allow connections through the VPN to an anti-virus update server in order to get clients that are failing SCV (because of an out-of-date anti-virus version) up-to-date so that they can be verified by SCV and allowed access to other parts of the network.
Client Authentication supports SecureClient connections as well. To enable this, select Client Auth in the action field on a rule, and then edit the Client Auth Action Properties and select Verify secure configuration on Desktop . This is generally used for cleartext (not encrypted) communication from an internal SecureClient PC.
Simplified Mode Rules
In Simplified Mode, adding rules for SecureClient VPN connections is exactly the same as setting up a rule for SecuRemote connections in Simplified Mode. To not allow SecuRemote connections and only allow SecureClient connections with SCV verified, check the box next to Apply Secure Configuration Verification on Simplified mode Security Policies in the Global Properties. Simplified Mode is, as its name suggests, easier to configure but not nearly as flexible as Traditional Mode.