Installing and Configuring a Policy Server
The first step toward ensuring that your remote users desktops adhere to your security policies, is to install and configure a policy server. Once the policy server is installed and configured, it will be able to transmit the appropriate security settings to the SecureClient process running on the remote desktops.
Installing from CD-ROM
The policy server can be found on the Check Point NG AI CD-ROM. To install the policy server onto your firewall module, insert the CD-ROM, and from the Add Products option, choose Install additional Check Point products . Then select SecureClient Policy Server , as shown in Figure 11.1.
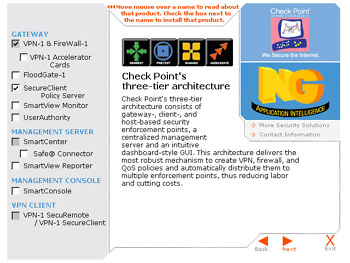
Figure 11.1: Check Point Policy Server Installation
This will load the Check Point installation wizard, which will first check that the VPN-1/FireWall-1 module is installed. If not, you will be required to install the VPN-1/FireWall-1 module prior to continuing with the policy server installation.
The policy server installation will proceed, and will not require any further input. Once it is complete, ensure that you have the appropriate license installed on your firewall and management station. The license on the management station must contain sufficient users for the number of actual users connecting to your environment. The license on the firewall must contain a license for the policy server, which is available with any VPN-1 Pro module. If your firewall license does not have a policy server SKU, you can regenerate it in UserCenter. If you do not know whether your license contains policy server functionality, consult your reseller, local Check Point office, or call Check Point Support and speak to Customer Advocacy.
Now that the policy server component of Check Point NG AI is installed, you can configure your security policy.
| Note | Starting with NG FP1, a Software Distribution Server (SDS) is included in the policy server package. NG FP1 and later SecureClient packages also include a Software Distribution Agent, which checks the SDS for updated software revisions using Transmission Control Protocol (TCP) port 18332. |
Configuring a Policy Server
The first step in configuring the policy server is to open the policy editor, go to Manage , and edit the firewall object. In this example, the firewall object is called ExternalFW . From the General Properties tab, under the Check Point Products section, check SecureClient Policy Server , as shown in Figure 11.2.
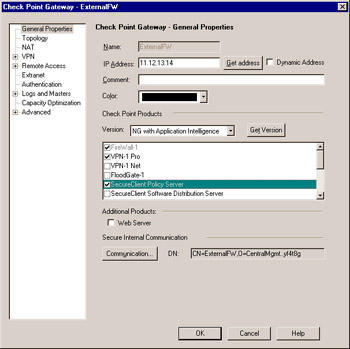
Figure 11.2: General Firewall Properties
By selecting this option, you are telling the firewall that the SecureClient policy server is installed. You may now continue to configure its remaining options.
Next, go to the Authentication tab of your firewall object. Here, you will see a new option that allows you to define a group of users, as shown in Figure 11.3.
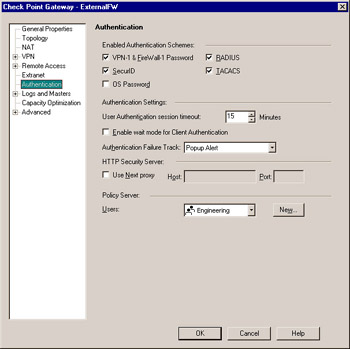
Figure 11.3: Authentication Firewall Properties
Select the user group that the policy server is going to manage. This user group should contain all of the SecureClient users who will log on to the policy server. If you are not restricting certain users from utilizing the VPN, you may select All Users , which allows any defined user to log on to the policy server. In this example, only Engineering users are able to log on to this policy server. Later, you will add all applicable users to this group. Once you install the policy, the policy server will start running.