| Unattended installation methods allow for installation of Windows 2000 Server with little or no user intervention. They are beneficial when a number of similar servers need to be installed. When configured properly, unattended installations can be completely hands-off after the installation has begun. For Windows 2000 Server, there are two methods of unattended installation:  | Script-based installations are the most prevalent in real life and on the exam, thus this section provides in-depth coverage of the configuration and deployment of script-based installation. You also get an overview of disk duplication, but we do not cover it in depth because the exam does not do so. |
Script-Based Unattended Installation Using Answer Files The premise of the script-based installation is that the installation progresses like a normal attended installation, except that where a user would normally answer setup questions, a text file provides the answers instead. This text file is thus intuitively called an answer file . Once the installation has begun, if you have configured the answers properly, no intervention is required. This list outlines the basic components of a script-based installation: -
The I386 directory from the Windows 2000 CD-ROM This is generally copied into a server-based folder and shared (unattended installations are almost exclusively network based). -
The WINNT.exe or WINNT32.exe programs WINNT is for DOS-based installations; WINNT32 is used for upgrades from 32-bit Windows operating systems. -
An answer file providing the generic answers to setup questions This is typically a file with a .txt extension (although the extension does not matter), and is usually named UNATTEND.txt. -
A uniqueness database file This file, which has a .udf extension, provides the answers to computer specific questions that will change from machine to machine (for example, the computer name or IP address). -
A batch file or command line that invokes the unattended installation This file is used to launch the unattended installation using the answer file and UDB files created to perform the installation. You can create the answer file using any text editor. However, a wizard is available to help you create this answer file and to ensure that you do not leave out crucial information. This wizard is called the Setup Manager Wizard. Using the Setup Manager to Create Unattended Answer Files The Setup Manager is part of the Windows 2000 Support Tools located in the \Support\Tools folder on the Windows 2000 CD-ROM. It is stored in a file called Deploy.cab and must be extracted from that .cab file before it will operate . Complete the following steps to extract the Setup Manager. -
Navigate to the Support\Tools folder on your Windows 2000 CD-ROM and double-click the Deploy.cab file. -
Select the setupmgr.exe, setupmgx.dll, and deptool.chm files; right-click one of them and choose Extract from the context menu as shown in Figure 2.11. Figure 2.11. Extracting the Setup Manager files for use. 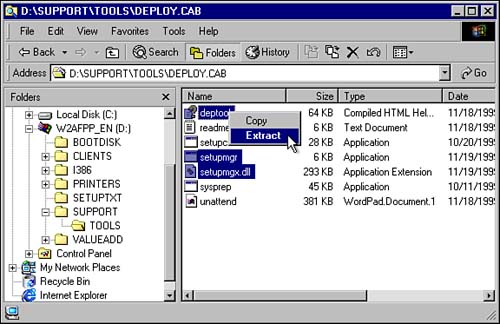 -
When the Browse for Folder dialog box appears, browse to the location to which you want to extract the Setup Manager files (it is recommended that you use systemroot \system32, but that is not required). -
Create a shortcut to the setupmgr.exe file on the desktop and/or in the Start menu so that you can easily invoke it when required. When the Setup Manager is extracted and accessible, you can use it to create an answer file as discussed in the following steps.  | If you will be using the answer file to install multiple servers, you can use the combination of a single answer file and a single .udf file to avoid having to create an answer file for every machine you are going to install. This will be more apparent to you by the time you have finished the following steps. |
-
Start the Setup Manager Wizard. -
At the Welcome to the Windows 2000 Setup Manager Wizard screen click Next to continue. -
At the New or Existing Answer File screen, choose whether you want to create a new answer file, have the current computer's settings be the defaults for the wizard, or modify an existing answer file. In this example, we want to create a new answer file. Click Next to continue. -
At the Product to Install screen, choose the product that this answer file is designed to install. Your choices are Windows 2000 Unattended Install, Sysprep Install, and Remote Installation Services. Choose Windows 2000 Unattended Install and click Next. -
At the Platform screen, choose the product (Windows 2000 Professional or Windows 2000 Server) for which you are creating this answer file. This example is for Windows 2000 Server. After making your selection, click Next to continue. -
At the User Interaction Level screen shown in Figure 2.12, you will need to specify how much control the user will have over the installation process and how much interaction she will have. Your choices are fully described here: -
Provide Defaults The user will be prompted to review (and perhaps change) the information you provide. This gives the user a guide to follow but allows them to make changes in any area. -
Fully Automated The user will see (perhaps only briefly ) all the processes as they happen, but he or she will not be able to make any manual changes to the settings. -
Hide Pages The user may be prompted for information, but only where you do not provide answers to questions. This is useful where you want some of the answers to be predefined but not all of them. This choice provides standardization in some areas and flexibility in others. In instances where all the information on a setup page has been provided, the user does not see the page. -
Read Only You provide the answers to the questions, and the user will be prompted for information that you do not provide (just like the previous choice). However, pages that have been filled in will be displayed. Also, when pages are displayed, the user will be unable to modify those questions for which you provided answers. -
GUI Attended The text-based setup is completely automated, but the GUI setup must be attended by a user who can answer the questions. Figure 2.12. The User Interaction Level screen. 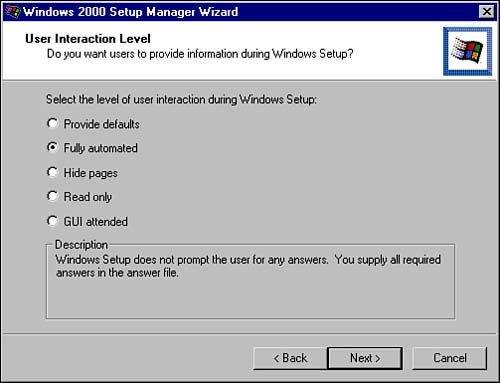 In this example, we assume you want to create a fully automated setup. Choose Fully Automated and click Next to continue. -
At the License Agreement screen accept the licensing agreement by clicking the check box. Click Next to continue. -
At the Customize the Software screen, enter your name and the organization name and click Next to continue. -
If you selected Windows 2000 Server in step 5, the Licensing Mode screen will appear next. Select the licensing type and number of seats if you choose Per Server. Refer back to the "CD-ROMBased Installation" section for a discussion on licensing options. Click Next to continue. -
At the Computer Names screen, shown in Figure 2.13, enter the names of each of the computers on which you will perform the installation using this answer file. After you type each computer name, click the Add button. You can continue to do this until all your computer names have been added. You also have the option of importing the names from a text file by clicking the Import button. Either of these options are used to create the UDB file that creates customized installations for each of the computers on which you are using this answer file. You can also simply allow Windows 2000 to automatically generate unique names for each machine by selecting the Automatically Generate Computer Names Based on Organization Name check box. This generates names as discussed previously in the attended installation section. Click Next to continue after you have added the required computer names . Figure 2.13. The Computer Names screen. 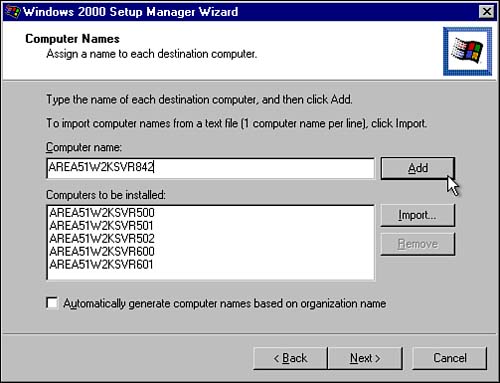 -
At the Administrator Password screen, provide a local administrator password for the computers you will be installing using this file. This password will be the same for each of the machines, so you may want to change them manually after the installation is complete. In addition to setting the password, you can also set the computer to automatically log on as the administrator. This option can be set to "auto" log on as many as 99 times before a user is prompted for a password. This feature not only allows for multiple automated logons as software is installed and the machine is restarted by the installation process, but it also allows for the security of passwords and manual logon once the allotted number of automatic occurrences is exceeded. Click the Next button when you are finished with this screen. -
At the Display Settings screen, choose the Colors, Screen Area, and Refresh Frequency that is appropriate for the computers you will install with this script. If they are all the same and you want to choose specific settings, do so. If they are not all the same, you want to leave the settings as the default to ensure that you do not try to set any machines to values they cannot handle. When you are done, click Next to continue. -
At the Network Settings screen, choose the type of network settings you want for each machine. If you choose Typical, each computer installed with this script will have the Microsoft Networking Client and TCP/IP with DHCP enabled. If you choose Custom, you will be prompted for the number of network adapters in each machine and you will be able to manually set networking properties (such as TCP/IP properties, additional clients , and so on) for each adapter. When you are done, click Next to continue. -
At the Workgroup or Domain screen you can choose how these machines will participate in your network structurewhether in a workgroup or a domain. If you choose a domain, you enter the domain name and whether to create a computer account at installation time. If you wish to create a computer account, you need to provide the credentials of a user who is allowed to add computer accounts to Active Directory. When you are done, click Next to continue. -
At the Time Zone screen, choose the time zone that the machines will be in and click Next. If you have machines in more than one time zone, consider making an answer file for each time zone. -
At the Additional Settings screen, you can choose to add additional setup parameters to the basic answer file you are creating. If you choose Yes, proceed through the next seven steps. If you choose No, skip directly to step 24. After making your choice, click the Next button to continue. -
The first additional setting is the Telephony screen. In it, you can choose location information for telephony configuration on the target machines. If you leave the settings at Do Not Specify This Setting, those settings are not put into the answer file and the user is prompted to enter this information upon the first login. Click Next to continue. -
The second additional setting is the Regional Settings screen. Regional settings include such options as language settings, time locales, currency, numbers , and dates. Click Next to continue after making your selection. -
The third additional setting is the Languages screen. Windows 2000 allows for the installation of support for more than just the primary language. You can choose which of the available languages you want to install automatically. Select as many languages as you require, and then click Next. -
The fourth additional setting is the Browser and Shell Settings screen, shown in Figure 2.14. You can use the default settings, use an autoconfiguration script (created by the IE Administration Kit), or specify proxy and default home page settings. Specify the settings appropriate to your environment by selecting a radio button. If you do not choose to use the default settings, you can customize the choice you made using the Settings buttons . When you finish, click Next to continue. Figure 2.14. Customizing the browser and shell settings. 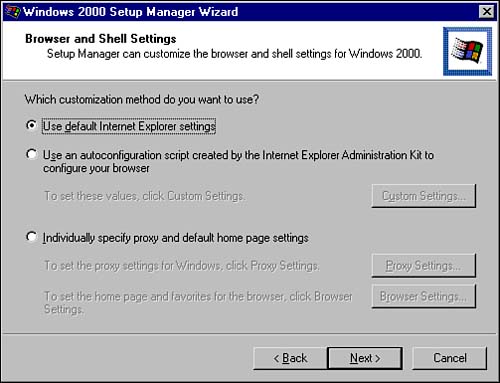 -
The fifth additional setting is the Installation Folder screen. In it, you can specify the location for the installation folder. You can install into the default location of WINNT, have the system create a unique name, or specify the folder name yourself. Click Next to continue. -
The sixth additional setting is the Install Printers screen. Here you can configure which printers the destination machines should be connected to. The first time a user logs on to on of these computers the network printers you configure here will be attached, provided that the user login has access to the printers. Click Next to continue. -
The final additional setting is the Run Once screen. On this screen, you can specify any commands you want to run after the installation has completed. These are most often setup files for installing software. You can use the Move Up and Move Down buttons to change the order in which these commands are executed. When you finish, click Next to continue. -
On the Distribution Folder screen, you choose whether to create a distribution folder. A distribution folder is a network share that contains the files you need for the automated installation. If you do not choose to create a distribution folder, you have to provide the CD-ROM at each installation point. Follow steps 2530 only if you choose to create or modify a distribution folder by choosing Yes. Make your choice and click Next. If you chose No, skip to step 31. -
If you choose to use a distribution folder, the Distribution Folder Name screen appears, prompting you for the path and share name of the folder you want to create or modify. Whether you choose to create or modify a distribution folder, you have to provide the path and the share name for it. Click Next to continue. -
On the Provide Additional Mass Storage Drivers screen, you can provide the locations for drivers that need to be installed but are not part of the Windows 2000 Server driver set. This setting is used to install drivers for devices such as hardware RAID controllers. By specifying these drivers, you not only modify the script to install them, but you also modify the distribution folder to include these drivers. Click Next to continue. -
On the Hardware Abstraction Layer screen, you can specify a new HAL to replace the default one. This is typically used by an OEM retailer who provides Windows 2000 Server with non-standard hardware that requires additional code not supplied in the Microsoft HAL. By using this setting, you can substitute your custom HAL when installing Windows 2000 Server on these non-standard client machines. Click Next to continue. -
On the Additional Commands screen, you can specify the execution of additional setup or configuration routines. Because no user will be logged on when they run, these must be routines that can run in that state. If you were creating an integrated installation set that included hot fixes, this would be the place where you would want to call out a script executing the hot fixes and the Qchain.exe command. Click Next to continue. -
On the OEM Branding screen, you can specify logos and backgrounds for the installation process. These are displayed while the automated installation is taking place. Click Next to continue. -
On the Additional Files or Folders screen, you can indicate additional files or folders that are to be placed onto the target computers at installation time. This may be data, programs, or other special files that are required on the target computers. You can indicate where these files are to be placed by selecting a particular folder in the provided tree and then clicking the Add Files button. Click Next to continue. -
On the Answer File Name screen, shown in Figure 2.15, you can indicate the name and path of the answer file to be created from the responses you gave. This screen also indicates that if you specified more than one computer name (in step 10), a .udf file would be created. This .udf file (uniqueness database file) contains the computer-specific information for each machine you specified. The path you indicate must exist at this point; the wizard will not create it. When you are done, click Next to continue. Figure 2.15. The Answer File Name screen. 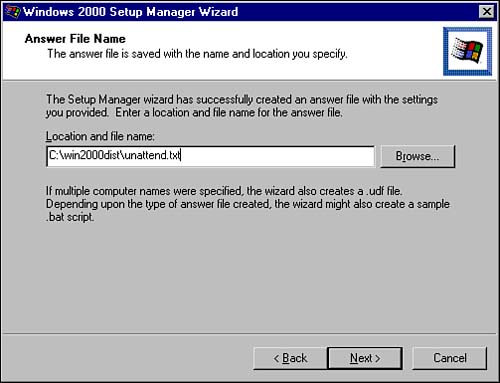 -
On the Location of Setup Files screen, you indicate the location where the setup files are stored. This is used to create your distribution folder. You can specify the CD or a local or network location. Click Next to continue. -
When the Setup Manager Wizard finishes copying files, click Next to continue. -
When the Completing the Windows 2000 Setup Manager Wizard screen appears, note the files it has created. Click Finish to exit. The following is a sample of an answer file (answer.txt), which could have been created using a text editor: ;SetupMgrTag [Data] AutoPartition=1 MsDosInitiated="0" UnattendedInstall="Yes" [Unattended] UnattendMode=FullUnattended OemSkipEula=Yes OemPreinstall=Yes TargetPath=\WINNT [GuiUnattended] AdminPassword=password OEMSkipRegional=1 TimeZone=35 OemSkipWelcome=1 [UserData] FullName="Authorized User" OrgName="Area 51 Partners" ComputerName=* [LicenseFilePrintData] AutoMode=PerServer AutoUsers=100 [TapiLocation] CountryCode=1 Dialing=Tone AreaCode=757 LongDistanceAccess="9" [SetupMgr] ComputerName0=AREA51W2KSVR500 ComputerName1=AREA51W2KSVR501 ComputerName2=AREA51W2KSVR502 ComputerName3=AREA51W2KSVR600 ComputerName4=AREA51W2KSVR601 ComputerName5=AREA51W2KSVR842 DistFolder=C:\win2000dist DistShare=win2000dist [GuiRunOnce] Command0="rundll32 printui.dll,PrintUIEntry /in /n \AREA51W2KSVR042\HPLASERJET2200" Command1="rundll32 printui.dll,PrintUIEntry /in /n \AREA51W2KSVR042\HPLASERJET2200_2" [Identification] JoinWorkgroup=AREA51LABS [Networking] InstallDefaultComponents=Yes If you study the preceding file, you will notice that the sections (headed by titles in square brackets) roughly correspond to the screens where you filled in answers in the Setup Manager Wizard. | | Notice that the CD-key is not included in the answer file created by the Setup Manager. You can include the CD-key in your answer file to completely automate it by adding this line of code to the [UserData] heading: ProductID=xxxxx-xxxxx-xxxxx-xxxxx-xxxxx So, in the example answer file shown, the [UserData] section would look like this: [UserData] ProductID=xxxxx-xxxxx-xxxxx-xxxxx-xxxxx FullName="Authorized User" OrgName="Area 51 Partners" ComputerName=* |
The unattended.udf file was created because a number of computer names were entered in the wizard. The .udf file will look something like this: ;SetupMgrTag [UniqueIds] AREA51W2KSVR500=UserData AREA51W2KSVR501=UserData AREA51W2KSVR502=UserData AREA51W2KSVR600=UserData AREA51W2KSVR601=UserData AREA51W2KSVR842=UserData [AREA51W2KSVR500:UserData] ComputerName=AREA51W2KSVR500 [AREA51W2KSVR501:UserData] ComputerName=AREA51W2KSVR501 [AREA51W2KSVR502:UserData] ComputerName=AREA51W2KSVR502 [AREA51W2KSVR600:UserData] ComputerName=AREA51W2KSVR600 [AREA51W2KSVR601:UserData] ComputerName=AREA51W2KSVR601 [AREA51W2KSVR842:UserData] ComputerName=AREA51W2KSVR842 | | You absolutely must know the difference between an answer file and a .udf (uniqueness database file) and their functions before taking this exam. |
The structure of a .udf file is like that shown previously. It begins with a set of computer names under the heading [Uniqueids]. What follows is a section for each computer, with the heading [computername:UserData], and under that is the unique variable name (such as ComputerName) and the value associated with that. With the answer files created, your task is simply to invoke the setup routine, indicating which answer file to use. This task is covered as the first topic in the next section. Installing Windows 2000 Server Using an Answer File Unlike attended installation procedures, unattended installations do not use the Setup.exe program. Instead, they use either winnt.exe or winnt32.exe to complete the installation. Recall that winnt.exe is for 16-bit operating systems such as MS-DOS and Windows 3. x , while winnt32.exe is for 32-bit operating systemsWindows 95 and later. Although you can use winnt.exe and winnt32.exe to initiate an attended installation, the true power of these programs lies in the fact that their behavior can be modified using various command-line switches as part of their execution syntax. Table 2.2 provides a brief explanation of the switches available for use with both winnt.exe and winnt32.exe. Table 2.2. Switches for WINNT and WINNT32 | WINNT | WINNT32 | Function | | /a | N/A | Enables accessibility options. | | /e: command | /cmd: command | Executes a command before the final phase of Setup. | | /i: inf_file | N/A | Specifies the name of the setup information file. | | /r: folder | /copydir: folder | Specifies an optional folder to be installed in the system root directory. | | /rx: folder | /copysource: folder | Specifies an optional folder to be copied, used for installations, and then deleted when the installation is done. | | /s: path | /s: path | Specifies the location of the installation files for Windows 2000 Server. You can specify up to eight sources to speed up (and load balance) the file copy process. The first source must be valid or the installation will fail. | | /t: drive | /tempdrive: drive | Specifies the location that the temporary installation files can be copied to and the location where Windows 2000 will be installed (this becomes the Boot partition). | | /u: file | /unattend:[ num ]:[ file ] | Specifies the location of the answer file for unattended installations and the number of seconds to wait between copying the files and restarting the computer. | | /udf: file | /udf: id , file | Specifies the location of the uniqueness database file for unattended installations. ID is the identifier within the UDF that defines the unique installation options for this computer. | | N/A | /cmdcons | Specifies that files required for command-line repair console be installed. | | N/A | /debug level: file | Creates a log file when conditions of certain severity occur during installation. The default level is 2 (warning). | | N/A | /syspart: drive | Copies files to a hard drive and marks it as active. Used to begin installation to a hard drive, which will then be relocated to another machine (its permanent home). | | N/A | /checkupgradeonly | Checks your computer to see if it can be upgraded to Windows 2000. This option does not actually perform an installation; instead, it creates a log file (winnt32.log for NT or upgrade.txt for Windows 9x), indicating the results of an upgrade. | | | You absolutely must know the switches for winnt.exe and winnt32.exe and their functions before taking this exam. |
Having seen the previous table and the process for creating answer and .udf files, you are now ready for an example of how they would actually be used. Suppose you wanted to create a batch file for the installation of a server called AREA51W2KSVR601 from the sample answer file and .udf file shown earlier. Your batch file would look like this: net use z: \AREA51W2KSVR042\win2000dist z:\winnt /s:q: /u:z:\answer.txt /udf: AREA51W2KSVR601,z:\answer.udf This code supposes that the installation is being done from an MS-DOS machine with network connectivity. Also note that the share win2000dist on the server AREA51W2KSVR042 was the specified location used in previous examples for both the answer file and the distribution filesyours will vary slightly depending on where you choose to store the files. Although creating unattended installations using scripts is a very popular method, many people have found other methods to be quicker and more efficient. The next section deals with disk duplication as an installation technique. Unattended Installations Using Disk Duplication Disk duplication , the process by which the entire hard drive of one machine is duplicated to the hard drive of another, is not a new concept. People have been doing it in one form or another for years , using third-party products. The idea that you can configure a machine completely (right down to all the application software you want), copy the information to a second disk, and then simply move the disk to a target machine is very appealing. The following disk duplication process formalizes the steps for creating a duplicate hard drive and allows for automated setup using the Sysprep.exe program. Sysprep, like the Setup Manager, is a tool stored in the deploy.cab file. It is recommended that you extract the Sysprep files from this cabinet file into a folder called Sysprep, as outlined in the following steps. -
From the Windows 2000 Server CD-ROM, navigate to the Support\Tools folder and double-click the Deploy.cab file. -
Select the files sysprep.exe, setupcl.exe, and deptool.chm; right-click one of them and choose Extract from the context menu. -
When the Browse for Folder dialog box appears, browse to the location to which you want to extract the Setup Manager files (it is recommended that you use bootpartition \sysprep, but it is not required). The role of Sysprep.exe is to prepare a disk for duplication. Once the disk has been prepared, a third-party tool can be used to copy the duplicated drive onto other machines. Sysprep.exe, which is run from the Tools Management Console or from a command line, configures the disk image so that SIDs and other unique information are removed and ready to be re-created on the target machine. This ensures that no conflicts arise in interaction with other machines that have the same SID. The following steps describe the process to duplicate the master computer (the computer you are using as a model for your disk duplicates): -
Install and configure Windows 2000 on the master computer. -
Log on to the computer as Administrator. -
Install and configure all applications on the master computer. -
Run Sysprep.exe on the master computer to prepare that hard disk for duplication. -
Use a disk-imaging tool on it to create an image of the master computer's hard drive. You need to use a third-party tool such as Norton's Ghost for this step. -
Create a copy of the target drive using your third-party duplication tool. Place the duplicated disk into the target computer. When the image has been transferred to a target machine, that machine is then restarted and a Mini-Setup Wizard is run to complete the setup on that computer. One of the problems in disk duplication in the past has occurred when the information on the target machine needed to be different from that on the source machine (for example, Security IdentifiersSIDsand computer names). Sysprep takes care of that and they are modified when the target machine is restarted. If you want to completely automate the process of creating new installations, you can have Sysprep create a Sysprep.inf file that provides answers to the setup routine that runs when the target machine is started after the disk image has been placed on it. This .inf file can make the installation completely automated (which is why this discussion falls under the topic of unattended installations). Using Sysprep.exe Table 2.3 outlines some additional parameters for Sysprep.exe that will allow you to control how it operates from a command line. Table 2.3. Switches for Sysprep.exe | Switch | Function | | -quiet | Runs the target computer's setup with no user interaction. | | -pnp | Forces full Plug and Play device enumeration and installation during Mini-Setup. Use only when you need to detect and install legacy devices that are not Plug and Play compatible. Do not use the -pnp switch on computers that have all Plug and Play devices because you will increase the time required for first-run experience without providing any additional benefits. | | -reboot | Restarts the configuration computer when Sysprep is complete rather than simply shutting it down. This will invoke the Setup program on the configuration computer and is used only when you want to verify that the setup program is going to function properly. | | -nosidgen | Prevents the regeneration of SIDs on the target computer. This is useful when you are transferring the contents of one machine to another for the purposes of decommissioning the original. The new machine then becomes an exact duplicate of the first. | | | You absolutely must know the Sysprep switches and their functions before taking this exam. |
If you want to completely automate the installation, you need to create a Sysprep.inf file. This file is similar in many ways to the answer file you created previously in this chapter and should be placed into a SYSPREP folder in the root of the hard disk that is being duplicated (on the source computer). You can create this file by using the Setup Manger Wizard and selecting that it is for a Sysprep installation. When the setup program runs on the target computer, it checks for this file and uses it if it's present.  |