| Attended installations of Windows 2000 Server are the most common installation performed, and thus will be our starting point for looking at installing Windows 2000 Server. Attended installations are those that are performed with a human sitting at the computer manually supplying required information (answers) during the course of the installation process. This is directly opposite of an unattended installation , which we will examine later in this chapter, which uses a script (an answer file) to provide the required installation information. There are four ways to perform an attended installation: -
Boot from the Windows 2000 CD-ROM. -
Boot with a set of Windows 2000 setup disks and then install from the Windows 2000 CD-ROM. -
Boot to a current 32-bit operating system and manually invoke the setup routine using winnt32.exe. -
Boot to a current 16-bit operating system and manually invoke the setup routine using winnt.exe. The end result will be the same no matter which method you use. In addition, the majority of the installation will follow the same steps, with only the installation initiation method varying.  | If you want to fully repartition your hard drive, you must boot from the CD-ROM or setup boot disks; otherwise , you cannot delete the partition that has the temporary setup files. |
CD-ROMBased Installation If you have a computer whose BIOS supports booting from a CD-ROM, you can install Windows 2000 Server without a previous operating system on your hard drive and without requiring network support. To do so, configure your computer to boot to the CD-ROM in the BIOS and then perform the following steps: -
Insert the Windows 2000 CD-ROM into the drive and boot your computer. After you have confirmed that you want to boot to your CD-ROM, Setup will begin and start copying files. After a short time, you will see the Welcome to Setup screen, as shown in Figure 2.1, which prompts you to choose what Setup will do next . Figure 2.1. Starting the Windows 2000 Server Setup. 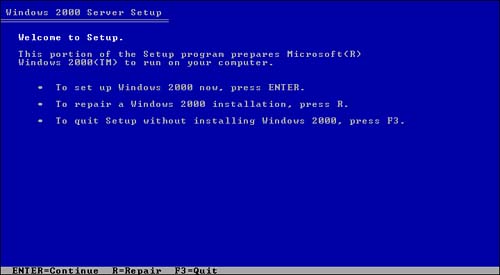 -
As prompted in Figure 2.1, press Enter to start the setup of Windows 2000 Server. -
Press F8 when the licensing agreement is displayed to continue on. You cannot install Windows 2000 without accepting the licensing agreement. -
If your computer currently has no formatted volumes , you are presented with the screen shown in Figure 2.2. If you are prompted with this screen, press C to continue. Figure 2.2. The new hard disk warning. 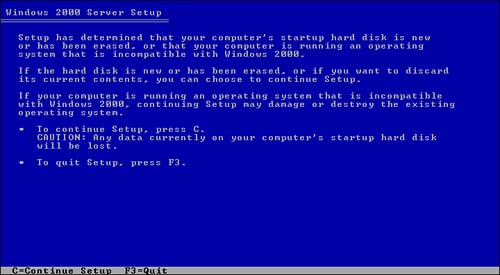 -
You are prompted to choose the partition (or to create a new one) on which Windows 2000 Server should be installed as shown in Figure 2.3. If you create a new partition, you see this screen after creation is complete. Select the partition onto which Windows 2000 Server will be installed and press Enter to continue. Figure 2.3. Select a partition to install on or create a new one. 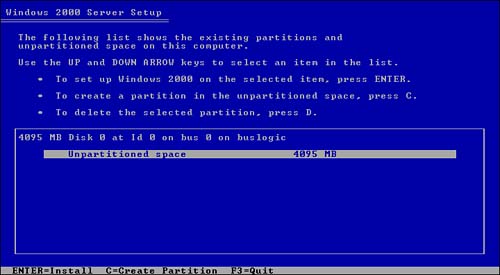 -
If the partition you chose was not already formatted, you will be prompted to format with either NTFS or FAT file system, as shown in Figure 2.4. If you format with the FAT file system and the partition is larger than 2GB, Setup formats it with FAT32; otherwise, it is formatted with FAT16. If the partition was already formatted, you see a slightly different dialog that allows you to choose to leave the partition formatted as is, format it using either NTFS or FAT, or convert it from its existing format to NTFS (this preserves any data already on the partition). Make your selection and press Enter to continue. Figure 2.4. Format your partition. 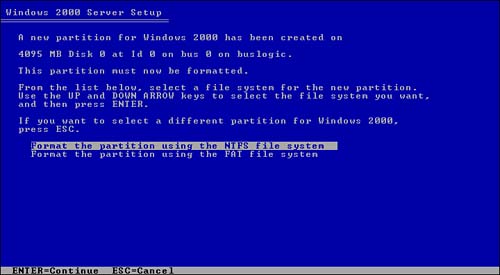 -
Setup copies files onto the hard drive and reboots the system in preparation for the GUI part of the setup. -
Once Setup has restarted your computer, you are presented with a screen prompting you to click Next to continue with system information gathering. You can click the Next button; however, if you do not do so after about 30 seconds, the device installation begins anyway. Setup spends some time locating and installing your system's hardware devices. Your screen may flicker during this process and the process may take several minutes, so be patient. -
When the Regional Settings screen appears, as shown in Figure 2.5, you will have the option of changing the system and user locales (the computer's location that dictates how currency, numbers , and dates appear) and the keyboard layout. If you want, you can change either of these by clicking the Customize button for either (or both) and choosing a different country location. If you do not customize these settings, the locales will be set to English (United States), and the keyboard will be configured as US. Click Next to continue. Figure 2.5. Selecting the regional settings and keyboard layout. 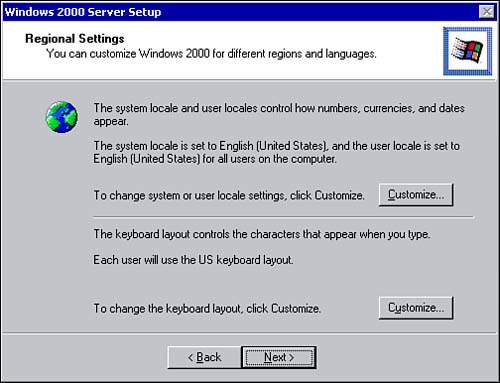 -
On the Personalize Your Software screen, enter your name and the name of your company or organization. You must supply an entry for the Name field. Setup cannot continue until you have typed something into the Name field. Click Next to continue. -
On the Your Product Key screen, enter the 25-character product key that is located on the CD case or certificate of authenticity for your Windows 2000 Server CD. Click Next to continue. -
The Licensing Modes screen allows you to indicate what type of licenses you own for this server (see Figure 2.6). Your choices are Per Server and Per Seat. By default, Per Server is chosen with five Client Access Licenses (CALs) selected; however, you can change either of those settings. Figure 2.6. Select either Per Server (and the number of concurrent connections) or Per Seat licensing. 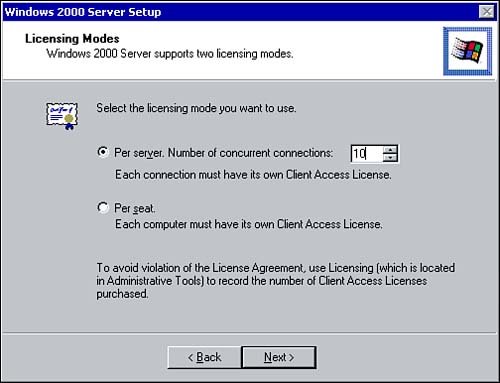 Licensing Options To know what choice to make in the Licensing Modes screen, you must first understand the available licensing modes. Per Server mode is a connection-based licensing model. In it, you purchase one license for every connection made to a specific server. If you have 1 server and 10 users could possibly connect to it at any one time, you would purchase 10 CALs. If a single user makes a connection to two different servers at the same time, that user will be using a CAL on each of the servers at the same time. In other words, two licenses would be required for a single workstation. That scenario is where the Per Seat mode comes in. Per Seat licensing licenses a user to make connections to all servers. Instead of monitoring the total number of connections made, all that really matters is the number of users making those connections. If you have 5 servers and 25 users and each user could make a connection to each of the servers, you would need only 25 CALs with Per Seat licensing. With Per Server licensing, you would need 125 licenses to provide the same licensed access. The rule on licensing is that if the number of possible connections made by your users is larger than the number of users you have, you should be looking at Per Seat licensing. In addition, Per Server is an effective model for use in organizations or departments with only one server. In cases where the same group of users is connecting to more than one server, it is usually best to consider Per Seat licensing. A simple way to remember these licensing concepts is as follows : Per Server = Any Seat (client) to one server and Per Seat = Any Seat (client) to any server. | -
The next screen is the Computer Name and Administrator Password dialog box as shown in Figure 2.7. Enter the computer name (as governed by your organization's naming conventions) and the password for the built-in Local Administrator account. By default, the computer name is generated from the first seven letters of the previously entered company name, followed by a hyphen and seven random alphanumeric characters. Ensure that your password conforms to good security standards; in other words, it should contain seven or more characters, include upper and lowercase characters , should be a combination of letters and numbers, and should not be any readily anticipated word or name from your personal or business life (like the name of your children, pets, or business) or any word from the dictionary. Having completed these fields, click Next to continue. Figure 2.7. Enter a computer name and a password for the local Administrator account. 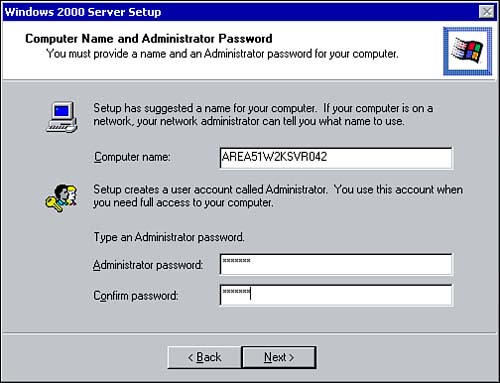 -
The next screen is the Windows 2000 Components screen, shown in Figure 2.8. You can select any optional components to install at this time. After making your selections, click Next to continue. Figure 2.8. Select any optional Windows 2000 components to install at this time (these components can be added later if desired). 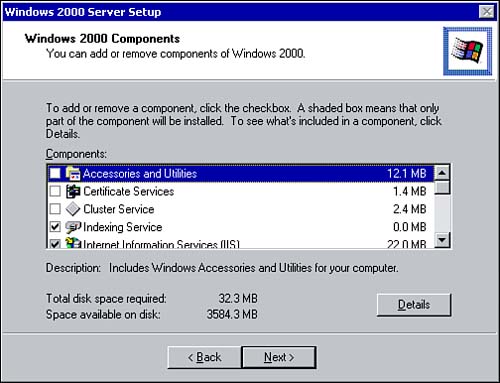 -
If you have a modem installed in your server, the Modem Dialing Information dialog box appears. You must provide at least a country of origin and an area code to proceed to the next screen. Click Next to continue. -
In the Date and Time Settings dialog box, you are prompted for the current date and time as well as the time zone you are currently in (and whether you observe Daylight Savings Time in your location). Click Next to continue. At this point, networking settings are detected , and networking components are installed. -
In the Networking Settings dialog box, you are prompted to configure the machine's networking components. If you choose Typical (the default), the Client for Microsoft Networks is installed, as is File and Print Sharing and TCP/IP with the DHCP (automatic address configuration) service enabled. If you choose Custom , you can manually add new clients (such as a NetWare client), services, or protocols (such as NWLink or NetBEUI). In addition, you can also manually configure TCP/IP to use static addressing. The options displayed differ depending on the options you chose during the network components section (for example, NetWare protocols are automatically added if Novell Services is selected). -
In the Workgroup or Computer Domain screen, you can configure what kind of a network group this computer belongs to, as shown in Figure 2.9. If you choose No, This Computer Is Not on a Network, you need to type the name of the this server's workgroup name in the text box provided. If this server is part of a domain, you need to provide this server's domain name. When you click Next, if you have decided to join a domain, you are prompted for the name and password of a user in that domain who has sufficient rights to create computer accounts (see following note). If you do not have this information available, to continue you have to make the computer a member of a workgroup, and then you can join the domain later. Figure 2.9. Choose the kind of network membership this server will have (Domain or Workgroup). 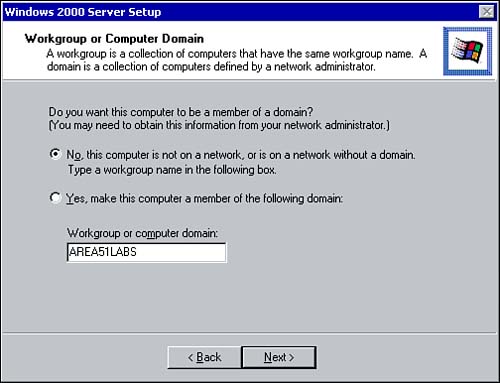 | | When a computer joins a domain it means that it becomes part of the domain structure. It also means that users logging in at the server's console will have the option of providing domain login credentials or local computer login credentials. To join a domain, either a computer account must exist in Active Directory or it must be created at the time the server is installed. This computer account is independent of any user and simply indicates that a specific (Windows 2000) computer will allow users to log in to the domain from it. This computer account provides authentication of the computer in the Active Directory. To create such an account, a user must have that right assigned to his user account. |
-
After the domain membership has been established (if joining a domain) or after the previous step (if in a workgroup), the Installing Components dialog box appears, and Setup installs all the components that have been requested thus far in the process. -
Finally, the Performing Final Tasks dialog box appears, and the final configuration of your server is completed. These steps may take a long time to complete, so be patient. -
When the Completing the Windows 2000 Setup Wizard dialog box appears, remove the CD-ROM from your drive and click Finish to restart your server. Installing with the Setup Disks and a CD-ROM If you have a machine with no current operating system on it that will not boot from a CD-ROM, you must use the setup disk method. The Windows 2000 setup disks are a set of four disks that perform the actions carried out by booting from the Windows 2000 CD-ROM during the initial file copying process, before Setup actually begins. After you have made the disks, you boot from the first one and progress through all four, at which point you are prompted to insert the CD-ROM in the CD-ROM drive, and the installation continues from that point using the CD. The disks are created using either MAKEBOOT.exe or MAKEBT32.exe, both of which are found in the BOOTDISK folder on your Windows 2000 Server CD-ROM. Both programs do the same thing, however, the "32" version is designed to be run under 32-bit operating systems, whereas the other is designed to be run under 16-bit operating systems, such as DOS and Windows 3.1. The process to create the Windows 2000 setup disks is as follows: -
From any operating system from which you can access a CD-ROM, navigate to the BOOTDISK folder on the Windows 2000 Server CD-ROM. -
If you are using a 16-bit operating system, run MAKEBOOT.exe; if your are using a 32-bit operating system, run MAKEBT32.exe. See Figure 2.10 for an example. Figure 2.10. You can create a Setup disk set using the MAKEBOOT or MAKEBT32 utility. 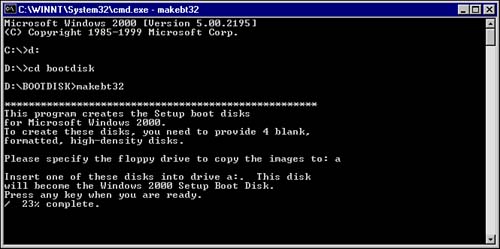 -
When prompted, type the letter of your floppy drive. -
Insert a blank disk (labeled Windows 2000 Setup Boot Disk) into the floppy drive and press Enter. -
When prompted, insert another blank disk (labeled Windows 2000 Setup Disk #2 ) into the floppy drive and press Enter. -
When prompted, insert a third blank disk (labeled Windows 2000 Setup Disk #3 ) into the floppy drive and press Enter. -
When prompted, insert a fourth blank disk (labeled Windows 2000 Setup Disk #4 ) into the floppy drive and press Enter. -
Remove the final disk and place them in a safe place for use later. After you have created a set of setup disks, you can begin the process of installing Windows 2000 Server by performing the following steps: -
Insert the disk labeled Windows 2000 Setup Boot Disk into your floppy drive and boot your computer. -
When prompted, insert the disk labeled Windows 2000 Server Setup Disk #2 and press Enter. -
When prompted, insert the disk labeled Windows 2000 Server Setup Disk #3 and press Enter. -
When prompted, insert the disk labeled Windows 2000 Server Setup Disk #4 and press Enter. Eventually you will see the screen shown previously in Figure 2.1. -
Continue using the remaining installation steps (starting at Step 2) as detailed previously in the "CD-ROMBased Installation" section. Installing by Manually Invoking WINNT32.EXE If a 32-bit Microsoft operating system is installed on the target installation computer, you can simply run setup.exe from the Windows 2000 Server CD-ROM after first booting the machine into the operating system that is already installed. If CD-ROM Autorun is enabled on your system, inserting the Windows 2000 Server CD-ROM into the drive also invokes setup.exe. Alternatively, you can invoke the program winnt32.exe, which is found on the CD-ROM in the I386 folder. In addition, if you have network connectivity, you can connect to a share point on another computer that has the Windows 2000 Server files on it, or in that computer's shared CD-ROM drive with the Windows 2000 Server CD in it, and run setup.exe or winnt32.exe from there. After you begin the Setup process, it progresses as previously discussed. Installing by Manually Invoking WINNT.EXE If you have MS-DOS or Windows 3.x installed on the target computer, you have two choices to complete the Windows 2000 installation. If you have a CD-ROM drive in that machine and the appropriate drivers to access it from DOS, you can use winnt.exe to begin the installation after first booting the machine into DOS. If you do not have access to a local CD-ROM but you have a networking client installed on the installation machine, you can connect to a network share to which the Windows 2000 Server CD has been copied , or connect to a computer's shared CD-ROM drive with the Windows 2000 Server CD in it, and use winnt.exe to begin the installation. To begin the installation from DOS, follow these steps. -
At a DOS prompt, type SMARTDRV and press Enter. This loads the SmartDrive program, which greatly reduces the time it takes to copy files from the CD-ROM. -
Insert your Windows 2000 CD into the CD-ROM drive and change to that drive letter using the DOS CD command. -
Navigate to the I386 folder on the CD and type WINNT . This starts the Setup program. -
When prompted, enter the location of the I386 directory you just navigated to and press Enter to continue. The file copying process commences. -
When prompted, press Enter to reboot your computer to continue the setup process. -
Continue using the remaining installation steps (starting at Step 8) as detailed previously in the "CD-ROMBased Installation" section. Although attended installations are common, there may be times when a number of similar servers need to be installed. To do that, an unattended installation is preferable. The next section describes that method of installation.  |