Suppose that you're on vacation. You've been taking photos like there's no tomorrow, and your digital camera's memory card is filling up fast. You're only three days into a two-week road trip. What do you do? Buy more memory cards? Pack a laptop and download all the photos to it every time you fill up the card? If you have an iPod 5G or an iPod photo, there's no need: For $29, you can get the iPod Camera Connector, a little white adapter from Apple that lets you empty your camera directly into the iPod whenever the camera gets full. The iPod stores the photos in their full resolution from the camera and uses the same internal format as the camera's memory card so that you can download the photos from the iPod into your computer when you get home. Meanwhile, while you're on the road, you can use the iPod to review each day's batch of photos, on its own color screen or on a TV. (See  Display Your Photos on a TV.)
If you have an iPod photo, you must have at least version 1.1 of the iPod photo software to use the iPod Camera Connector. Visit http://www.apple.com/ipod/download/ to download the latest updater, and see  Update Your iPod's Software for instructions.
The iPod Camera Connector does not work with the iPod nano or with any iPod that has a monochrome screen.
The iPod Camera Connector has the drawback of using up your iPod's battery power very quickly. It's a good idea to keep the iPod near a source of recharging power (the AC adapter or a computer to which you can attach the iPod using the Dock or cable) if you plan to use the Camera Connector a lot.
This site contains troubleshooting information that helps you determine whether your digital camera model will work with the iPod Camera Connector.
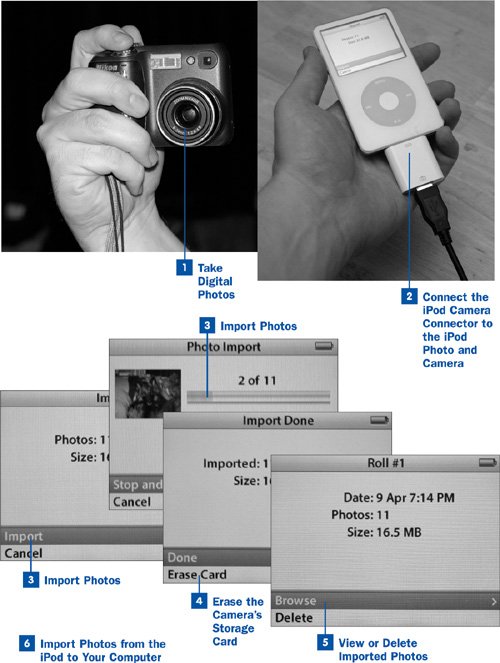
 Take Digital Photos
Take pictures using your digital camera. Fill up the internal memory card, being aware of how much capacity it has and how much free space is available on your iPod. Remember that you can't delete music or photos from the iPod without a computer to connect it to, so you can't adjust how much space is available while you're away from home. Be sure to leave plenty of space on your iPod for all your photos!
Tip
Be sure to carry the camera's USB connection cable with you. The iPod Camera Connector has a standard USB port to connect to the camera, the same as on a computer, but different models of cameras use different kinds of USB cables with their own styles of connector on the camera end. You won't be likely to find a compatible spare in an emergency, and without one, you won't be able to download your photos.
 Connect the iPod Camera Connector to the iPod Photo and Camera
Plug the iPod Camera Connector into the iPod's Dock connector (the logo on the connector facing front). The iPod immediately switches to an Import screen that says there's nothing to import.
Plug the camera's USB cable into the camera and into the other end of the iPod Camera Connector. The camera should go into its natural "importing" mode, the same as when you connect it to your computer. The iPod, meanwhile, reports how many photos there are to import along with their collective size.
 Import Photos
On the iPod's Import screen, highlight Import and press Select. The photos are transferred from the camera to the iPod, each one displayed as a thumbnail icon as it is copied to the iPod's disk. This process takes several minutes, especially if your camera's card is full. The transfer rate, you will notice, is considerably slower than the usual rate at which your photos download to your computer from your camera.
Tip
At any time during import, you can select Stop and Save to interrupt the process and preserve all the photos transferred so far, or you can select Cancel to delete everything transferred up to this point.
 Erase the Camera's Storage Card
At the end of the import process, you're given the option to erase the transferred photos from the camera's memory card; highlight Erase Card and press Select to do this. If you don't want to erase the photos from the camera's memory card, select Done instead.
 View or Delete Imported Photos
The photos you imported are available from a screen called Photo Import, found on the Photos screen above your Photo Library and albums. Inside this screen is the option to import more photos (if you select this option, return to Step 2) or to view an album called Roll #1. (The album's name is followed by the number of pictures in that album.) When you select this album, you're shown statistics about it, such as the number of photos in it and the date it was imported. If you select Browse from this screen, you will view the album as you would any other, as described in  Carry and View Your Mac or PC's Digital Photos and Slideshows on an iPod.
The statistics screen also has a Delete option. You can use this option to delete the entire album from your iPod. This can be useful if you're using the iPod 5G's large screen for quick proofing of photos on the road and you don't want to permanently take up space on the iPod's disk with photos that you will eventually import directly from the camera to your computer, or if you don't like any of the shots in the album.
As you import more "rolls of film" from your camera, each roll or album is added to the list: Roll #2, Roll #3, and so on.
 Import Photos from the iPod to Your Computer
When you finally get home from your trek, you'll want to move the fullresolution photos from the iPod into your favorite photo organizer application (iPhoto for Mac users, or Adobe Album or Adobe Photoshop Elements for Windowsalthough any software that imports photos from a digital camera will work). After you've loaded photos onto the iPod from your camera, the iPod acts like a digital camera when it's connected to your computer. Your photo software will think it's another camera and download the photos from it accordingly.
Connect the iPod to the computer using the Dock or cable. After the iPod syncs with iTunes, launch your photo organizer application and import the photos as you normally do from your camera. Be sure to erase the "camera's" contents (using the photo organizer's mechanism for doing so) when you're done transferring! Doing so ensures that your iPod's disk regains its free space.
Notes
You might have to set up the iPod as an external hard disk for the photo software to recognize it as a camera-like device. See  Use Your iPod as an External Hard Disk for more information, and remember to unmount the iPod from your computer when you're done transferring photos.
If you can't get your photo software to download the photos automatically, set up the iPod as a hard disk and navigate into its DCIM folder to copy the photos manually from it to your computer.
 Before You Begin
 See Also