VPN Services in FreeBSD: IPSec
| VPN services in FreeBSD are conducted using IPSec, or IP Security. The IPSec protocol is routed like IP, but it contains a payload that's encrypted and authenticated. This payload needs to be decrypted by the machine at the other end using the key exchanged during the tunnel-setup procedure. IPSec is an industry-standard protocol that has been supported in FreeBSD for some time as the result of the work of the KAME project (www.kame.net). It is not built into the default FreeBSD kernel; however, you can enable it easily by building a new kernel. Tip The techniques in this chapter describe setting up a VPN using the built-in IPSec functionality in FreeBSD. An alternative VPN infrastructure, using SSL instead of IPSec and boasting a more straightforward configuration, is OpenVPN, available in the ports or packages (in the security category), and with a website at http://openvpn.net/. Try OpenVPN if your company's VPN architecture supports SSL, or if you will be in control of both ends of the tunnel and can specify that the VPN should use SSL instead of IPSec or PPTP. Note, though, that OpenVPN cannot interoperate with an IPSec or PPTP tunnel. There are third-party tools available to allow FreeBSD to work with a PPTP tunnel if that's what your company uses. Try pptpclient, in the net category of the ports or packages, and refer to http://www.freebsddiary.org/pptp.php for a how-to guide. A popular VPN solution used by many companies is the Cisco 3000 Series Concentrator, which uses a proprietary protocol and a software client that isn't available for FreeBSD. Instead, use vpnc, a Cisco-compatible VPN client available in the security category of the ports or packages. Preparing Your SystemTo add IPSec support to your FreeBSD kernel, you'll need to add the following three options lines to your kernel configuration file (consult Chapter 18, "Kernel Configuration," for details on modifying your kernel if you're unfamiliar with the process): options IPSEC #IP security options IPSEC_ESP #IP security (crypto; define w/ IPSEC) options IPSEC_DEBUG #debug for IP security Recompile your kernel and restart your system. With these kernel options added, your machine will have two internal databases you will have to know about when configuring IPSec:
These two databases can be manipulated using the setkey command, which is part of the FreeBSD system. You will next need to install racoon (note the spelling), which is a tool developed by KAME to facilitate the exchange of keys during the creation of an IPSec tunnel. The racoon program, which is a component of a project known as IPSec-tools, can be installed from the ports at /usr/ports/security/ipsec-tools. (Refer to Chapter 16, "Installing Additional Software," for more information on using the FreeBSD ports collection.) The purpose of racoon, as far as basic VPN setup is concerned, is to automatically manipulate the SAD and create a VPN tunnel upon startup of the computer. In order to set up your tunnel, you will need the following few pieces of information:
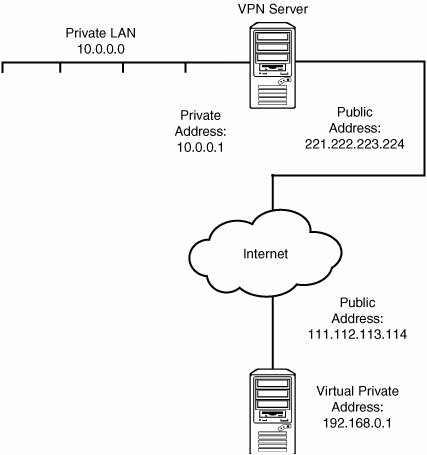
The most important piece to remember is the shared key; this will have to be agreed upon in advance by you and the administrator of the remote VPN server. The shared key is stored in the file /usr/local/etc/racoon/psk.txt, which does not exist in the default racoon installation. This file contains line-by-line pairs of peer IP addresses and their respective shared keys; a file located at /usr/local/share/examples/ipsec-tools/psk.txt contains sample lines to show you the required format. Create the directory /usr/local/etc/racoon, and then create your own psk.txt file in that directory and add to it the following line, where IP-address is the address of the remote VPN server and shared-key is the shared key agreed upon by you and the administrator of the server: IP-address shared-keyIn other words, if the server's IP address is 221.222.223.224 and the shared key is "somesecurestring," you would add the following line: 221.222.223.224 somesecurestringNote The two fields in the shared key line you add to your psk.txt file can be separated by either tabs or spaces, as is the case with most configuration files. Next, make the psk.txt file secure by giving it a permissions mode of 600 (readable only by the owner) and ensuring that it's owned by root; otherwise, racoon will refuse to read the file: # chmod 600 /usr/local/etc/racoon/psk.txt # chown root /usr/local/etc/racoon/psk.txt Finally, create racoon's configuration file by copying /usr/local/share/examples/ipsec-tools/racoon.conf to /usr/local/etc/racoon/racoon.conf; then make a couple of modifications to ensure smooth operation over the Internet WAN. Change the lifetime time and lifetime byte fields, specified in the sainfo anonymous block, to 36000 secs and 50000 KB, respectively. (Add the lines if they are not present in the default configuration.) Note There are several sample variants of the racoon.conf file inside /usr/local/share/examples/ipsec-tools; these include sample configurations for GSSAPI (Kerberos) authentication, NAT Traversal topologies, and PlainRSA keys (as used in SWAN networks). There is also a roadwarrior subdirectory that contains sample configurations for a static server and a roaming client (for example, a laptop using unpredictable dynamic IP addresses). When you are done, the block should look like this: sainfo anonymous { pfs_group 2; lifetime time 36000 sec; lifetime byte 50000 KB; encryption_algorithm 3des; authentication_algorithm hmac_sha1; compression_algorithm deflate ; }Also, add the lifetime 50000 KB line to the corresponding point in the remote anonymous block: remote anonymous { ... nonce_size 16; lifetime time 1 min; lifetime byte 50000 KB; initial_contact on; support_mip6 on; ... }Connecting to a FreeBSD VPN ServerIt may be that you are fortunate enough to have another FreeBSD machine as the server for your VPN connection. If this is the case, you can set up both machines in the same way, with their racoon configurations mirroring each other. However, racoon only works if you have set up the SPD and SAD using the /etc/ipsec.conf file, which does not exist by default. First, enable the reading of that file at startup time by adding an override line to /etc/rc.conf: ipsec_enable="YES"Also, you will need to add the gif0 virtual interface to your available network interfaces and configure it according to the local and remote IP addresses so that the kernel can route tunneled traffic to the proper destination. Add a gif_interfaces line in /etc/rc.conf like this: gif_interfaces="gif0"IPSec in FreeBSD works as shown in Figure 31.5. Each VPN peer machine has two network interfaces. On the server side, one of the interfaces is "private" and on the same LAN as the address-translated private network to which you want to connect, and the other is the "public" IP address in the untranslated address space. On your local machine, which only has one physical Ethernet card, your private IP address is really just an internal "dummy" address because your machine isn't routing any traffic except to itself. However, the gif0 device needs the private address in order to route properly. You will need to bind both your public and private addresses to your single Ethernet card. Figure 31.5. Each of the peer machines in the VPN connection has a "public" and a "private" IP address. The private address on the local machine is a dummy address bound to the same card as the public address. Suppose that your machine's IP address in the public space is 111.112.113.114 and that this address is already bound to your fxp0 card. You can create a virtual address of 192.168.0.1 for use with the IPSec tunnel. Add the following line to /etc/rc.conf immediately after the line that configures the card: ifconfig_fxp0_alias0="inet 192.168.0.1 netmask 255.255.0.0"Furthermore, suppose that the remote VPN server's public IP address is 221.222.223.224 and that this server manages the internal, private Class A network 10.0.0.0, on which its own private IP address is 10.0.0.1. You now can configure the local machine's gif0 device by adding the following lines to /etc/rc.conf: ifconfig_gif0="inet 192.168.0.1 10.0.0.1 netmask 255.0.0.0"This line tells FreeBSD to assign the virtual private address 192.168.0.1 to the gif0 interface and connect it to the remote private address 10.0.0.1 at the other end. gifconfig_gif0="111.112.113.114 221.222.223.224"This line creates the "public" side of the connection, directing traffic from your public address 111.112.113.144 to the public address of the VPN server, 221.222.223.224. Finally, create /etc/ipsec.conf and add the following lines to it: flush; spdflush; spdadd 192.168.0.1/32 10.0.0.0/8 any -P out ipsec esp/tunnel/111.112.113.114-221.222.223.224/require; spdadd 10.0.0.0/8 192.168.0.1/32 any -P in ipsec esp/tunnel/221.222.223.224-111.112.113.114/require; The spdadd lines are what control the SPD and assign the rules for what traffic FreeBSD should encrypt. Note that there are two such rule lines, and they're mirror images of each other; this is because you're creating a virtual routing mechanism, and routers must be bidirectional. The first spdadd line applies to all traffic originating from your machine's private network (192.168.0.1, with a CIDR mask of /32, making the network synonymous with your single IP address) and destined for the remote private LAN (10.0.0.0, a Class A network). It specifies that all traffic matching that pattern should be routed across the tunnel between the two public addresses, 111.112.113.114 and 221.222.223.224. Tip Classless Inter-Domain Routing (CIDR) is a network mask notation. A CIDR mask of /32 describes a network that matches all 32 bits of the given IP address (a netmask of 255.255.255.255), or in other words, that given machine only. A CIDR mask of /8 means the mask is only 8 bits long, or 255.0.0.0, which describes a Class A network. Replace these numbers with the addresses that are correct for your configuration; make sure to set up the second line as a mirror image, as shown here. Restart the machine to ensure that all the configuration items are read properly and cleanly. Note A remote FreeBSD VPN server will likely be configured similarly to your own machine, using /etc/ipsec.conf and racoon. However, it is critical that it have its own configuration rules that mirror those on your own machine. The remote FreeBSD VPN server must be configured to send encrypted traffic to your machine through its own gif0 interface. Add (or have the remote machine's administrator add) the appropriate spdadd lines, which would be the same as the ones shown here. The lines are symmetrical, so if you reverse the numbers, they turn out to be the same set of lines as on your local machine, except for the in and out tags: spdadd 10.0.0.0/8 192.168.0.1/32 any -P out ipsec esp/tunnel/221.222.223.224-111.112.113.114/require; spdadd 192.168.0.1/32 10.0.0.0/8 any -P in ipsec esp/tunnel/111.112.113.114-221.222.223.224/require; Now that the kernel is set up to use the gif0 virtual interface, there's only one thing left to do: You must run racoon, which monitors outgoing flows and sets up the appropriate key exchange. This process happens transparently and may cause a slight delay in the first few packets you send. When you installed racoon, it created a startup script in /usr/local/etc/rc.d. This script automatically starts racoon at boot time. However, if you need to start racoon while the machine is already running, you can do so by invoking the script with the start parameter: # /usr/local/etc/rc.d/racoon.sh startTry sending a ping to a machine on the remote private network (for example, ping 10.1.1.10). If you get a reply, your VPN tunnel is up and running! Connecting to a Windows 2000 VPN ServerMost of the time the remote VPN server will not be a FreeBSD machine. It's far more likely these days to be a Windows 2000/2003 server. However, this should not present a problem; with a few tweaks to racoon.conf on your end, you should be able to connect to a corporate Windows server seamlessly. The first thing to note is that a Windows server assigns identifier addresses dynamically; therefore, in the remote anonymous block, comment out the whole set of lines beginning with my_identifier: #my_identifier address; #my_identifier user_fqdn "sakane@kame.net"; #peers_identifier user_fqdn "sakane@kame.net"; #certificate_type x509 "mycert" "mypriv"; Next, change the proposal sub-block to list the encryption and checksum methods preferred by Windows 2000: proposal { encryption_algorithm 3des; hash_algorithm md5; authentication_method pre_shared_key ; dh_group 2 ; }Finally, go down into the sainfo anonymous block and alter it to match the following: sainfo anonymous { pfs_group 2; lifetime time 36000 sec; lifetime byte 50000 KB; encryption_algorithm 3des,des,cast128,blowfish ; authentication_algorithm hmac_sha1,hmac_md5; compression_algorithm deflate; }Now, you must do some configuration on the Windows end. The following instructions are for a Windows 2000 server; Windows Server 2003 configuration might be slightly different.
|