Creating the Disk Labels
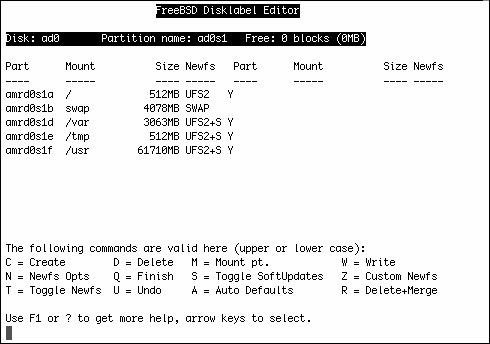
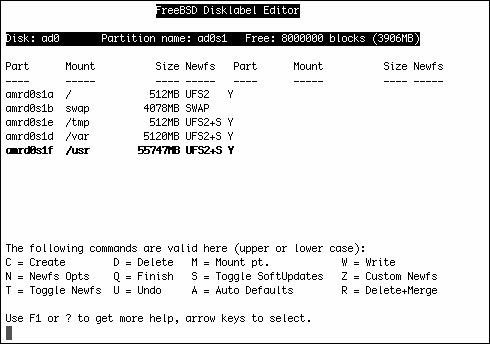
| The disk is now sliced and has been made FreeBSD-friendly, but it still isn't formattedyou can't use it in your system yet. You do that next, in the Disk Label Editor. Still in Sysinstall, select Label ("The Disk Label Editor"). You'll again be asked to select from the list of installed disks; use the spacebar to select ad1. You're presented with the Disk Label Editor screen, a visual interface to the command-line disklabel command. This is where you assign the BSD partitions and format the disk. Caution FreeBSD's Disk Label Editor doesn't allow you to resize existing BSD partitions. A partition can't be modified without reformatting it and losing its data, and FIPS (as discussed in Chapter 3, "Advanced Installation Tasks") can't operate on BSD partitions, so consider carefully what your partitions will be used for before you commit your changes! Creating a Complete FreeBSD Partition LayoutIf you're just adding a new disk to the system, skip ahead to the "Adding a New Disk" section. This section of the chapter, however, demonstrates how to use the Disk Label Editor to assign BSD partitions and mount points for a complete FreeBSD system, including a root partition, /usr and /var partitions, and a swap partition. This is useful if you're going to be installing FreeBSD onto the new disk, (for example if you're replacing your current disk with a larger one). Press A to apply the Auto Defaults settings. This automatically allocates a set of partitions that are appropriate for most systems, choosing sizes for the various partitions that are appropriate to the size of the disk and the amount of RAM installed in your system (see Figure 20.4). You can probably go with the defaults if you plan to use your FreeBSD system as a workstation or a small server with only a few users. Figure 20.4. The Disk Label Editor, after using the "Auto Defaults" option. However, these defaults will often turn out to be woefully inadequate for a high-profile server. Mail and log files both live in the /var partition; if you have 100 users all storing their mail spools on the server, or if your web server generates hundreds of megabytes of log files every week, the default /var size might not be sufficient for your needs (although modern versions of FreeBSD create /var partitions of 1GB or more if the disk space is available). You might want to allocate some more space to /var; this gives you an excellent excuse to experience some of the more flexible workings of the Disk Label Editor. First, delete both the /var and /usr partitions. (Remember, nothing is actually done to the disk itself until you press W to write changes; right now you're just setting up the configuration for it to write.) Delete these two partitions by selecting each of them and pressing D. Now, scroll back up to the top of the screen, where the Free: field shows all the space you've recovered by deleting these two partitions. You can now reallocate that space as you see fit. With the selector bar on the Partition name: ad1s1 line, press C to create a new partition. You are given a dialog asking how much space to dedicate to the new partition. Let's give /var 2GB; that should be enough for a medium-sized server. (Give it an even higher number if you want to be really safe.) Assign this by deleting the number displayed and entering 5g or 5120m. In the next dialog, select FS to create a filesystem instead of a swap partition. You're then asked for the mount point for the new partition; enter /var. The partition is created and added to the list, and the Free: space listed at the top is updated accordingly. Now you can repeat the process, this time accepting the default size for the remaining partition (to use all the rest of the space on the disk) and entering /usr for the mount point. (You may need to reduce the number slightly before it will accept it.) The resulting list will be similar to Figure 20.5. Figure 20.5. A customized partition layout. Note that in the default layout, /var, /tmp, and /usr have the Soft Updates data-integrity protection system turned on (learn more about Soft Updates in "Journaling Filesystems and Soft Updates," in Chapter 12). A filesystem that has Soft Updates turned on is denoted by UFS+S; you can toggle this setting on and off with the S key. Soft Updates are advisable for filesystems with lots of data that changes frequently; /var is therefore a good candidate, as is /usr. Adding a New DiskYou can create up to eight BSD partitions on your new disk. Don't use the A option if you're simply creating more space to add to your current system; instead, with the Partition name: ad1s1 line selected, press C to create a new partition. If you want to make one big BSD partition out of the disk (for example, if you want to add all 80GB to /home), accept the default value for the size of the partitionthe entire available capacity of the slice you're in. Alternatively, you might choose to specify a size (such as 20G) for one partition and allocate the rest to another partition. It's up to you how to carve up the space. When prompted, select FS to create a filesystem rather than swap space and then specify a mount point. FreeBSD 5.0 and later will attempt to automount the new filesystem at the mount point you specify. This means that you should specify the mount point carefully so that the proper entry in /etc/fstab can be made and the disk can be mounted cleanly after the disk-labeling process is concluded. Note Prior to FreeBSD 5.0, what you enter as a mount point isn't really important in adding new disks to the system; you can just make something up, such as /blah. The mount point only specifies what will be written into /etc/fstab for the new filesystem that will be associated with this partition, and this does not happen in earlier versions of FreeBSD unless you're doing the initial system installation. You can continue creating partitions this way until the available space is all consumed. Delete a partition by selecting it and pressing D. Remember, the disk itself is not touched by any of these operations; no changes are written until you press W. Note There is an effective limit of four working BSD partitions that you can create in the Disk Label Editor. If you create more than four partitions, the "reserved" partition names will be used, beginning with a and b; c will be skipped because it has a specific reserved meaning. Beyond d, however, a "dummy" label of X will be used, and you won't be able to use the partition properly. Writing Changes and Formatting the DiskFormatting disks in FreeBSD is done with the newfs command, another command-line utility that is handled automatically by the front-end in Sysinstall. Each filesystem in the list that has a Y in the Newfs column will be formatted when you commit changes. You can toggle this on and off with the T key. Take a good look at the partition labels that the editor is assigning. These are listed under the Part column at the far left; you'll notice that no matter how you set up your partitions, the a through d partitions are reserved for special uses. The first partition you can create yourself is e. This means that your new mountable partitions, if you're adding space to the existing system, are named ad1s1e, ad1s1f, and so on. You'll need to remember these labels for when you mount the filesystems. When you're happy with the partition layout, press W to write the changes. The disk is partitioned, and newfs processes are fired off to format each partition you've specified. When the partitioning is completed, press Q to exit and then quit Sysinstall. |