Partitioning a Hard Disk
| Okaynow that all the background is out of the way, it's time to get down to the action. Adding a new disk to the system involves four steps: installing it, partitioning it, labeling it, and mounting it. Depending on whether you've gone with a SCSI or IDE disk, the installation procedure varies; use the installation instructions that come with the disk. The following examples assume you've installed a new 80GB IDE disk as the primary slave. The device name is /dev/ad1. (You can learn more about FreeBSD filesystem structure, device names, and mount points in Chapter 12.) A SCSI disk in a similar configuration would be /dev/da1; the rest of the instructions here apply just the same.) As you learned earlier, there's a lot more to a typical disk device name; the extensions beyond the initial ad1 specify additional partitioning and sub-partitioning information. This is how you refer to specific parts of a disk that you've separated for different useseither so you can run more than one operating system from the same disk or so you can keep different parts of your system separate so they won't steal storage space from each other. BIOS Partitions (Slices)Every operating system allows you to partition your disk. The thing to remember about FreeBSD, though, is that it allows not one but two levels of partitioning. First come the BIOS partitions, addressed directly by the system BIOS in PC hardware; you can have up to four of these, which are what other operating systems think of as "partitions." If you partition your Windows, MS-DOS, or Linux disk, each partition is one of these BIOS partitions. FreeBSD uses the term slices for these BIOS partitions, and it's important that you remember this terminology. When FreeBSD refers to partitions, it's talking about the second level of partitioning, which occurs within the slices. This second level contains what are properly known as the BSD partitions. BSD PartitionsThese BSD partitions are subpartitions that separate different parts of a FreeBSD system from one another/var, /usr, /home, and the like. Each partition has a single letter for a name, and there are eight BSD partitions available, shown in Table 20.2. When you divide a slice into BSD partitions, the first few letters are reserved for special uses, but the remaining ones (listed as "General use") are free for you to use in the system.
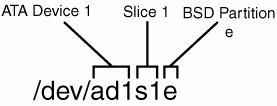
Figure 20.2 shows a fully specified device name. The first part (ad1) specifies the base device name. IDE/ATA disks can be ad0 through ad3 (primary master, primary slave, secondary master, and secondary slave). Next comes the slice name, whose numbers start at 1 (s1). Finally, comes the BSD partition name (e). Figure 20.2. Understanding a disk device name. Foreign Extended PartitionsSome other operating systems have constructs analogous to FreeBSD's partitions; for instance, Extended DOS Partitions provide a way to get subpartitions (logical partitions) into a DOS/Windows machine. Linux uses a functionally identical method. Extended DOS Partitions work by creating additional partitions in sequence beyond the first four, rather than hierarchically within the four primary ones. This method is in many ways more awkward than the FreeBSD solution. Interoperability between different operating systems can be fairly tricky because partitions within the Extended DOS Partitions scheme are treated by FreeBSD as additional slices on the same level as regular DOS partitions, but starting at slice 5 (after the four regular DOS partitions). To mount the second logical partition within an Extended DOS Partition on a disk installed as ad3, you would address /dev/ad3s6 rather than trying to use BSD-style partition names within a slice. Going the other direction is even trickier. You probably won't be able to mount a FreeBSD disk in a DOS/Windows system, but you may have to do something like that on a Linux machine. Linux treats its partitions (called slices in FreeBSD) the same way that FreeBSD treats them, meaning that they're labeled numerically and sequentially, rather than hierarchically. To mount a FreeBSD slice under Linux, use Table 20.3 (which describes a primary slave disk with FreeBSD in its third BIOS partition/slice) as an equivalency guide.
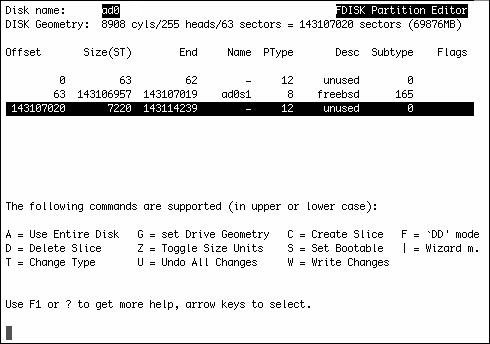
This mapping scheme is reliable only if you don't have any more Linux partitions after the FreeBSD slice! Always be aware of the peril of expanding a hierarchical structure into a sequential one. The Slice Editor (fdisk) in SysinstallThe first step in installing a new disk is to use the Slice Editor, fdisk, to define the disk's slices. To use the fdisk program, as root, enter the Sysinstall program and select Configure. Scroll down to the Fdisk option, labeled as The Disk Slice (PC-Style Partition) Editor. Selecting this option gives you a list of all the disks the system has detected. Make sure that ad1 (the primary slave, your new disk) is listed. If it isn't, the disk hasn't been installed properly. Tip If fdisk doesn't detect your installed disk, check the /var/run/dmesg.boot file to see whether the disk was detected at all when the machine booted; if it wasn't, check your cabling and the jumpers on the disk. Remember that if you only had a single disk on the primary IDE chain before you installed the new one, its jumpers were probably set to the Single position; make sure the primary disk's jumpers are set to Master and the new disk's jumpers to Slave. If your disk is listed, select it with the spacebar and enter the visual fdisk (fixed disk) editor. This utility exists in some form on every operating system because every PC hardwarebased operating system needs a way to control its BIOS partitions (slices). You can use fdisk directly from the command line, but its many options and potential pitfalls make it a better idea to use the more straightforward fdisk interface in Sysinstall. It's not especially wise to work without a net around such things as disk reformatting and repartitioning tools! Any preexisting partitions show up in the fdisk menu. A new, unformatted disk displays an essentially empty list of slices. You have a lot of flexibility in how you can handle these slices. If you really want to, you can do all your slicing here in this menu, setting up BIOS partitions for other operating systems or even for FreeBSD in the Linux or DOS style. In most cases, however, this is unnecessary. In general, you should select the A option for Use Entire Disk to produce the results shown in Figure 20.3. Don't worry about any of the other optionsthey're there for flexibility and compatibility. Figure 20.3. The Slice Editor, after you choose the Use Entire Disk option. At this point in the process, you have three entries: a small "reserved" space for the boot manager to be installed later, a single large FreeBSD slice (ad1s1), and a third "leftover" chunk of negligible space that could not be made part of the main slice. Nothing has yet been done to the disk. Select Q to quit the Slice Editor. You'll now be prompted for what kind of boot manager to install. If this is a secondary disk that you're adding to an already running system, select None. Install the FreeBSD Boot Manager (BootMgr) if you will be booting from this disk (if you're prepping this disk to be used in a new machine, for example) or to replace the existing disk in your current system. Otherwise, select Standard to do the equivalent of the DOS command fdisk /MBR, which removes operating systemspecific boot managers (such as Linux's LILO and FreeBSD's BootMgr) from the Master Boot Record and makes it available to other operating systems (for example, if you're reusing the disk to make a new Windows machine). Caution The Slice Editor has a Write Changes option: the W command. This should be used before quitting the Slice Editor if, and only if, you are modifying an existing disk setup. If you're installing FreeBSD for the first time, or if you're preparing a new disk for installation, just quit the Slice Editor and move on directly to the Disk Label Editor. The W option reiterates this warning if you use it. |