Section 3.1. System Cleaning
3.1. System CleaningDirt is the main enemy of PCs. Dirt blocks air flow, causing the system to run hotter and less reliably. Dirt acts as thermal insulation, causing components to overheat and thereby shortening their service lives. Dirt causes fans to run faster (and louder) as they attempt to keep the system cool. Dirt worms its way into connectors, increasing electrical resistance and reducing reliability. Dirt corrodes contact surfaces. Dirt is nasty stuff. Computers become dirty as a natural part of running. Fans suck dust, pet hair, and other contaminants into the case, where they rest on every surface. Even in clean rooms, operating theaters, and other very clean environments, a PC will eventually become dirty. If there's any dust in the air at all, the system fans will suck it in and deposit it inside the case, where it will become a problem sooner or later. The severity of the problem depends on the environment. Industrial environments are often filthy, so much so that standard PCs are unusable. In a shop-floor environment, we have seen standard PCs become so clogged with dirtliterally in one daythat they stopped running because of overheating. Typical home and office environments are much better, but still surprisingly bad. Pets, carpeting, cigarette smoking, gas or oil heatall of these contribute to dirty PCs. Routine weekly vacuuming of the case exterior helps, but is not sufficient. Figure 3-1 shows the back I/O panel of a PC that was left running 24 hours a day for 6 months in a typical residential environmentwhich happens to be our homewithout being cleaned other than casual vacuuming of the accessible areas of the case. (Barbara asked Robert to point out that she vacuums thoroughly and dusts every week, but that Robert specifically asked her to make no special effort to clean this system so that he could use it as an illustration.)
Figure 3-1. Rear I/O panel of a PC that has gone uncleaned for six months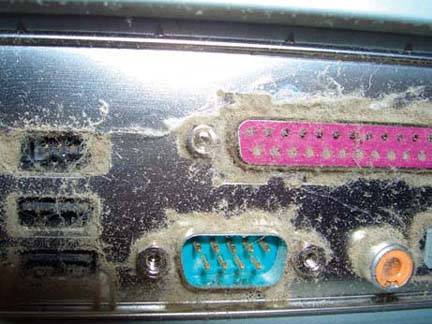 Figure 3-2. Front panel of a PC that has gone uncleaned for six months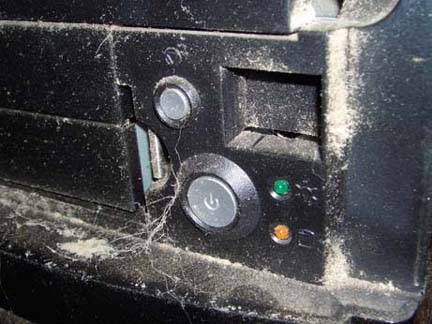 Six months without a thorough cleaning has left this system totally clogged with dust and pet hair. The purple LPT port at the upper right is stuffed with dust, as are the USB ports at the left. The front of the system is no better, as Figure 3-2 shows. Dust and dog hair has collected at every small gap through which air is drawn into the case. And yet, this systemwhich happens to be Robert's den systemdid not appear particularly dirty at first glance. The rear of the system was inaccessible and completely out of view. All of the dust and dog hair shown in Figure 3-2 was also invisible, concealed by a hinged door that closes over the drive bays and power switch area. Pulling the front bezel from the case reveals the built-in air filter shown in Figure 3-3. At first glance, it doesn't appear too bad. There's some dust accumulation, but the filter appears mostly clear. That's because the filter had accumulated so much dust that when we removed the front bezel the dust fell off in a pile, partially visible at the bottom of Figure 3-3. Figure 3-3. Built-in air filter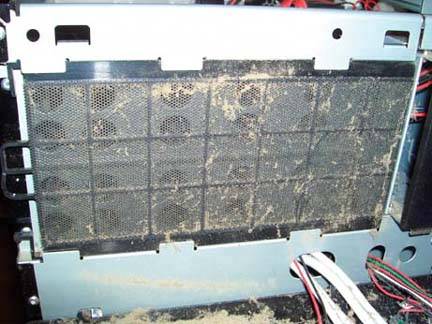 Routine vacuuming of the case exterior helps keep the dust down, but it's not a complete solution. Every few weeks to every few monthsdepending on how dirty your environment isyou'll need to do a more thorough job. To begin, vacuum the exterior surfaces of the case, if you haven't done so already, and if necessary use Windex, Fantastic, Formula 409, or a similar household cleaning solution to remove grease and other accumulations from the case exterior. Although you can get by with just a standard vacuum cleaner and a brush or two, it's easier to do the job properly if you have the right tools. Most computer stores sell vacuum attachments intended for use with PCs. These attachments are small enough to get in all the cracks and crevices, and the adapter that you use to connect them to your home vacuum is often designed to cut down the air flow to a level more appropriate for cleaning a PC. (We've used some vacuum cleaners that we actually feared might suck components off the motherboard.) Cleaning the exterior with a standard vacuum cleaner probably missed some dirt, so to begin the deep cleaning, connect your PC cleaning attachments and go to work. Begin with the rear of the system. Figure 3-4 shows one of these PC vacuum attachments, a small brush, being used to clean the rear I/O panel. (Don't be tempted to use a gas station air hose. The air from these hoses often contains water or oil from the compressor.) Figure 3-4. Using a vacuum attachment designed for cleaning PCs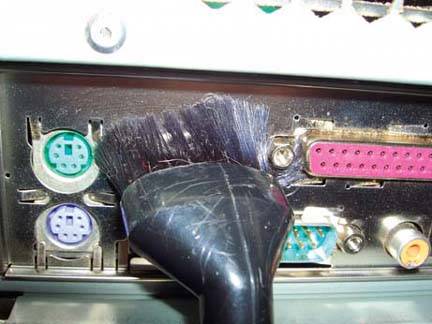 Chances are good that the power supply fan blades are filthy. Depending on the power supply, you may or may not be able to remove the grill that protects the fan blades. If you can remove the grill, do so. Otherwise, use a screwdriver or similar implement to hold the fan blades in place as you vacuum them, as shown in Figure 3-5. (If left free, the fan blades will simply spin in the air flow of the vacuum, making them impossible to clean.) If the vacuum isn't doing the job, use a brush with long bristles to knock the dust and grime off the fan blades and vacuum it up later. While you're cleaning the fan blades, try to position the system so that the gunk falls outward rather than into the body of the power supply. If there are areas of the fan blades you can't reach with the brush, try using "canned air" or zero-residue cleaner. Figure 3-5. Cleaning the power supply fan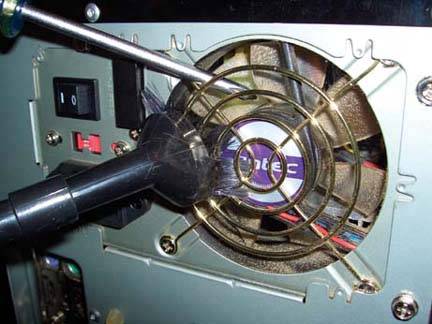 To clean a particularly filthy power supply, we sometimes remove it from the case and use an air compressor to blow it out. If you do that, make certain to prevent the fan blades from moving while the high-pressure air is striking them.
When you finish cleaning the back of the system, remove the side panel(s) from the case to expose the interior. Use the vacuum cleaner to remove the bulk of the dust from the floor of the case and other easily accessible areas. Use a brush to remove any large clumps of dust that are visible. (You'll need to revacuum these areas later, but removing most of the dust first makes it a lot more pleasant to work inside the case.) Most mini-tower and similar cases have a removable front bezel. Some front bezels attach to the chassis with screws, but most use plastic locking tabs. Many cases have a wire mesh air filter behind the front bezel that accumulates huge amounts of dust. Even if your case has no air filter, the area between the front bezel and the front of the chassis is a dust magnet, because that's where most of the air is drawn into the case. Pull the front bezel and use your vacuum cleaner to remove the dust, hair, and other grunge, as shown in Figure 3-6.
Figure 3-6. Vacuuming the front panel area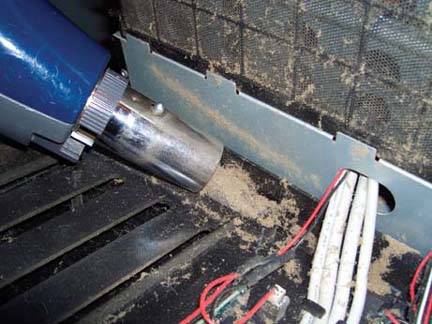 With the bulk of the dirt removed, you can begin cleaning the inside of the case. Work from the top down, so that any dust you dislodge falls onto areas you haven't yet cleaned. Assuming that you have the case lying flat on its side, motherboard at the bottom, the next step is to clean any supplemental case fans, as shown in Figure 3-7. Use a brush or the brush attachment of your vacuum to remove the dust and grime adhering to the fan blades, hub, and grill. Use your finger to prevent the fan blades from rotating as you clean them, and make sure to clean both sides of the fan blades and the hub. If necessary, remove the four screws that attach the fan to the case, and remove the entire fan for thorough cleaning.
Figure 3-7. Cleaning a supplemental case fan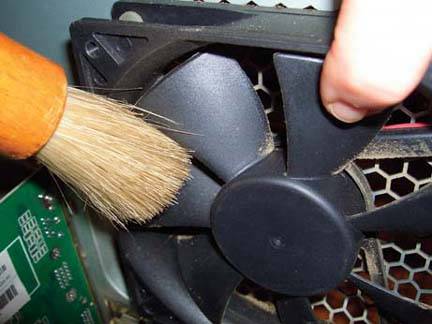 The power supply's internal grill, shown in Figure 3-8, is another area that accumulates a great deal of dirt. Nearly all modern power supplies use exhaust fans rather than intake fans, which means that air is drawn through the case and power supply before being exhausted from the rear of the power supply. Figure 3-8. Cleaning the power supply's internal grill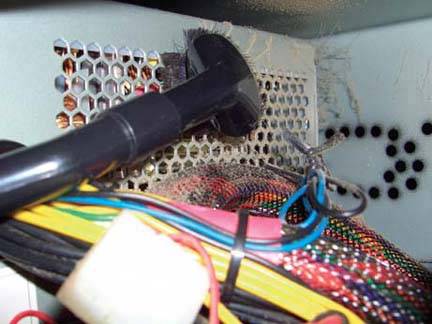 It's very important to keep this area clean, because blockage of the grill not only reduces general system cooling significantly, but may cause the power supply to run quite hot. That reduces the amount of amperage the power supply can provide, and may cause fluctuations in voltage regulation, both of which reduce system stability. Continue working your way down within the case. Clean the hard drive bays, as shown in Figure 3-9, the optical drive bays, any expansion cards, and the other areas of the case above the motherboard. Figure 3-9. Cleaning the hard drive bay area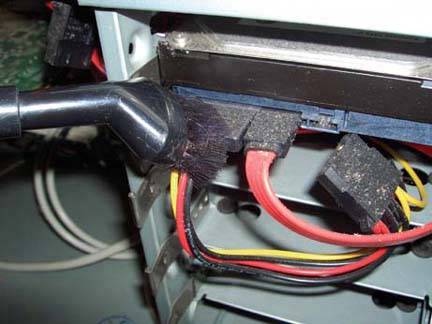 At this point, you have cleaned the system down to the motherboard level. There're probably some clumps of dust lying on the motherboard, so vacuum them up before proceeding. The next step is to clean the CPU cooling fan and heatsink. This is both the most important step in system cleaning and one of the most difficult. The heatsink/fan area accumulates dust readily because the fan moves a lot of dust-laden air through the closely spaced heatsink fins. As dust accumulates, it covers the blades of the heatsink, insulating them and thereby reducing their ability to radiate the heat produced by the processor. To compensate, the CPU cooling fan spins faster (and makes more noise) as it tries to draw enough air through the heatsink to cool the processor. Eventually, the air channels in the heatsink become completely clogged and the heatsink loses its ability to cool the processor. The processor begins running very hot, which can cause data corruption, system lock-ups, and even damage to the processor itself. To avoid such problems, it's important to keep the CPU cooler clean. To begin cleaning the CPU cooler, use a brush or vacuum cleaner to remove the muck from the top of the cooling fan, as shown in Figure 3-10. If necessary, use your finger or a small tool to prevent the fan blades from spinning as you clean them. Figure 3-10. Vacuuming the CPU cooling fan blades After the first pass with the vacuum cleaner or brush, the top of the cooling fan should be relatively clean. Looking through the fan blades, examine the heatsink carefully. You'll probably see a great deal of dirt clogging up the fins of the heatsink, as Figure 3-11 shows. If so, you're not finished yet. You have to get most (ideally, all) of that dust out from between the fins. Figure 3-11. Dust clogging the heatsink fins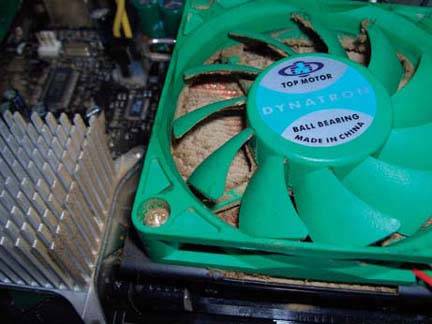 The quick, easy way to clean the heatsink fins is to use a can of compressed air, as shown in Figure 3-12, which you can also use to remove dirt from the underside of the fan blades. Figure 3-12. Using canned air to clean the heatsink fins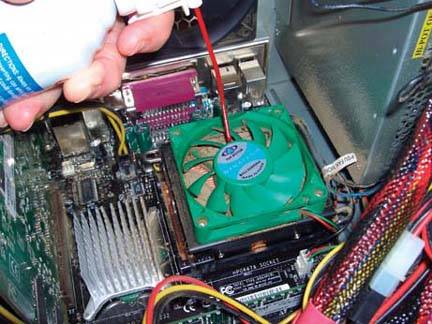 Unfortunately, canned air often isn't enough to do the job, particularly if the heatsink fins are completely clogged with dirt. If your heatsink is clogged badly, the only alternative may be to remove the fan from the heatsink so that you can get at the dirt. Some CPU coolers, including the one shown in Figure 3-13, allow you to remove the fan simply by removing the four screws that secure it to the heatsink body. If your CPU cooler has such a design, remove the screws, disconnect the fan power cable from the fan power header on the motherboard, and lift the fan away from the heatsink. Figure 3-13. Removing the screws that secure the CPU fan to the heatsink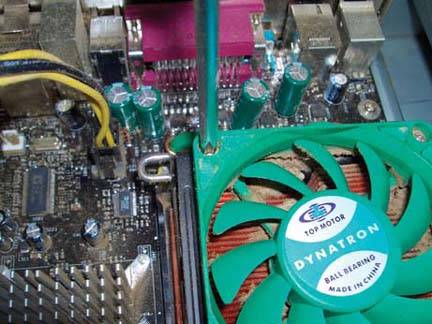 If the design of your CPU cooler doesn't have accessible screws, the only solution is to remove the entire CPU cooler for cleaning. Depending on the arrangement of your case, motherboard, and the clamping mechanism that secures the CPU cooler to the processor socket, you may have to remove the motherboard from the case in order to remove the CPU cooler without damaging anything. If so, refer to Chapter 4.
With the CPU fan removed, all or most of the heatsink body should be visible, as shown in Figure 3-14. Use a brush with long bristles to remove as much dust as possiblenot just from the top of the heatsink, but from between its fins. You'll probably scatter clumps of dust around while doing this. Vacuum them up before proceeding. Figure 3-14. Use a brush to remove most of the dust from the heatsink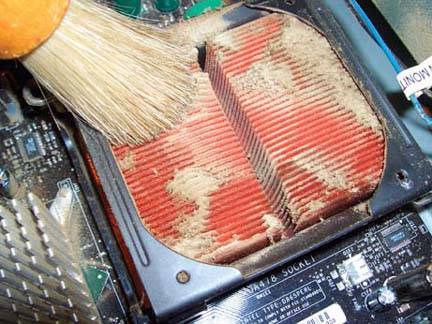 Once you've removed as much dust as possible with the brush and vacuum, used canned air to blow out the remaining dust and any bristles that came off the brush. If you smoke, or if you heat with gas or oil, you'll probably find that the heatsink fins are covered with a brown, greasy film. This film attracts and holds dust, so leaving it in place just means that your heatsink will clog up again that much faster. Remove the film by spraying zero-residue cleaner directly on the heatsink to dissolve and wash away the film. Figure 3-15 shows the heatsink after partial cleaning. The bright reddish areas are the naked copper of the heatsink after being flooded with propellant from the canned air. The darker brownish areas are still covered by the greasy film. Once you have the heatsink body thoroughly clean, clean the CPU fan itself and then reassemble the CPU cooler. (Make sure to install the fan right-side up, and don't forget to reconnect the CPU fan power cable to the CPU fan power header on the motherboard.) Figure 3-15. A partially cleaned heatsink, showing film accumulation If you want to do a complete job, remove all of the expansion cards and memory modules and vacuum out their slots thoroughly. Many expansion cards and memory modules use gold contacts, which do not oxidize. Some use contacts made of tin or other metals, however. Those are subject to oxidation, which can degrade the quality of the electrical connection. There's not much you can do to clean the inaccessible contacts in the slots other than drenching them down with contact cleaner, but you can at least clean the contacts on the expansion cards and memory modules directly. Some people use a soft, clean rubber eraser for cleaning contacts, but we think the best tool for that purpose is a fresh dollar bill, which has just the right abrasiveness to clean the contacts without damaging them. Simply rub the dollar bill briskly against the contacts, as shown in Figure 3-16. Figure 3-16. Polishing the contacts on an expansion card using a dollar bill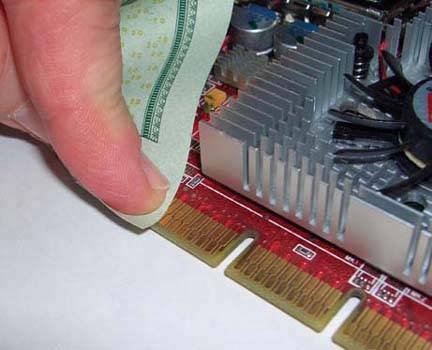 Do a final check to make sure that no dust remains inside the case. Check all of the cables to make sure you haven't left anything disconnected, and verify that all expansion cards and memory modules are fully seated. Once everything looks right, connect the keyboard, mouse, and monitor, and power up the system. If the system boots normally and all fans are running properly, reinstall all the panels. Depending on the dustiness of your environment, the system shouldn't require another thorough cleaning for another three to six months. If you have hardwood floors, don't smoke, heat with electricity or another clean fuel, and don't have pets, weekly vacuuming of the system exterior may suffice for another year or more.
|
EAN: 2147483647
Pages: 126