Building Paths
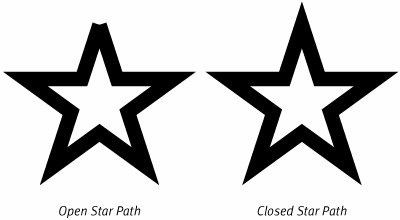
| Having discussed many of the properties of paths, it is time to examine the API that applications use to construct paths. If your application wants to create a stand-alone instance of a path using the Quartz 2D APIs, it can call the routine CGPathCreateMutable and keep track of the object returned using a variable of the CGMutablePathRef type. Once you've created an instance of CGPath, you can call methods of the class to construct the path it represents. It was mentioned in Chapter 4, "The Graphics Context," that the CGContext stores a path, called the current path, as part of its structure. The interface for the CGContext class contains many of the same methods for constructing a path that CGPath provides. These methods make changes to the current path implicitly. Although the methods are very similar to those found in the interface of the CGPath, you should watch the parameter lists carefully. The CGContext also maintains a transformation that is applied to the path as you build it. The CGPath methods accept the transformation as an additional parameter. If you are working with a Cocoa application you construct a path in an instance of NSBezierPath. The NSBezierPath class has methods that perform the same basic path construction that CGPath and the CGContexts do. The names are slightly different because they follow Cocoa naming conventions, but the basic behavior is the same. Within all of these interfaces, there are low-level routines that allow you to construct the path by directly adding individual curve segments, and there are higher-level routines that allow you to construct a path using complete shapes like lines, rectangles, and arcs. In every case the routine adds segments, or contours, to the path for you. We'll look at both the low-level and high-level routines in the following sections. Building from SegmentsWhen a path is first created, it is empty and it contains no points. You can empty the current path of a CGContext using the CGContextBeginPath routine. You can clear out an NSBezierPath using the removeAllPoints method. An empty path is a clean slate; it contains no points. From this staring point there are a number of fundamental operations from which paths are constructed. These fundamental operations are common to all the path construction interfaces. The actual routine names, and the parameters passed to them are slightly different but the fundamental operations are the same. A discussion of the operations is next, and then an examination of the differences in the methods follows. These path construction interfaces allow you to add both straight and curved segments to a path. As the routines add each segment, that segment's endpoint becomes the starting point for next segment. The endpoint of the last segment is called the current point of the path. The methods use the current point to start the segment and accept the other control points of the new segment as parameters. Move ToBecause the path starts out with no points, but the operations that add segments expect the path to have a current point. The first, fundamental operation for constructing a path, therefore, is the one that establishes a new starting point for the contour that follows. The path construction operation that does this is the Move To operation. The Move To operation takes a point in user space as a parameter. It begins a new contour at that point. The point you pass in also becomes the current point for the path. Because the operations that follow rely on the fact that the path has a current point, it is illegal to try and add a segment without first having established a current point using the Move To operation. Line ToThe Line To operation adds a straight line segment to the current path. This operation takes a single point as a parameter and adds a line segment from the current point of the path to the new point. The endpoint of the segment becomes the new current point for the path. Curve ToThe Curve To operation adds a cubic curve segment to the current path. You pass in three points. The segment starts with the current point of the path. The first parameter is the first BCP of the bezier segment. The second parameter is the BCP that corresponds with the endpoint of the segment. The last parameter, of course, is the endpoint itself. This last point becomes the current point of the path. Quad Curve ToTo add a quadratic curve segment, you use the Quad Curve To operation. This operation accepts two points, the first of these being the quadratic curve's BCP and the second point, the endpoint of the segment. As in the other fundamental operations, the endpoint becomes the current point of the path. Close SubpathThe final path primitive is Close Subpath. Subpath, in this case, is synonymous with contour. When closing a contour, if the endpoint does not match the starting point, the computer adds a line segment between them. The contour now forms a complete circuit and has no endpoint. In fact, after a close subpath operation, the path itself no longer has a current point. To begin a new contour, you start over with the Move To operation once again. The importance of properly closing a path cannot be overemphasized. There is a significant difference between a closed contour and a contour whose staring and ending points happen to coincide. Closing a contour can have a profound impact on the way that contour is drawn. For example, when stroking a path, the computer uses different techniques to draw the endpoints of the path than it uses to draw the joining points between segments of the path. If you don't close a path, the drawing may not look the way you expect it to. Figure 6.6 illustrates the kind of effect you might see if you do not close a path properly. Figure 6.6. The Effect of Closing a Stroked Star Path The star-shaped path in Figure 6.6 has a wide stroke applied to it. In both halves of the figure, the single contour of the path starts and ends at the apex of the star. The path on the left is an open path whose starting and ending points are at the same location. In contrast, the path on the right is closed. The two endpoints of the open path coincide but are not joined. The computer draws them as the ends of the segments. As a result, the apex of the star is missing. Contrast this with the figure on the right where the point at the top of the star is a joint between the first and last segments of the path. The computer draws this as a joint, instead of two end caps, and the star is complete. API DifferencesIt has already been mentioned that each of the path construction interfaces, CGContext, CGPath, and NSBezierPath, use the fundamental drawing operations just discussed to create their paths. There are, however, some slight differences in the APIs that are worth mentioning. The routines that perform the basic operations for a CGPath are CGPathMoveToPoint CGPathAddLineToPoint CGPathAddQuadCurveToPoint CGPathAddCurveToPoint CGPathCloseSubpath Where these basic operations call for points, the method calls accept the x and y components for the path instead. Each of the routines in CGPath that accept points also allow you to pass in a transformation. The computer will apply this transformation to the points before it adds the new segment to the path. The routines that construct the current path of a CGContext using segment operations are very similar: CGContextMoveToPoint CGContextAddLineToPoint CGContextAddQuadCurveToPoint CGContextAddCurveToPoint CGContextClosePath The CGContext itself already has a transformation associated with it, so these routines do not have the transformation parameter found in the CGPath interface. Other than that small change, however, the routines are very similar to those found in CGPath. Note that the Close Subpath operation is simply called ClosePath in the CGContext API. Its behavior, however, is the same. NSBezierPath extends the basic path construction interface just a bit. The fundamental routines are named moveToPoint: lineToPoint: curveToPoint:controlPoint1:controlPoint2: closePath
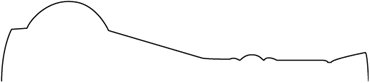
These routines accept NSPoints as parameters instead of using individual components. The routines also do not accept a transformation on the parameter list. Instead, you can construct an entire path and then use the transformUsingAffineTransform: method to change all the points of the path. In addition to the basic methods just mentioned, the NSBezierPath interface also contains the routines relativeMoveToPoint: relativeLineToPoint: relativeCurveToPoint:controlPoint1:controlPoint2: The names of these routines point out the operations they relate to. The difference between these and the previous routines is the way that the parameters are interpreted. Rather than treating the points as absolute locations in user space, the components of the paths are interpreted as component-wise offsets from the current point. You can achieve this same effect in the CGPath and CGContext APIs by retrieving the current point from the path (using CGPathGetCurrentPoint or CGContextGetPathCurrentPoint) and performing the addition yourself. Segment Construction Sample CodeConstructing paths using the segment routines is pretty straightforward. Nevertheless, it doesn't hurt to see at least one example of the APIs at work. This sample creates a path that is one-half of the silhouette of a fancy bottle. This image might be a small part of a larger image of a wizard's workshop. The image that this sample creates is not complex, but it does demonstrate the use of both straight and cubic curve segments. The bottle also contains some smooth transitions and some transitions that create sharp corners. The image is little more than a path that is stroked to make it visible. Figure 6.7 shows the path generated by the code sample. Figure 6.7. The Bottle Profile from the Code Sample Listing 6.1 presents the sample code that generates the bottle profile path. Listing 6.1. Routine to Generate the Bottle Profile Path
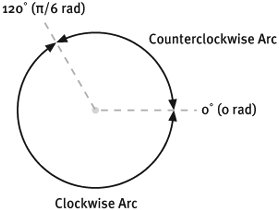
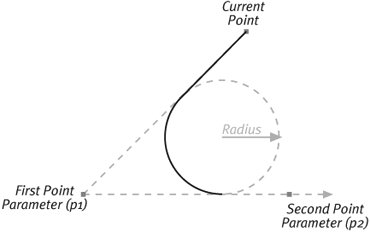
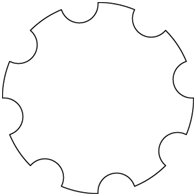
The code constructs the path from the right-hand side of Figure 6.7 to the left (the top of the bottle to the bottom). The locations of segment transitions are carefully placed to correspond to portions of the path that have sharp bends. The code demonstrates that even complex shapes can be built from simple curves and straight segments. Constructing Common ShapesThe segment construction APIs can create any path that Quartz 2D is capable of working with. There are, however, some basic shapes, like rectangles, that are pervasive in computer graphics. Quartz 2D provides a number of routines that make it easy for applications to construct paths for common shapes. These routines are built on top of the basic path construction APIs. They construct the shapes using one or more of the fundamental segment types and add the resulting contours to the path. This section explores the higher-level path construction routines and the services they provide. LinesIf you need to add a single line to the current path, you can simply use Move To and Line To in the API of your choice. If you need to add a long string of lines (sometimes called a polyline), you can use CGContextAddLines, CGPathAddLines, or the NSBezierPath method appendBezierPathWithPoints:count:. These routines are also convenient mechanisms for creating polygons and accept an array of points (and the number of points in the array). If the current path is empty, the routine simply creates a path consisting of line segments that connect the points in the path. If the path has a current point, however, the computer adds a line segment from the current point to the first point in the array and then appends the additional segments to the end of that. The computer will not close the path at the end, though you are welcome to do so yourself. RectanglesRectangles are a popular graphics primitive found in all but the most basic graphics libraries. In Quartz 2D, you could easily construct a rectangular path using line segments, but that practice would soon become very tedious. You can add an entire rectangular contour to a path using the Core Graphics methods CGContextAddRect and CGPathAddRect or with the NSBezierPath method appendBezierPathWithRect:. These routines add the rectangle just as if you had executed the segment construction methods to build them directly. If you are working through the Core Graphics APIs, you can use the routines CGContextAddRects and CGPathAddRects to build a large number of rectangular contours into the path at once. The routines accept C-style arrays of CGRect structures and add all of those rectangles to the path in one efficient routine call. NSBezierPath does not have the same functionality, but you could get the same effect by calling appendBezierPathWithRect: repeatedly. Ellipses (Ovals)If you want to add an elliptical contour to your path, you can use the Core Graphics routines CGContextAddEllipseInRect and CGPathAddEllipseInRect. NSBezierPath users can call the routine appendBezierPathWithOvalInRect:. The ellipse that you add is a complete, closed contour with a clockwise direction and is inscribed inside the rectangle you provide with the center of the ellipse coincident with the center of the rectangle. If you use a square instead, the routine will add a circular contour to the current path. Circular ArcsIf you don't want an entire circle, you can ask Quartz 2D to add a circular arc to your path. Quartz 2D offers two different techniques for specifying the shape of the circular arc you want to add. Each technique uses slightly different parameters, and you may find, based on the information you have on hand, that one technique makes it easier for you to add an arc than the other. The first technique uses the center, radius, and sweep angles to construct an arc. This technique is illustrated in the following figure. Figure 6.8. Specifying a Circular Arc Using Sweep Angles This figure shows two arcs that start at 0° and sweep around the circle to 120°. The starting and ending angles are parameters you pass to the appropriate method. The figure also shows the difference between the clockwise and counterclockwise arcs for those two angles. To generate this kind of arc you can use the routines CGContextAddArc, CGPathAddArc, or appendBezierPathWithArcWithCenter:radius:startAngle:endAngle:clockwise:, depending on which API you are working with. The second building technique builds an arc based on the current point of the path, two points passed in as parameters, and a radius. It uses the points to define two directions that become the incoming and outgoing directions for the resulting curve. This technique is particularly good at creating a circular arc that rounds off a sharp corner. This includes creating rounded rectangles with a particular corner radius. Figure 6.9 illustrates the second circular arc technique. Figure 6.9. Specifying a Circular Arc Using Start and End Directions When using this technique, you supply the routine with two points (which we'll call p1 and p2), and a radius. Those points, in conjunction with the current point of the path, define two directions. The circular arc will start along the line that passes through the current point and p1. The curve will also start so that the line is just tangent to the curve. From there the arc will curve around with the specified radius until it meets the line between p1 and p2. The curve leaves in the direction from p1 to p2. Another way to think of this is to imagine the angle formed by the current point, p1, and p2. The computer is going to nestle a circle into this angle so that it just touches each of the lines that form the angle. It then adds the circular arc that connects the two lines to the current path. When you call the routine, if the current point does not coincide with the starting point of the circular arc, the computer will add a straight segment from the current point to the start of the circular arc for you and then draw the arc. To create a circular arc using this technique, you use the Core Graphics routines CGContextAddArcToPoint or CGPathAddArcToPoint. If you are using Cocoa you can use the NSBezierPath method appendBezierPathWithArcFromPoint:toPoint:radius:. A more concrete example may help you to understand the different circular arc construction methods. Suppose you want to create a path that outlines a the shape of a circular cog. This cog is illustrated in Figure 6.10. Figure 6.10. The Circular Cog Path The code that generates the circular cog path (and strokes it) is shown in listing 6.2. Listing 6.2. Routine to Draw the Circular Cog Path
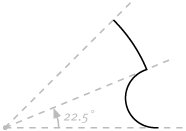
This routine exploits the circular symmetry of the cog. Much of the apparent complexity of the routine comes from the need to use radians to specify the angles involved. The cog is built by repeating the same motif eight times around the circle. After drawing each motif, the code rotates the coordinate system by 45°(p/4 radians) and continues with the next motif. Figure 6.11 illustrates the motif that is repeatedly drawn inside the for loop. Figure 6.11. A Single Circular Cog Motif There are two parts to the motif. The two parts together cover 45°, or 1/8 of a circle. The first portion of the motif is created using CGContextAddArcToPoint. The curve starts at the x axis, extends toward the center of the circle, and then returns to the outer edge of the cog. To accomplish this the code computes the point on the circle midway through the 45° angle (midPoint in the code) and uses that point and the origin as the parameters to the arc routine. The radius for this arc is carefully selected so that the resulting curve will end on the midpoint. The second half of each motif is created using CGContextAddArc. The starting angle is simply the 22.5° mark (half of the 45° sweep of the motif), and the ending angle is simply the 45° mark. As each motif is drawn, the endpoint of the previous motif becomes the starting position for the next one. Adding PathsIf you construct a stand-alone path, either as a CGPath or an NSBezierPath, you can add that entire path and all its contours to another path. This not only allows you to create more complex paths from smaller elements, but it is also the key to drawing CGPaths in a CGContext. The routines you use to combine paths are CGContextAddPath, CGPathAddPath, and appendBezierPath:. Each of these routines accepts the path you want to add as a parameter. When you are working through NSBezierPath, you use that class to both store and draw the path. The CGPath interface, however, does not include any methods for drawing a path. To draw a CGPath object, you have to first copy the object into the current path of a CGContext. To do that, you use the routine CGContextAddPath, which adds the path to the current path in the context. If you want to draw the CGPath object by itself, you can first clear the current path in the context with CGContextBeginPath. Once your CGPath is in the current path of a context, you can stroke or fill it using the usual CGContext routines. Additional CGContext FunctionalityThe CGContext API contains an interesting routine that constructs a path from the stroked representation of another path. The routine that accomplishes this is CGContextReplacePathWithStrokedPath, which takes into account the stroke parameters in the context (things like stroke with and line join style) and the current path. From these, the routine generates a new path that outlines the portion of user space that would be colored if the computer were to stroke the current path with those parameters. It replaces the current path in the context with this new path. You can use this routine to achieve a number of special effects. For example, if you want to color the stroke of a particular path with a pattern, you can use CGContextReplacePathWithStrokedPath to construct the appropriate path and then use the usual CGContext routines to fill that path with a pattern. The routine also helps if you want to use the stroke of a path as a clipping area. Additional NSBezierPath FunctionalityThe NSBezierPath class has two methods that make it easy to create entire paths from simple shapes. As its name implies, bezierPathWithRect: creates and returns an NSBezierPath instance that contains a rectangular contour. Similarly, bezierPathWithOvalInRect: returns an NSBezierPath instance that contains an oval contour. There are two routines that construct new paths from existing paths. bezierPathByFlatteningPath is an instance method that asks a path to return a new bezier path that is a flattened representation of itself. Flattening a path involves taking every curve segment in the path and replacing it with a series of short straight line segments that closely approximate the path. The bezierPathByReversingPath routine returns a new bezier curve, but the directions of all the contours in the path run in the opposite direction. This can be a handy routine to use when constructing a path that you will eventually use the non-zero winding rule to fill. More information on winding fill rules can be found in the next chapter. Finally, the NSBezierPath class contains a number of routines that make it easy for you to extract the shapes of the glyphs from fonts and use them when constructing paths. Those methods are appendBezierPathWithGlyph:inFont: appendBezierPathWithGlyphs:count:inFont: These routines append the paths that form glyphs from a particular font. The path that you are appending the letter shapes to must have a current point at the time you call this routine. That current point will serve as the text location for the glyphs you are adding to the path. Note that these routines accept Glyph IDs and not characters. If you want to draw text, there are much better options available. However, this can be a handy pair of routines if you want to extract the paths from some text and manipulate those paths before drawing them. |
EAN: 2147483647
Pages: 100
- The Four Keys to Lean Six Sigma
- Key #3: Work Together for Maximum Gain
- Making Improvements That Last: An Illustrated Guide to DMAIC and the Lean Six Sigma Toolkit
- The Experience of Making Improvements: What Its Like to Work on Lean Six Sigma Projects
- Six Things Managers Must Do: How to Support Lean Six Sigma