11.4 DIET Policies
| Earlier in the chapter we observed the similarity between a policy and a computer program. This concept will now be explored further by applying a few computer program design rules. The first rule is that there are many ways to design, or write, a computer program. Likewise, there are many different methods of policy composition. Often, if the syntax is correct and the program or policy works, then you have achieved your goal. However, often elements of simplicity and performance tend to fall by the wayside. It is important to design our policies in the most modular, scalable, and efficient fashion possible. This makes our policies easier to parse, configure, and interpret. We propose calling this the DIET policy design method. You may ask how this name was determined. Seeing as how the fellow playing at being our manager while writing this book could stand to lose a few pounds , it was decided that the idea of shedding excess weight could apply to policy as well. If you chuckled when you read this, then the likelihood is that you will remember the four steps of policy dieting when needed and that you also had "one of those" kinds of managers! The four steps of the DIET are outlined in Figure 11-6. Figure 11-6. DIET Policy Design Model The four steps of the DIET policy method that will aid in proper design and implementation of an effective policy are as follows :
In the next section you will begin your policy creation using the DIET methodology. The objective will be to design polices that are easy to understand and implement and that carry out the functions defined in the design stage. 11.4.1 Designing PoliciesThe world of computer programming has given us subroutines. Subroutines are a way of breaking down a complex problem into smaller pieces so that each section can solve a subset of the overall problem, leading to a solution that is easy to implement and understand. There are many reasons to break down a program into subroutines. Consider the following from an online Perl programming guide by Emmie Lewis [13]:
Now here's the same text again, but with the word "program" replaced with "policy" and the word "subroutine" with " term ":
The essence of good policy design is taking a policy you want to design and separating it into as many terms as there are tasks . There are also similarities between the if , then , and else statements used in programming and the from , to , and then statements used in policy. The if statement represents the match conditions of the from and to statement. The then statement is executed if the from and to statements match, and the else statement represents the default policy action for all routes that did not match. For example, to define a policy that selects all OSPF routes from the routing table learned from a particular neighbor ( 10.0.1.1 ) and sets them to a metric of 10, the code could look as follows: policy-options { policy-statement get-ospf { from { protocol ospf; neighbor 10.0.1.1; } then { metric 10; accept; } } } Using the DIET methodology, the objectives of the policy were divided into two tasks:
Most of simple policies are designed with a single term. A single-term policy contains only one term. However, a term does not need to be explicitly specified in the policy. In the following example, we see a policy named redistribute-isis with one term, get-isis . The get-isis term matches and accepts all IS-IS routes in the routing table. policy-statement redistribute-isis { term get-isis { from protocol isis; then accept; } } This policy can be rewritten without a term statement as follows: policy-statement redistribute-isis { from protocol isis; then accept; } Both policies have the exact same effect. The only difference between the two is that the explicit term definition was dropped in the second example. The policy is called redistribute-isis and contains two statements. The from protocol isis statement selects all IS-IS routes, which are in turn accepted with the accept statement. The second example may seem like good practice, and in some cases it is. However, it is recommended to keep the explicit term definition, which is more in line with the scalability rule defined earlier. There is an old saying that a stitch in time saves nine. That saying can be applied here. If you must modify a single-term policy at a later stage, then having spent an extra few seconds on explicitly defining a term makes the policy easier to modify and scale. This is not so much a rule as a recommendation. At the end of the day, a policy will wear the mark of its designer. The recommended design rules can be summed up as follows:
11.4.2 Implementing PoliciesAfter a policy has been designed, the next step is to implement it. All policies are implemented in the CLI under the [edit policy-options] level of the hierarchy. There are a number of commands used to implement a policy. A typical implementation could take the following three steps:
The order in which policies are implemented under the [edit policy-options] hierarchy level does not matter; it is the order of their execution that is important. The order in which terms are defined within a policy is also important. Whenever the active configuration is being compiled by the routing engine, policies are read in the order in which they are applied. Terms, however, are read from top to bottom (see Figure 11-5). Policies are executed term by term from top to bottom unless another policy is called within a term. There are two other methods of policy implementation that we have not mentioned yet. These include route filters and regular expressions. Both are very important areas of policy implementation and will be covered in detail in subsequent sections. 11.4.3 Executing PoliciesPolicies do not automatically take effect after implementation. Rather, they are executed after they are applied to the appropriate routing protocol, such as RIP, IS-IS, OSPF, BGP, or Distance Vector Multicast Routing Protocol (DVMRP). Earlier in the chapter we reviewed import and export policies. At this stage we must set the rules for policy application. The primary rule is that we cannot set an import policy for IS-IS or OSPF, which would be detrimental to routing stability. We can, however, set up import and export policies for BGP. A policy is executed using the set protocols command under the [edit] hierarchy level of the CLI. Let us suppose that we have two other export policies, namely policy-2 and policy-3 , to apply under the BGP hierarchy level. This would appear in the configuration as follows: [edit] user@Chicago# set protocols bgp export [policy-1 policy-2 policy-3] Extract from bgp configuration: protocols { bgp { export [ policy-1 policy-2 policy-3 ]; } Order is very important here because we are creating a policy chain. Our chain is made up of three policies. First policy-1 is evaluated and only if there are no matches in policy-1 , policy-2 is evaluated. Again, if there are no matches in policy-2 , policy-3 is evaluated as the last step. The policy chain is read by the router from left to right and is treated as an ordered list. Thus, policy-1 is applied and executed first, and so forth. The insert command can be used to change the order in which policies are evaluated and has two options: before and after . The following example illustrates its use: [edit] user@Chicago# show protocols bgp export [ policy-1 policy-2 policy-3 ]; [edit] user@Chicago# insert protocols bgp export policy-2 before policy-1 [edit] user@Chicago# show protocols bgp export [ policy-2 policy-1 policy-3 ]; [edit] user@Chicago# insert protocols bgp export policy-2 after policy-3 [edit] user@Chicago# show protocols bgp export [ policy-1 policy-3 policy-2 ]; In the above example we have modified the order in which the policies are executed by moving around policy-2 . Within BGP, import and export policies can be applied at three different levels:
The general rule is that neighbor-level policies supercede group-level policies, and group-level policies take precedence over global-level policies. The next example shows a BGP configuration that includes two BGP peer groups, one for internal and one for external peers. For the purpose of this example, we have specifically used private addresses and ASNs. It is important to note that external peer addresses would usually be public addresses, that is addresses other that those reserved for private use as specified in RFC 1918 [6]. There are three policies configured as follows:
[edit] user@Chicago# show protocols bgp export global-bgp-policy; group external-peers { type external; export group-policy; peer-as 65535; neighbor 192.168.1.1 { export special-policy; } neighbor 192.168.1.2; neighbor 192.168.1.3; } group internal-peers { type internal; neighbor 172.16.1.1; neighbor 172.16.1.2; } 11.4.4 Testing PoliciesAfter your policies have been designed, implemented, and executed, you are nearly finished with your policy DIET! The last step is to test the policies. Aside from actual use and implementation, policies can be router tested in two ways:
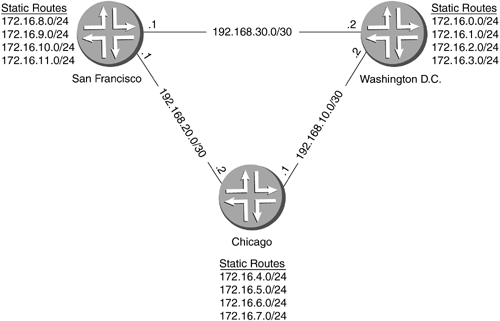
In the above commands, policy-1 is the name of the policy being tested, a.b.c.d/e is a specific route being tested, and 0.0.0.0/0 signifies all the routes contained in the inet.0 routing table. Through the use of the test policy command, it is possible to determine whether or not the policy implemented meets the intended design criteria. Consider the simple network in Figure 11-7, which shows three routers: Washington D.C., Chicago, and San Francisco. All routers are running OSPF and belong to backbone area 0 . The 172.16 . x /24 networks are static routes used to simulate attached customer networks. Table 11-7 lists the aggregate required on each router to encompass each of the static routes. Figure 11-7. Simple Network to Illustrate Policy Testing Table 11-7. Aggregate Routes
The network is set up so that the aggregates are shared into OSPF through use of policy, while the specific networks are not. This is achieved by means of a simple export policy named aggregate-2-ospf . The aggregate routes will be accepted by this policy, while everything else will be rejected. As you review the configurations, notice that each policy is applied as an export statement within OSPF before the actual policy is listed. The relevant pieces of the configuration have been highlighted for you. Following are the configurations for each of the three routers.
You can test the effect of the policies by issuing the show policy command on any of the three routers in the example. As previously described, there are two ways of using the test policy command: testing against the entire routing table or against a specific route. The following example uses the Washington D.C. router to test aggregate-2-ospf against the aggregate route 172.16.0.0/22 and against all routes in the routing table. The output is as follows: user@Chicago> test policy aggregate-2-ospf 172.16.0.0/22 inet.0: 13 destinations, 13 routes (13 active, 0 holddown, 0 hidden) Prefixes passing policy: 172.16.0.0/22 *[Aggregate/130] 03:34:06 Reject Policy aggregate-2-ospf: 1 prefix accepted, 4 prefixes rejected The sample output confirms that the aggregate route passes the policy, but how can we be sure that no other routes will match? You should also issue a test policy 0.0.0.0/0 command, as follows, to ensure that no unexpected routes slip through the policy: user@Chicago> test policy aggregate-2-ospf 0.0.0.0/0 inet.0: 13 destinations, 13 routes (13 active, 0 holddown, 0 hidden) Prefixes passing policy: 172.16.0.0/22 *[Aggregate/130] 03:51:24 Reject Policy aggregate-2-ospf: 1 prefix accepted, 12 prefixes rejected As you can see, the results are very similar to the previous output, which in this case is a good sign. Washington D.C.'s routing table contains 13 active routes, but only the aggregate passed the policy, which is exactly what it was designed for. Another useful command, the show policy command, lists all configured policies on a router. user@Chicago> show policy Configured policies: Aggregate-2-ospf In the previous example, there is only one policy configured on the router. If you would like to see what is configured in a policy, you can issue the show policy policy-name command, where policy-name is the name of the policy you are examining. Issuing the show policy aggregate-2-ospf command shows the rules defined within the policy as follows: user@Chicago> show policy aggregate-2-ospf Policy aggregate-2-ospf: Term match-aggregate: from proto Aggregate then accept Term reject-all-else: then reject |

EAN: 2147483647
Pages: 176