Enhancing and Maintaining Web Site Security After Migration
To provide comprehensive security for your Web site, you must ensure that the entire Web server is protected from unauthorized access. To maintain the security of your server, you need to implement continuing security practices such as security monitoring, detection, and response. For more information about maintaining Web server security, see Managing a Secure IIS Solution in Internet Information Services (IIS) 6.0 Resource Guide of the Microsoft Windows Server 2003 Resource Kit (or see Managing a Secure IIS Solution on the Web at http://www.microsoft.com/reskit).
Configuring Windows Server 2003 Security Settings
After installing Windows Server 2003, the security settings are configured so that the server is locked down. After installing IIS 6.0, evaluate the default security settings to determine whether they are sufficient for the Web sites that your Web server hosts . You might need more stringent security requirements for Web sites when the following is true:
-
Users on the Internet access the Web sites.
-
The Web sites contain confidential information.
Configure Windows Server 2003 to more restrictive security settings by completing the following steps:
-
Rename the Administrator account.
The built-in account, Administrator, exists by default on every newly installed Web server. Potential attackers only have to guess the password for this well-known user account to exploit it. You can rename the Administrator user account to help protect your Web server from potential attackers . The Administrator account cannot be disabled.
Important During the default installation of Windows Server 2003, the Guest account is disabled. Ensure that the Guest account has not been enabled since the installation.
-
Convert all disk volumes to the NTFS file system.
From a security perspective, the primary reason for requiring that all disk volumes be converted to NTFS is that NTFS is the only file system supported by Windows Server 2003 that allows you to secure files and folders. FAT or FAT32 partitions cannot be secured.
Because the Web sites are stored as files and folders on the Web server, NTFS helps prevent unauthorized users from directly accessing or modifying the files and folders that make up your Web sites. For more information about the benefits of formatting disk volumes as NTFS on Web servers, see NTFS Permissions in IIS 6.0 Help, which is accessible from IIS Manager.
If any existing disk volumes are FAT or FAT32, convert the disk volumes to NTFS. Volumes converted to the NTFS file system cannot be converted back to FAT or FAT32.
The command-line tool Convert.exe converts FAT and FAT32 volumes to the NTFS file system.
-
Remove NTFS permissions that are granted to the Everyone group on the root folder of all disk volumes.
By default, the Everyone group is granted Read and Execute permissions on the root folder of each disk volume. The default permissions can pose a potential security threat for any newly created folders on the volumes because, unless explicitly denied , these permissions are inherited in any new folders. To help prevent this potential security problem, remove all permissions that are granted to the Everyone group on the root folder of all disk volumes.
Important The Administrators group still has full control on the root folder of each disk volume. In Setting NTFS Permissions later in this chapter, you will grant access to the Web site users by setting the appropriate NTFS permissions on the Web site content.
-
Remove any compilers or development environments.
If compilers or development environments are installed on production Web servers, potential attackers can use them to upload source files to a malicious program and then use the Web server to compile the malicious program. In many instances, the source files might not be perceived as a threat, whereas an executable file would be. You can remove any compilers and development environments to help ensure that potential attackers cannot remotely compile a malicious program and then run that malicious program on the Web server.
Consult the documentation of the compiler or development environment for information about how to remove them.
-
Disable NetBIOS over TCP/IP.
To prevent attackers from executing the NetBIOS Adapter Status command on a server, and reveal the name of the user who is currently logged on, disable NetBIOS over TCP/IP on public connections of the server.
Important If you disable NetBIOS over TCP/IP, note the following conditions:
You might not be able to connect to computers that are running operating systems other than Windows 2000, Windows XP, or a Windows Server 2003 operating system.
You cannot use broadcast-based NetBIOS name resolution to resolve computer names to IP addressed for computers on the same network segment. Instead, you must install a DNS server and either having the computers register with DNS (or manually configure DNS records) or configure entries in the local Hosts file for each computer.
The following procedures explain how to configure Windows Server2003 security settings.
To disable and rename the Administrator user account
-
In Control Panel, click Administrative Tools , and then click Computer Management .
-
In the console tree, double-click Local Users and Groups , and then click Users .
-
In the details pane, right-click Administrator , and then click Properties .
-
On the General tab, select the Account is disabled check box, and then click OK .
-
In the details pane, right-click Administrator , and then click Properties .
-
Type the new account name, and then press Enter .
To disable and rename the Guest user account
-
In Control Panel, click Administrative Tools , and then click Computer Management .
-
In the console tree, double-click Local Users and Groups , and then click Users .
-
In the details pane, right-click Guest , and then click Properties .
Figure 6.5 shows how to disable the Guest user account.
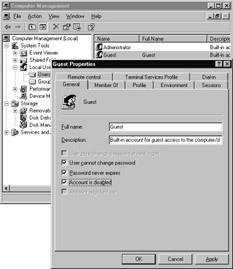
Figure 6.5: Disabling and Renaming the Guest User Account -
In the Guest Properties dialog box, on the General tab, click the Account is disabled check box, and then click OK .
-
In the Details pane, right-click Guest , and then click Rename .
-
Type the new user name, and then press Enter .
Important To complete the following procedure and convert FAT and FAT32 volumes to NTFS, you must use the Convert.exe tool.
To convert FAT and FAT32 volumes to NTFS
-
In the Run dialog box, type convert followed by the appropriate syntax, and then click OK.
Syntax
convert [ Volume ] /fs:ntfs
Parameters
Volume
Specify the drive letter (followed by a colon ), mount point, or volume name to convert to NTFS. Required if the volume to be converted is not the current volume.
/fs:ntfs
Required. Converts the volume to NTFS.
To secure the root of the system volume by removing permissions
The system volume must use the NTFS file system if you want to set file and folder permissions.
-
Open Accessories, and then click Windows Explorer .
-
In Windows Explorer, locate the root of the system volume (for example, C:\).
-
Right-click the root of the system volume, click Properties , and then click the Security tab.
-
In the Group or user names list box, click Everyone , and then click Remove .
-
Click OK .
To disable NetBIOS over TCP/IP
-
In Control Panel, click Network Connections , click the connection on which you want to disable NetBIOS over TCP/IP, and then click Properties .
-
On the General tab (for a local area connection) or the Networking tab (for all other connections), click Internet Protocol (TCP/IP) , and then click Properties .
-
Click Advanced , and then click the WINS tab.
-
In the NetBIOS setting box, click Disable NetBIOS over TCP/IP , click OK three times, and then click Close .
Preventing Unauthorized Access to Web Sites
Each Web site and application in IIS 6.0 and Windows Server 2003 is stored as a grouping of folders and files. Unauthorized access to, or modification of, these files and folders can present a serious breach of security. You must ensure that only authorized users can access or modify the Web sites that are hosted on your Web server.
Storing Content on a Dedicated Disk Volume
Store the files and folders that comprise the content of your Web sites on a dedicated disk volume that does not contain the operating system. Doing this helps prevent directory transversal attacks . Directory transversal attacks occur when an attacker attempts to send the Web server a request for a file that is located in another directory structure.
For example, Cmd.exe exists in the systemroot \System32 folder. Without the appropriate security settings, an attacker might be able to make a request to systemroot \System32\Cmd.exe and invoke the command prompt. If the Web site content is stored on a separate disk volume, a directory transversal attack cannot work because Cmd.exe does not exist on the same disk volume. The default NTFS permissions for Windows Server 2003 prohibit anonymous users from executing or modifying any files in the systemroot folder and subfolders , so that only an unauthorized authenticated user can perform this type of attack.
In addition to security concerns, placing the content on a disk volume that is dedicated to Web site and application content makes administration tasks , such as backup and restore, easier. In cases where you store the content on a separate physical drive that is dedicated to the content, you will reduce the disk contention on the system volume and improve overall disk-access performance. Ensure that the dedicated disk volume is converted to NTFS.
To help protect your Web sites, store content on dedicated disk volumes by completing the following steps:
-
Create a disk volume, or designate an existing disk volume, where the Web sites will be stored.
-
Configure the NTFS permissions on the root of the disk volume so that:
-
The Administrators group has full control.
-
All other permissions are removed.
-
-
Create a folder, or designate an existing folder, on the dedicated disk volume to hold the subfolders that will contain the Web sites.
-
Beneath the folder that you created, or designated, in the previous step, create a subfolder for each Web site or application that will be installed on the Web server.
-
Install the Web sites in the subfolders that you created in the previous step.
At this step in the deployment process, only members of the Administrators group have access to the content. You will grant access to the users who will access the Web sites in Setting NTFS Permissions later in this chapter.
Setting IIS Web Site Permissions
In IIS 6.0, you can set Web site permissions that allow you to control access to a Web site or virtual directory. IIS examines Web site permissions to determine which type of action can occur, such as accessing the source code of a script or browsing folders.
Use Web site permissions in conjunction with NTFS permissions, not in place of NTFS permissions. You can set Web site permissions for specific sites, directories, and files. Unlike NTFS permissions, Web site permissions affect everyone who tries to access your Web site.
| Note | If Web site permissions conflict with NTFS permissions for a directory or file, the more restrictive settings are applied. |
Table 6.6 lists and describes the Web site permissions that are supported by IIS 6.0.
| Permission | Description |
|---|---|
| Read | Users can view the content and properties of directories or files. This permission is set by default. This permission is required for Web sites that have static content. If all of your content is scripted, such as a Web site that only uses ASP content, you can remove the Read permission. |
| Write | Users can change content and properties of directories or files. |
| Directory browsing | Users can view file lists and collections. |
| Log visits | A log entry is created for each visit to the Web site. As an operational security practice, it is highly recommend that you enable logging. |
| Index this resource | Indexing Service can index this resource. This allows searches to be performed on the resource. |
| Execute | Users have the appropriate level of script execution:
|
Setting NTFS Permissions
NTFS permissions allow you to set permissions that are observed by IIS and by other Windows Server 2003 components . Windows Server 2003 examines NTFS permissions to determine the types of access a user, or a process, has on a specific file or folder.
Use NTFS permissions in conjunction with Web site permissions, not in place of Web site permissions. NTFS permissions affect only the accounts that have been granted or denied access to the Web site and application content. Web site permissions affect all of the users who access the Web site or application.
| Note | If Web site permissions conflict with NTFS permissions for a directory or file, the more restrictive settings are applied. |
You need to set NTFS permissions to allow the following situations:
-
Administrators can manage the content of the Web sites.
-
Users can, at a minimum, read the content of the Web sites.
Web sites can run under the identity of the following:
The user who is accessing the Web sites
When you want to restrict access to resources, such as specific Web pages or database content that is stored in SQL Server, run your Web site under the identity of the user. For example, Basic authentication can allow Web sites to pass through the identity of the user to other servers, such as a computer running SQL Server. By using this method, you can control the behavior of the Web site or application on a user-by-user basis.
Regardless of the identity that is used to run the Web site or application, you need to assign the appropriate NTFS permissions to the Web site or application so that it can run under the corresponding identity. Typically, these NTFS permissions are assigned to a group to which a number of users belong. Use this group when setting the permissions on the resources.
The primary disadvantage of restricting access by user accounts and NTFS permissions is that each user must have an account and must use that account to run the Web sites. For your Internet-based Web site, requiring users to have accounts might be impractical . However, for intranet Web sites you can use the existing accounts of users.
Explicitly deny access to anonymous accounts on the Web site when you want to prevent anonymous access. Anonymous access occurs when a user who has no authenticated credentials accesses system resources. Anonymous accounts include the built-in Guest account, the group Guests, and the IIS anonymous accounts.
In addition to explicitly denying access to anonymous accounts, eliminate write access permissions for all users except members of the Administrators group.
| Tip | If IIS denies access to content, you can enable object access auditing to find out the account that was used to access the content. The failed access event is recorded in the Security event log. The event log entry specifies the account that was used in the failed access. After you identify the account used in the failed access, grant the appropriate NTFS permissions to the account. |
Maintaining Web Site Security
After securing the Web sites on your Web server, you need to help ensure that the Web sites stay secure. You need to deploy Web servers that are easy to manage and operate . As you deploy the Web server, keep in mind the operations and processes that must be performed after the Web server is deployed.
For more detailed coverage of security operations processes, see Managing a Secure IIS Solution in Internet Information Services (IIS) 6.0 Resource Guide of the Windows Server 2003 Resource Kit (or see Managing a Secure IIS Solution on the Web at http://www.microsoft.com/reskit).
Obtaining and Applying Current Security Patches
You should always evaluate and apply the latest security updates to help ensure that your Web sites remain secure. These security updates are published as service packs or hotfixes. As new security vulnerabilities are discovered , Microsoft publishes updates to help mitigate any security risks they might cause. You need to apply these security updates to help ensure that your Web server is protected from the most current security risks.
Stay current with security updates by completing the following steps:
-
Obtain the current security updates by using any combination of the following:
-
Subscribe to the Microsoft Security Notification Service newsletter. The Microsoft Security Notification Service newsletter is a free subscription-based service that sends notification e- mails about available security updates to administrators. To subscribe to the Microsoft Security Notification Service newsletter, see the Microsoft.com Profile Center link on the Web Resources page at http://www.microsoft.com/windows/reskits/webresources. There is no charge for registering to receive the newsletters.
-
Run Windows Update on a regular basis. Windows Update is a service that runs on Windows-based computers. Windows Update scans the local computer and identifies any updates that are applicable for the software installed on the computer. Windows Update is installed on Windows Server 2003 by default. You must manually start Windows Update on the Web server from Help and Support Center for Microsoft WindowsServer2003.
For more information about running Windows Update, see Windows Update in Help and Support Center for Windows Server 2003.
-
-
Deploy Microsoft Software Update Services (SUS) . SUS is a service that acts as an intermediary between the Windows Update server on Microsoft.com and the Windows-based computers in your organization running Windows Update. By using SUS, you can download the latest updates to a server on your intranet, test the updates on test servers, select the updates that you want to deploy, and then deploy the updates to computers within your organization.
For more information about deploying SUS, see Deploying Microsoft Software Update Services in Designing a Managed Environment of the Microsoft Windows Server 2003 Deployment Kit (or see Deploying Microsoft Software Update Services on the Web at http://www.microsoft.com/reskit).
Table 6.7 lists the options for obtaining security updates, and describes the advantages and disadvantages of each option.
Table 6.7: Options to Obtain Security Updates Option
Advantages
Disadvantages
Microsoft Security Notification Service Newsletter
-
Does not require Web servers to be directly connected to the Internet
-
Does not require a dedicated server
-
Free
-
Is not specific to a particular technology, such as IIS
-
Is not specific to a particular operating system version
-
Requires administrators to manually review newsletters for recommended updates
Windows Update
-
Provides automatic notification of available updates
-
Free
-
Requires the Web server to have Internet access.
SUS
-
Provides automatic notification of available updates
-
Requires a dedicated server to run properly
-
Requires the SUS server be able to access the Internet
-
Requires separate purchase of SUS
You can configure Windows Update and Automatic Updates in SUS to install updates automatically, with or without confirmation, based on the security rating of the update.
Table 6.8 lists the security ratings used by Windows Update and Automatic Updates, and provides a description of each rating.
Table 6.8: Security Ratings Used by Windows Update and Automatic Updates Rating
Description
Critical
A vulnerability that, if exploited, might allow the propagation of an Internet worm without user action.
Important
A vulnerability that, if exploited, might result in a compromise of the confidentiality, integrity, or availability of users data, or of the integrity or availability of processing resources.
Moderate
A vulnerability risk that can be mitigated by factors such as default configuration, auditing, or difficulty to exploit.
Low
A vulnerability that is extremely difficult to exploit, or that has minimal impact.
-
Enabling Windows Server 2003 Security Logs
Collecting information about the security aspects of the Web server is required to help ensure that the Web server stays secure. Windows Server 2003 uses security and system logs to store collected security events. The security and system logs are repositories for all events recorded on the Web server. Many management systems, such as Microsoft Operations Manager, periodically scan these logs and can report security problems to your operations staff.
If you audit or log too many events, the log files might become unmanageable and contain superfluous data. Before enabling the system and security logs, you need to enable auditing for the system log and establish the number of events that you want recorded in the security log. You cannot change the information that is logged in the system log: These events are preprogrammed into Windows Server 2003 services and applications. You can customize system log events by configuring auditing . Auditing is the process that tracks the activities of users and processes by recording selected types of events in the security log of the Web server. You can enable auditing based on categories of security events. At a minimum, enable auditing on the following categories of events:
-
Any changes to user account and resource permissions
-
Any failed attempts for user logon
-
Any failed attempts for resource access
-
Any modification to the system files
You can customize which types of events are recorded in the security log. The most common security events recorded by the Web server are associated with user accounts and resource permissions.
The following procedures explain how to enable security auditing.
| Important | To complete the following procedure and define auditing policy settings for an event category, you must use the Local Security Policy MMC snap-in. |
To define or modify auditing policy settings for an event category on the local Web server
-
Open Administrative Tools, and then click Local Security Policy .
-
In the console tree, click Local Policies , and then click Audit Policy .
-
In the details pane, double-click an event category for which you want to change the auditing policy settings. Figure 6.6 shows how to define which policy settings you want to audit.
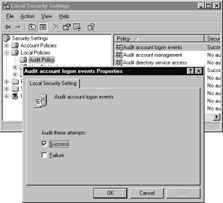
Figure 6.6: Defining Auditing Policy Settings for an Event Category -
On the Properties page for the event category, do one or both of the following:
-
To audit successful attempts, select the Success check box.
-
To audit unsuccessful attempts, select the Failure check box.
-
-
Click OK .
To define or modify auditing policy settings for an event category within a domain or organizational unit, when the Web server is joined to a domain
This procedure is run on the domain controller.
-
Open Administrative Tools, and then click Active Directory Users and Computers .
-
Right-click the appropriate domain, site, or organizational unit and then click Properties .
-
On the Group Policy tab, select an existing Group Policy object to edit the policy.
-
In Group Policy Object Editor , in the console tree, double-click Computer Configuration , double-click Windows Settings , double-click Security Settings , double-click Local policy , and then click Audit Policy .
-
In the details pane, double-click an event category for which you want to change the auditing policy settings.
-
If you are defining auditing policy settings for this event category for the first time, select the Define these policy settings check box.
-
Do one or both of the following:
-
To audit successful attempts, select the Success check box.
-
To audit unsuccessful attempts, select the Failure check box.
-
-
Click OK .
Enabling File Access Auditing for Web Site Content
In addition to enabling Windows Server 2003 security logs, enable file access auditing for your Web site content. This is a separate step that must be completed to monitor any changes to the files and directories that contain your application and content.
You can enable auditing on a user-by-user basis for each file and directory. However, at a minimum, enable auditing for all users for any successful or failed attempts to do the following:
-
Modify or delete existing content.
-
Create new content.
Tip Beyond these minimal events, you can audit content for other purposes, such as forensic analysis of intruder detection.
Before you set up file access auditing for your Web site content, you must first enable object access auditing. This security setting determines whether to audit the event of a user accessing an object, such as a file, folder, or printer. You can enable object access auditing by defining auditing policy settings for the object access event category of the Audit Policies in Local Security Settings. After object access auditing is enabled, you can view the security log in Event Viewer to review the results of your changes. You can then set up file access auditing for Web site content.
| Tip | Because the security log is limited in size , carefully select the files and folders to be audited . In addition, consider the amount of disk space that you want to devote to the security log. The maximum size for the security log is defined in Event Viewer. |
If file or folder auditing has been inherited from the parent folder, you will see one of the following:
-
In the Auditing Entry for File or Folder dialog box, in the Access box, the check boxes are unavailable.
-
In the Advanced Security Settings for File or Folder dialog box, the Remove button is unavailable.
Important To complete the following procedures and enable file access auditing for Web site content, the following must be true:
-
You are logged on as a member of the Administrators group or you have been granted the Manage auditing and security log right in Group Policy.
-
Windows Explorer is installed on the target server.
-
The disk volumes on which the Web site is stored use the NTFS file system.
-
To enable object access auditing
-
Open Administrative Tools, and then click Local Security Policy .
-
Double-click Local Policies , and then click Audit Policy .
-
Right-click Audit object access , and then click Properties .
-
Enable auditing by clicking one of the following:
-
Click Success to generate an audit entry when a user successfully accesses an object.
-
Click Failure to generate an audit entry when a user unsuccessfully attempts to access an object.
-
If you clear both check boxes, object access auditing is turned off.
-
-
Click OK .
To apply or modify auditing policy settings for a local file or folder
-
Open Accessories, and then click Windows Explorer .
-
Right-click the file or folder for which you want to set audit policy settings, click Properties , and then click the Security tab.
-
Click Advanced , and then click the Auditing tab.
-
Do one of the following:
-
To set up auditing for a new user or group, click Add . In Enter the object name to select , type the name of the user or group that you want to audit, and then click OK .
-
To remove auditing for an existing group or user, click the group or user name, click Remove , click OK , and then skip the rest of this procedure.
-
To view or change auditing for an existing group or user, click the name of the group or user, and then click Edit .
-
-
In the Apply onto box, click the location where you want auditing to take place.
-
In the Access box, indicate what actions you want to audit by selecting the appropriate check boxes:
-
To audit successful events, select the Successful check box.
-
To stop auditing successful events, clear the Successful check box.
-
To audit unsuccessful events, select the Failed check box.
-
To stop auditing unsuccessful events, clear the Failed check box.
To stop auditing all events, click Clear All .
Figure 6.7 shows how to apply auditing policy settings to a local file or folder.
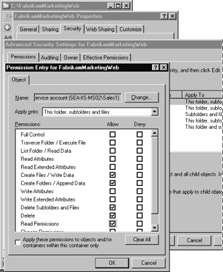
Figure 6.7: Applying Auditing Policy Settings to a Local File or Folder -
-
If you want to prevent subsequent files and subfolders of the original object from inheriting these audit entries, select the Apply these auditing entries to objects and/or containers within this container only check box.
Configuring IIS Logs
In addition to the Windows Server 2003 system and security logs, you should configure IIS to log site visits. When users access your server running IIS 6.0, IIS logs the information. The logs provide valuable information that you can use to identify any unauthorized attempts to compromise your Web server.
Depending on the amount of traffic to your Web site, the size of your log file (or the number of log files) can consume valuable disk space, memory resources, and CPU cycles. You might need to balance the gathering of detailed data with the need to limit files to a manageable size and number. If you are planning to put thousands of Web sites on one Web server with high traffic volumes and disk writes , you might want to use centralized binary logging to preserve server resources. Also, consider limiting log size by changing the frequency of log file creation. For more information, see Saving Log Files in IIS 6.0 Help, which is accessible from IIS Manager.
Logging information in IIS 6.0 goes beyond the scope of the event logging or performance monitoring features provided by Windows. The IIS logs can include information, such as who has visited your site, what the visitor viewed, and when the information was last viewed . You can use the IIS logs to identify any attempts to gain unauthorized access to your Web server.
IIS 6.0 supports different log formats for the IIS logs that you enable. Based on the characteristics of the Web site in this scenario, the following log formats are most applicable.
W3C Extended log file format
World Wide Web Consortium (W3C) Extended format is a customizable ASCII format with a variety of different properties. You can log properties that are important to you, while limiting log size by omitting unwanted property fields. Properties are separated by spaces. Time is recorded as Universal Time Coordinate (UTC).
For information about customizing this format, see Customizing W3C Extended Logging in IIS 6.0 Help, which is accessible from IIS Manager. For more information about the W3C Extended format specification, see the W3C World Wide Web Consortium link on the Web Resources page at http://www.microsoft.com/windows/reskits/webresources.
IIS log file format
IIS log file format is a fixed (meaning that it cannot be customized) ASCII format. This file format records more information than other log file formats, including basic items, such as the IP address of the user, user name, request date and time, service status code, and number of bytes received. In addition, IIS log file format includes detailed items, such as the elapsed time, number of bytes sent, action (for example, a download carried out by a GET command), and target file. The IIS log file is an easier format to read than the other ASCII formats because the information is separated by commas, while most other ASCII log file formats use spaces for separators. Time is recorded as local time.
For more information about the IIS log file format, see About Logging Site Activity in IIS 6.0 Help, which is accessible from IIS Manager.
NCSA Common log file format
National Center for Supercomputing Applications (NCSA) Common log file format is a fixed ASCII format that is available for Web sites, but not for FTP sites. This log file format records basic information about user requests , such as remote host name, user name, date, time, request type, HTTP status code, and the number of bytes sent by the server. Items are separated by spaces. Time is recorded as local time.
For more information about the NCSA Common log file format, see About Logging Site Activity in IIS 6.0 Help, which is accessible from IIS Manager.
For more information about the other logging formats supported by IIS, see the Configuring IIS Logs topic in Securing Web Sites and Applications in Internet Information Services (IIS) 6.0 Deployment Guide of the Microsoft Windows Server 2003 Deployment Kit (or see Securing Web Sites and Applications on the Web at http://www.microsoft.com/reskit) .
Enabling IIS Logging
IIS logging is enabled by default in IIS 4.0. If you disabled logging in IIS 4.0, the migration process will transfer the disabled setting to IIS 6.0 logging. If you want to a record of all Web site traffic, you must enable IIS 6.0 logging.
You can create separate logs for each Web site on the Web server and record events for each of those Web sites. After you enable logging for a Web site, all traffic to the Web site (including virtual directories) is written to the corresponding file for each site. You can also enable logging for specific virtual directories.
To enable logging on a Web site
-
In IIS Manager, double-click the local computer, double-click the Web or FTP Sites directory, right-click the Web site for which you want to enable logging, and then click Properties .
-
On the Web Site tab, select the Enable logging check box.
Figure 6.8 displays the Web Site tab as it appears in IIS 6.0.
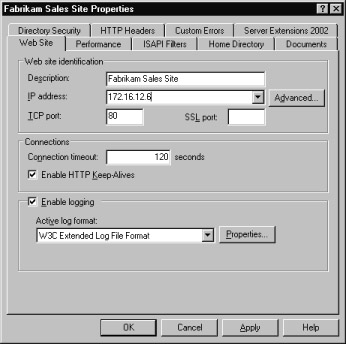
Figure 6.8: Enabling Logging on a Web Site -
In the Active log format list box, click to choose a log format. By default, the format is W3C Extended Log File Format .
-
Click Apply , and then click OK .
To enable logging for a specific virtual directory on a site
-
In IIS Manager, double-click the local computer, double-click the Web Sites directory, right-click the virtual directory for which you want to enable logging, and then click Properties .
-
On the Virtual Directory or Directory tab, select the Log visits check box if it is not already selected. By default, the check box is selected.
-
Click Apply , and then click OK .
For more information about logging Web site activity, see Logging Site Activity in IIS 6.0 Help. For more information about managing IIS logs, see Analyzing Log Files in Internet Information Services (IIS) 6.0 Resource Guide of the Microsoft Windows Server 2003 Resource Kit (or see Analyzing Log Files on the Web at http://www.microsoft.com/reskit).
Reviewing Security Policies, Processes, and Procedures
As a part of maintaining the security of your Web server, you must perform periodic reviews of the security policies, processes, and procedures in use by your organization. Review your security practices for any changes that might affect the security of the Web server. These changes in security practices can include the following:
Ensuring that any recent security risks are mitigated
As new security risks are identified, such as new viruses, you need to ensure that your security practices help mitigate these risks. If your current security practices do not address the new risks, then modify them to help mitigate the risks.
Identifying changes in Web server configuration that can compromise security
Through the course of normal administration of the Web server, configuration changes are made. During this process, security settings might have been inadvertently changed. You need to periodically review the configuration of the Web server to ensure that it complies with the security requirements of your organization.
You can categorize these Web server security practices by their function, such as operating system security, security policies, firewall security, and router security. In addition, the frequency with which these processes and procedures are completed varies. Some security practices need to be completed continuously while others might be completed monthly.
Table 6.9, Table 6.10, Table 6.11, and Table 6.12 list examples of security policies, processes, and procedures for an ISP, grouped by categories. These examples are representative of the types of security practices that are required to maintain the security of your Web server. For more information about the security policies, processes, and procedures for your Web server, see Managing a Secure IIS Solution in Internet Information Services (IIS) 6.0 Resource Guide of the Microsoft Windows Server 2003 Resource Kit (or see Managing a Secure IIS Solution on the Web at http://www.microsoft.com/reskit).
| Security Policy, Process, or Procedure | Frequency |
|---|---|
| Limit user rights to only those that are required. | Constant |
| Limit any windows for vulnerabilities that can be exploited when deploying new servers. | Constant |
| Limit Terminal Services access to only necessary accounts. | Constant |
| Run a two- tier DNS structure to protect the identity of internal servers. | Constant |
| Run an intrusion detection system. | Constant |
| Scan the ports in use on your server addresses and addresses assigned to remote users. | Daily |
| Review event and IIS logs. | Weekly |
| Test firewalls from inside and outside by using port scanners and other appropriate tools. | Weekly |
| Security Policy, Process, or Procedure | Frequency |
|---|---|
| Explicitly deny interactive logon user right to all nonadministrative accounts. | Constant |
| Explicitly deny Allow logon through Terminal Services user right to all nonadministrative accounts. | Constant |
| Enable FULL (Success/Failure) auditing on domain Group Policy objects. | Constant |
| Send event notification when events like User added to Domain Administrators occur. | Constant |
| Allow only Administrators to have write permissions on all content servers. | Constant |
| Require strong passwords for all users | Constant |
| Require smart cards for all administrators. | Constant |
| Allow administrators to log on only to specific workstations. | Constant |
| Enable account lockout policies for failed logon attempts. | Constant |
| Audit the domain Group Policy object. | Monthly |
| Audit Active Directory user rights. | Monthly |
| Audit all servers to determine if nonessential services are running. | Monthly |
| Security Policy, Process, or Procedure | Frequency |
|---|---|
| Restrict the network segments where management traffic is allowed. | Constant |
| By default, deny IP traffic and log any failed attempts. | Constant |
| Ensure that the minimal firewall rules are enforced, including:
| Constant |
| Security Policy, Process, or Procedure | Frequency |
|---|---|
| Run virus scans on all servers. | Constant |
| Monitor security distribution lists and newsgroups for potential security issues. | Constant |
| During virus outbreaks, block any suspicious content (such as e-mail attachments). | Constant |
| Monitor the number of Non-Delivery mail reports generated (indicates e-mail spamming ). | Weekly |
| Monitor SMTP relay attempts that are not valid (indicates e-mail spamming). | Weekly |
| Audit accounts to determine the users who are no longer employed at the organization, partner organizations, or customer organizations. | Monthly |
EAN: 2147483647
Pages: 96