Completing the Migration
At this point in the process, you have migrated your Web site to the target server and configured the IIS 6.0 properties to match settings on the source server. Now you need to verify that the migration completed successfully, capture the current configuration of the target server, and enable client access to the target server. After you perform these last steps, your migration is complete.
Verifying That the Web Site Migrated Successfully
Before deploying the target server to a production environment, verify that the Web site content and configuration information migrated successfully by completing the following steps:
-
Review the system log in Windows Server2003 on the target server to determine whether the Web site did not start.
IIS 6.0 creates entries in the system log when a Web site fails to start for any reason. Search the System log on the target server for to determine if any errors occurred. For more information about how to troubleshoot Web sites that fail to start, see Troubleshooting in IIS 6.0 Help, which is accessible from IIS Manager.
-
Verify that the Web site content migrated to the target server.
Compare the files and folders for the Web site on the target server with the original files and folders on the source server to determine whether the Web site content has been migrated correctly. Ensure that the number and size of the files and folders on the target server approximates the number and size of the same files on the source server.
-
Verify that the Web site configuration migrated to the target server.
View the configuration information for the Web site that was migrated. Compare the Web site configuration on the target server with the corresponding Web site configuration on the source server. Ensure that the configuration has been migrated correctly.
-
Perform functional testing of the migrated Web sites to ensure that the Web site behaves as expected.
You can find possible causes of application failure by reviewing the Windows Server2003 and IIS 6.0 Migration Tool logs and application configuration, but the only way to accurately assess whether your Web site migrated successfully is to perform functional testing. Functional testing is designed to ensure that Web sites are functioning correctly in the most common usage scenarios (for example, URLs and inputs).
Procedures for performing functional testing of Web sites are beyond the scope of this chapter. For more complete information about general testing, see the MSDN Online link on the Web Resources page at http://www.microsoft.com/windows/reskits/webresources, and then search for testing .
Backing Up the Target Server
Before you enable client access to the target server, perform a complete image backup of the target server. Performing this image backup provides you with a point-in-time snapshot of the Web server. If you need to restore the target server in the event of a failure, you can use this backup to restore the Web server to a known configuration.
| Important | Do not proceed further unless you have a successful backup of the entire target server. Otherwise, you can lose Web sites, applications, or data that you migrated to the target server. |
You should back up a Web server before upgrading it or making configuration changes to it. A complete Web server backup includes all Web sites, applications, and data stored on the Web server. For example, before an upgrade, or before you enable client access to a target Web server, perform a complete image backup before you change any of the configuration settings on the existing Web server. The image backup provides a point-in-time snapshot of the Web server. If unforeseen problems occur during the upgrade or configuration process, you can use this backup to restore the Web server to a known configuration
A backup file can be saved to a hard disk, a floppy disk, or to any other nonremovable or removable media on which you can save a file. Backup files usually have the file name extension .bkf, but you can change it to any extension you prefer.
You should back up all boot and system volumes , including the System State, when you back up the Web server.
The following procedures explain how to back up and restore the Web server.
| Important | To complete the following procedures to back up and restore the Web server, you must use the Ntbackup.exe tool. |
To back up to a file
-
Open Accessories , click System Tools , and then click Backup .
-
Click the Advanced Mode link on the Backup or Restore Wizard.
-
Click the Backup tab, and then on the Job menu, click New .
-
In the Click to select the check box for any drive, folder, or file that you want to back up text box, click the box next to System State and any other items you would like to backup. You should back up all boot and system volumes along with the System State.
-
In Backup destination , click File to back up files and folders to a file. This option is selected by default.
-
In Backup media or file name , type a path and file name for the backup (.bkf) file, or click the Browse button and navigate to a specific file.
-
Click Tools , and then click Options to select any backup options you want, such as the backup type and the log file type. When you have finished selecting backup options in the Options dialog box, click OK .
-
Click Start Backup , and then make any necessary changes to the Backup Job Information dialog box.
Figure 6.4 shows the information for a backup job.
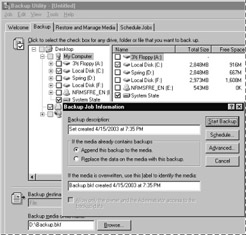
Figure 6.4: Backing Up the Target Server -
Click the Advanced tab if you want to set advanced backup options such as data verification or hardware compression. When you have finished setting advanced backup options, click OK .
-
Click Start Backup to start the backup operation.
To restore the Web server from a file
-
Open Accessories , point to System Tools , and then click Backup .
-
Click the Advanced Mode link on the Backup or Restore Wizard.
-
Click the Restore and Manage Media tab, and then in Expand the desired media item, then check the box for the items to restore , double-click the media item that contains the backup file you want to use, and select the check box next to System State for that file. This will restore the System State data along with any other data you have selected for the current restore operation.
-
In Restore files to , do one of the following:
-
Click Original location if you want the backed up files and folders to be restored to the folder or folders they were in when they were backed up. Skip to step 6.
-or-
-
Click Alternate location if you want the backed up files and folders to be restored to a folder that you designate . This option will preserve the folder structure of the backed up data; all folders and subfolders will appear in the alternate folder you designate.
-or-
-
Click Single folder if you want the backed up files and folders to be restored to a folder that you designate. This option will not preserve the folder structure of the backed up data; the files will appear only in the folder that you designate.
-
-
If you selected Alternate location or Single folder , type a path for the folder under Alternate location , or click the Browse button to find the folder.
-
On the Tools menu, click Options , click the Restore tab, and then do one of the following:
-
Click Do not replace the file on my computer if you do not want the restore operation to copy over files that are already on your hard disk.
-or-
-
Click Replace the file on disk only if the file on disk is older if you want the restore operation to replace older files on your disk with newer files from your backup.
-or-
-
Click Always replace the file on my computer if you want the restore operation to replace files on your disk regardless of whether the backup files are newer or older.
-
-
Click OK to accept the restore options you have set.
-
Click Start Restore .
-
Click the Advanced tab if you want to change any advanced restore options, such as restoring security settings and junction point data. When you are done setting advanced restore options, click OK .
-
Click OK to start the restore operation.
Enabling Client Access
After you have migrated your Web sites from the source server to the target server, you are ready to enable client access to the Web sites on the target server while maintaining the DNS entries to the source servers. After a period of time that meets your business needs, you can remove the DNS entries that point to the Web sites on the source server.
Enable client access to the Web sites that are on the target server by completing the following steps:
-
Create the appropriate DNS entries for the Web sites running on the target server.
For more information about how to create DNS entries for your Web sites, see Managing resource records in Help and Support Center for Windows Server2003.
-
Monitor client traffic to determine whether clients are successfully accessing the target server.
For more information about how to monitor client traffic to Web sites on the target server, see Verifying That Clients Are Not Accessing the Web Site earlier in this chapter.
-
Establish a monitoring period, such as a few hours or a day, to confirm that clients accessing Web sites on the target server are experiencing response times and application responses that meet or exceed your requirements.
-
Remove the DNS entries that are pointing to the Web sites on the source server.
For more information about how to remove DNS entries for your Web sites, see Managing resource records in Help and Support Center for Windows Server2003.
-
Prevent new clients from accessing the Web sites on the source server by pausing the Web sites on the source server.
For more information about how to pause Web sites on the source server, see Verifying That Clients Are Not Accessing the Web Site earlier in this chapter.
-
Monitor client traffic to the Web sites on the source server to determine when clients are no longer accessing the source server.
For more information about how to monitor client traffic to Web sites on the source server, see Verifying That Clients Are Not Accessing the Web Site earlier in this chapter.
-
When clients are no longer accessing the Web sites on the source server, decommission the hardware for the source server.
EAN: 2147483647
Pages: 96