Common Topics
|
|
Since most Active Directory administrative tools have been realized as MMC snap-ins, all of them have similar interfaces and basic features. Knowing these features allows you to use all of these tools in the most effective way possible, and to optimize them to fit your specific tasks. Sometimes, a snap-in's design and features may even affect some aspects of deploying Active Directory in an enterprise (see a bit later in this chapter "Choosing Columns for Displaying"). Let us start by discussing administrative snap-ins, taking into consideration some common features of snap-ins.
Making a Custom MMC Console
Most standard administrative tools can be started from the Start | Administrative Tools menu, or can be added to a custom MMC console. Such tools as the Active Directory Schema Manager snap-in or the Group Policy Object Editor snap-in should always be initially added to an MMC document:
-
Enter mmc in the Start | Run window.
-
Press <Ctrl>+<M>, or select the Console | Add/Remove Snap-in command. Click Add in the window that is open.
-
Select the desired snap-in in the Add Standalone Snap-in window, and click Add. You can repeat this step for all the snap-ins you need. Then in turn click Close and OK.
-
Save the resulting console with any name.
Making your own administrative console may have some valuable advantages:
-
You will have on hand all the instruments you want, which will be configured to your discretion. For example, you may have snap-ins connected to different domains, or Group Policy Object Editor snap-ins linked to various GPOs.
-
There will be more options for configuring and customizing snap-ins (see in this chapter "Customizing Snap-ins").
-
The computer's memory is used more efficiently. A number of tools started separately allocate considerably more memory than the same tools added to a single MMC console.
| Note | On Windows .NET-based domain controllers (unlike those in Windows 2000), all administrative snap-ins can be opened in the "Author" mode (right click on a snap-in's name and select Author in the context menu), which allows you to reconfigure these tools (add new snap-ins in the same MMC document, etc.). |
Browsing the Tree Pane in a Snap-in's Window
While working in a snap-in window, don't forget about such simple but timesaving web-style features on the Standard toolbar as the Forward ![]() and Back
and Back ![]() buttons, the Up one level
buttons, the Up one level ![]() button, and the Refresh
button, and the Refresh ![]() button. When pointing to an object, you can view its properties either by selecting the Properties command in the context menu, or — to do it faster — by clicking the Properties
button. When pointing to an object, you can view its properties either by selecting the Properties command in the context menu, or — to do it faster — by clicking the Properties ![]() button.
button.
Choosing Columns for Displaying
When working with different Active Directory objects, it is possible (and may be very helpful) to display more fields than just the three default ones, or to delete unnecessary ones. Select the Add/Remove Columns (in Windows 2000 — Choose Columns) command in the View menu, and add or delete the necessary columns in the Add/Remove Columns window (Fig. 7.1). Each object will have its own set of fields.
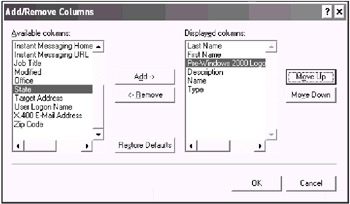
Fig. 7.1: Choosing necessary object attributes to be displayed
In Fig. 7.1, note that in MMC v.2.0 you can move any item to the beginning of the Displayed columns list. In Windows 2000, the Name item is always at the top.
| Note | When the Active Directory Users and Computers snap-in is used for creating new users, the Full Name field is generated as a concatenation of the First name and Last Name fields. The Full name field, in turn, determines the value of the cn attribute. (You can, however, change this order, if you like — see articles Q250455 and Q277717 in the Microsoft Knowledge Base.) You may want, for some reason, to use proprietary naming conventions in your organization. (This can be easily organized by using scripts or batch tools, such as LDIFDE or CSVDE. Manual manipulations are also possible.) For instance, you may wish for the cn attribute (i.e., the Full name field) to have the same value as the sAMAccountName attribute (the Pre-Windows 2000 Logon Name field) or as a proprietary ID code. |
| Note | Sometimes, the Windows 2000 version of the Active Directory Users and Computers snap-in does not sort a container contents on some columns. (In Windows .NET, this is not an issue.) You can use the Find Users, Contacts, and Groups window rather than the main snap-in's window. This window allows you to sort rows according to the contents of any column. "Hide" the Name column from view and rearrange the columns in the order most useful for you. (It is not possible to remove this column in the main window. Moreover, in Windows 2000, this column must always be first.) Click Browse to view the forest tree and go to any location (then click Find Now). You can select the most appropriate of the two windows depending on your requirements. |
Exporting the List of Objects
To document the objects stored in Active Directory, you can export any currently displayed list into a file for processing or printing from the Word or Excel applications. Point to a container or an object and click the Export List ![]() button, or select the Export List command in the context or Action menu. You can choose between tab-separated (.txt) and comma-separated (.csv) formats. CSV files are easily imported into Microsoft Excel documents.
button, or select the Export List command in the context or Action menu. You can choose between tab-separated (.txt) and comma-separated (.csv) formats. CSV files are easily imported into Microsoft Excel documents.
Customizing Snap-ins
Standard configured administrative snap-ins lack certain useful features that are realized in Microsoft Management Console (MMC) technology. These features are common for all MMC consoles, and there are many reasons why using them in the administrative tools allows an administrator to save a lot of time and effort.
Favorites
In Windows .NET, this feature is implemented in a slightly different way than it is in Windows 2000. (Keep in mind that the Windows 2000 systems use the MMC version 1.2, whereas the Windows XP/.NET systems use the MMC version 2.0.)
In a custom MMC v.1.2 console, the Favorites tab will appear near the usual Tree tab. A MMC v.2.0 console has the Favorites command on the main console menu. You can browse Active Directory in a web-like style, and save the pages you'd like to access later. Point to any container in the Tree pane, and select Add to Favorites in the Favorites menu. This feature can be very helpful in large domains that contain many OUs and other objects.
Notice also that any container in Active Directory that can be viewed in different snap-ins can be designated as a favorite; it will be placed in the same list of favorites. You can, for instance, simultaneously have main OUs from different domains, authoritative DNS zones, DHCP scopes, site connections, etc., all on the Favorites tab (or on the Favorite menu—in MMC v.2.0). Do not forget about traditional browsing features, such as the Back, Forward, Up one level, and Refresh buttons.
Creating Custom Taskpads
An administrator may create specialized taskpads for him—or herself (for some routine tasks) as well as for users that need to carry out certain (limited) tasks, or for subordinate administrators to whom control of some OUs or objects is delegated.
Let us discuss an example of how to create a taskpad for administering organizational units. This taskpad will allow us to view all accounts in an OU and perform three predefined operations: create a computer, user, and group.
Select an OU in the Active Directory Users and Computers snap-in, and click New Taskpad View from the Action menu. The New Taskpad View Wizard will be started, which will guide you through all necessary steps. At any step of wizard working, you can go back and change the selected options or entered information.
Leave the default options in the Taskpad Display and Taskpad Target steps unchanged. This means that the tab of the created taskpad will appear for each OU in the domain (but not for other domain containers!). Enter the necessary information at the Name and Description step. When the wizard has finished (i.e., the view without task buttons has been generated), check the Start New Task wizard box in the last window and click Finish. The New Task Wizard will start.
The default Command Type is Menu command. In the Shortcut Menu Command step, select Tree item task in the Command source list (Fig. 7.2). In this case, we will be able to choose the commands for the entire OU. First, select New->Computer.
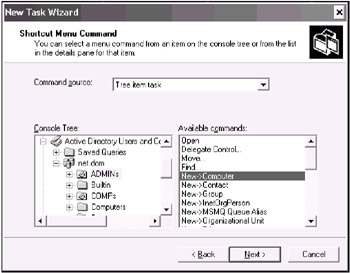
Fig. 7.2: Selecting the source of the commands for the new taskpad
At the next step, enter a relevant task name, and a description for this task. Then you can choose a graphical representation (icon) for the task. A new task has now been created. To add the other two commands, check the Run this wizard again box in the last window of the wizard, and click Finish. The wizard will start again. Repeat the necessary steps, the first time selecting New->User, and the second time—New->Group. Fig. 7.3 shows an example of a taskpad created according to the described procedure.
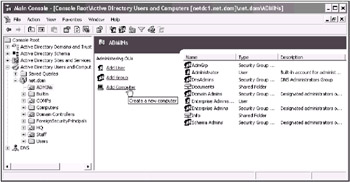
Fig. 7.3: An example of a taskpad
You may add/delete tasks, and/or change the properties (options) of a taskpad by selecting the appropriate tab and clicking Edit Taskpad View in the Action menu.
It is possible to define commands (tasks) for an entire container as well as for an individual (selected) object in a container. While browsing the object tree, only those commands that are acceptable for the selected object will be enabled in a taskpad.
|
|
EAN: 2147483647
Pages: 154