Active Directory Users and Computers Snap-in
|
|
Active Directory Users and Computers Snap-in
The Active Directory Users and Computers snap-in is perhaps one of the tools that an administrator will use most often. That is why it is advisable to learn all of the features that this snap-in provides for an administrator. This is especially true if a domain contains thousands of objects, which complicates viewing and manipulating them.
New Features
The Windows .NET version of the Active Directory Users and Computers snap-in offers some new features:
-
Multiple selection of directory objects
-
Drag-and-prop option for move operations of various type and adding member(s) to a group
-
Saved Queries
Connecting to Domain or Domain Controller
The Active Directory Users and Computers snap-in operates with only one DC — and, therefore, one domain — at a time. By default, this is your current logon domain and DC (unless you have changed the domain or DC and checked the Save this domain setting for the current console box, Fig. 7.4).
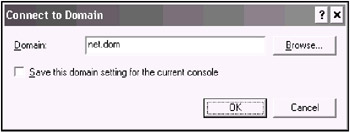
Fig. 7.4: You may choose any domain in the forest to administer
You can choose a domain that you wish to investigate by pointing to the root of the snap-in (or by selecting the domain object from the tree pane) and then selecting the Connect to Domain command in the Action menu. In the Connect to Domain window enter the domain name in the Domain field, or click the Browse button and select the domain from the expanding domain tree. Notice the Save this domain setting for the current console box, which allows you to have a few saved snap-ins configured for different domains.
Similarly, you can select any domain controller in the current domain with the Connect to Domain Controller command in the Action menu. It makes sense to do this when, for some reason (e.g., regarding a replication issue), you need to administer a Global Catalog server, or a DC performing a specific FSMO role, such as PDC Emulator. In the Connect to Domain Controller window (Fig. 7.5) you can see your current DC's name and the list of available controllers.

Fig. 7.5: Selecting a controller within a domain
Contents Displaying Options
The Active Directory Users and Computers snap-in has a few specific features, which don't change the administrative options of the snap-in essentially, but significantly affect the scope of objects available for manipulating. These features are discussed below.
Saved Queries
This is a new feature available in Windows .NET only.
An administrator can create one or more queries using the LDAP filters and save them in the snap-in for subsequent use. These queries will allow him or her to quickly select the necessary objects only, which simplifies work with large number of directory objects of a specific type (user, group, computer, etc.). All queries are stored in the Saved Queries folder in the snap-in's tree pane and can be organized in a folder structure (see an example in Fig. 7.6).
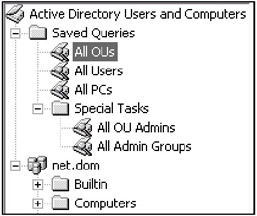
Fig. 7.6: A sample structure of saved queries
You can either immediately create a new query on a computer or import query definition of an already existing query.
To create a query:
-
Select the Saved Queries folder and right click it.
-
Select New | Query in the context menu.
-
In the New Query window (Fig. 7.7), fill in the Name and Description (optional) fields.
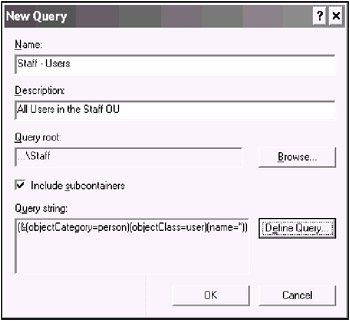
Fig. 7.7: An example of a new saved query -
Click Browse and select the query root — a container in the domain structure (by default, the entire domain container will be looked through). Make sure that the Include subdirectories box is properly set.
-
Click Define Query and compose a necessary query string. For detailed information on that operation, see the "Filter Options" section.
-
Click OK. The query is ready.
The saved queries are not sorted and are placed in the query structure in the order that they are created.
Saved queries are stored on the computer where they have been created. (These queries are included in the roaming user profile if the user has such a profile.) To distribute saved queries, the Help and Support Center proposes to copy the dsa.msc file to other domain controllers (located in the same domain). However, this statement most likely needs clarification.
In Windows .NET, some administrative snap-ins save the user settings in XML files located in the “Documents and Settings\<UserName>\Application Data\Microsoft\MMC folder. The name of such a file correlates with the snap-in's file name (see details in the next chapter, section "File Names of Administrative Snap-ins"). I have found in my own experience that you can safely copy the dsa file from that folder to another computer (to a similar folder in the user profile). Remember, however, that all snap-in's settings (including all saved queries) are copied with this operation.
There is a legitimate and proven way to distribute saved queries. You can simply export a query definition (in XML format) and import it to every computer where it is necessary. Right click a query name and select Export Query Definition. Save the definition to a file, copy the file to another computer, start the Active Directory Users and Computers snap-in, right click the Saved Queries folder, and select Import Query Definition.
Advanced Features Mode
By default, the Active Directory Users and Computers snap-in only displays five nodes in basic mode. For some administrative tasks this is not enough, and you need to switch to the Advanced Features mode that displays some important "invisible" containers and has additional options. This can be done using the Advanced Features command in the View menu.
Perhaps one of the most valuable nodes shown in advanced mode is the System container (Fig. 7.8), which provides access to a number of system objects, for instance, to the MicrosoftDNS container that stores DNS zone information if a zone (zones) is (are) Active Directory-integrated and is replicated on all DCs in the current domain. (This is the only option in Windows 2000-based domains and one of four possible options in Windows .NET-based domains.)
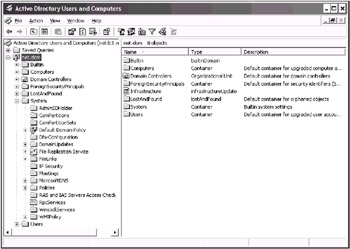
Fig. 7.8: The advanced view of a domain objects tree
Even more important is that only in the Advanced Features mode will you have the Object and Security tabs in the Properties window of any Active Directory object. All changes related to delegation of control over some object are displayed in the Security tab. For example, if you want to revoke an administrative right from a user or a group, you need to open this tab for the object and delete the appropriate permissions.
There is also one remarkable possibility related to this mode. You might notice that five "default" nodes (plus the possible subdomains) are visible while browsing the Directory node in the My Network Places folder from Windows 2000-based domain clients (see Fig. 7.9 where a root and a child domains are shown). Sometimes this information will annoy end users, while at other times you may not want end users to be able to access these nodes.
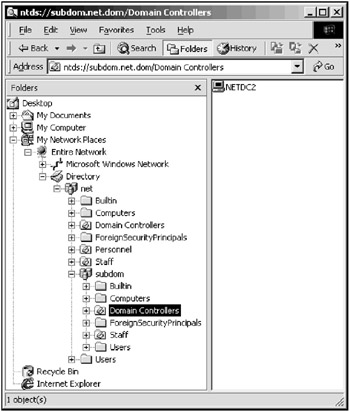
Fig. 7.9: Browsing the entire domain tree may be tiresome or undesirable
You can control the "visibility" of any Active Directory container or object by using an optional Boolean attribute showInAdvancedViewOnly (it can be set to FALSE or TRUE, the case of the letters doesn't matter). The majority of Active Directory objects have this attribute, and you can change its value as needed with the ADSI Edit tool (see the "ADSI Edit Snap-in" section in this chapter). If an object (container) has this attribute set to TRUE, the object will not be displayed during domain browsing or in the base mode in the Active Directory Users and Computers snap-in. This has no affect on the general behavior of the domain.
Fig. 7.10 shows the same domain structure that is represented in Fig. 7.9, but the ShowInAdvancedViewOnly attribute has been set to TRUE for some domain objects, so none of the users in the forest will be able to see the contents of these domains. (In an actual situation, this might be too strict a limit, but do not forget that this is only an example!)
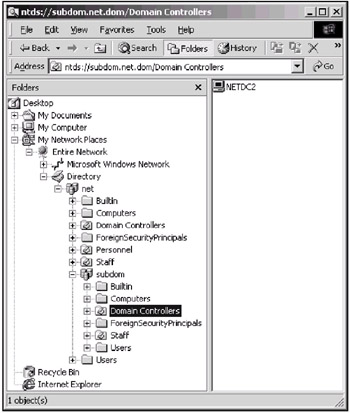
Fig. 7.10: You can restrict browsing of both parent and child domains for clients and "hide" unnecessary objects from viewing
| Important | Windows 2000-based client computers can browse any Active Directory domains (Windows 2000- and Windows .NET-based). This feature has not been included in Windows XP/.NET, and the Directory node is not present in the My Network Places folder. |
| Note | It is also possible to control the "visibility" of Active Directory objects using access permissions. Both methods have their own pros and cons; therefore, select the most convenient method, depending on your requirements. For example, permissions allow for more comprehensive control, but if you use them, rather than have the ability to make selected object invisible (or visible), you will have to accept that all objects will become invisible (or visible) with your selection. |
Users, Groups, and Computers as Containers Mode
Some Active Directory objects act as containers for other objects. By default, this fact has no visible representation in the Active Directory Users and Computers snap-in. Nevertheless, there are situations when you may wish to see all object relations. For example, compare the two screenshots shown in Fig. 7.11 and Fig. 7.12. The first one is a default view of the Domain Controllers OU and the NETDC1 domain controller; the second one shows the same controller as a container.
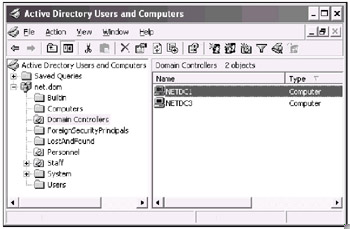
Fig. 7.11: The default view of a domain controller

Fig. 7.12: Using the Users, Groups, and Computers as containers mode for locating a published printer connected to the selected domain controller
As you can see in Fig. 7.12, the domain controller has child objects; in particular, a published printer. You might want to move the printer object to any other OU. This will not affect the printer's behavior.
| Note | All printers are initially published in Active Directory as child objects of relative computers. You may want to gather them in a single OU for users' or administrators' convenience, although the Search option is a more convenient way to work with printers. |
Filter Options
As the number of objects in Active Directory considerably increases, the length of time it takes to find specific objects may become unbearable. However, you can set a filter and look up only the desired objects. Select the Filter Options command in the View menu or click the Set Filtering Options ![]() button on the Standard toolbar. You can set the types of objects to be displayed from a predefined list, or create your own custom filter. The process of creating a filter is intuitively simple. Fig. 7.13 shows how to create a filter for selecting user accounts with names starting with the letter "a". To activate the filter, you must click the Add button and place the criteria onto the list.
button on the Standard toolbar. You can set the types of objects to be displayed from a predefined list, or create your own custom filter. The process of creating a filter is intuitively simple. Fig. 7.13 shows how to create a filter for selecting user accounts with names starting with the letter "a". To activate the filter, you must click the Add button and place the criteria onto the list.
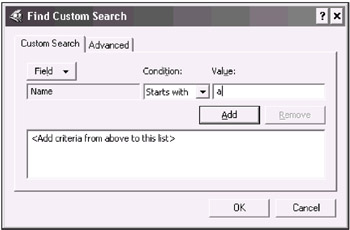
Fig. 7.13: An example of a custom filter
| Caution | Using a filter may present a potential danger when working with containers (OUs). Suppose you have set a filter that displays only computer accounts. You may decide that an OU is empty or holds only unnecessary computer accounts (since it seems it does not contain any computers). You might just forget that this OU can contain other objects and inadvertently delete the entire OU rather than only the necessary accounts … Therefore, do not forget to turn off any filters when doing such operations as deleting or moving container objects! |
| Note | Many Active Directory objects have the Name attribute. Regretfully, the object name isn't displayed in the Fine Custom Search window in any form. Therefore, you must remember all parameters of any added criteria. |
| Note | Since two or more added criteria are AND-combined, an object is displayed in the snap-in window only if all specified conditions are true. OR-combined criteria are not available. Use the LDAP query if you need a complicated filter condition. |
| Caution | Filters, especially complex ones, may considerably slow down object display in the snap-in window. |
In addition, you can use LDAP queries. Click the Advanced tab in the Find Custom Search window and enter a query (LDAP filter string) in text format. For example, the following query fetches only non-default user accounts:
(& (objectCategory=Person) (objectClass=user) (displayName=*))
| Caution | All defined custom search filters along with the LDAP query are connected by a logical AND. This means that you may, for instance, define the first filter condition as "Name + Starts with + a", and view all user accounts whose names start with "a". If you add the second filter condition defined as "Name + Starts with + d" (or add an LDAP query such as (cn=d*), you won't see user accounts beginning with "a" or "d". (You must instead specify an OR-condition in a single filter!) You'll see no accounts at all, because there are no accounts whose names start with "a" and "d". Therefore, the combination of filter conditions and LDAP queries has to be regarded as a chain of sub-queries within other queries, i.e., as an intersection of sets. |
Finding Active Directory Objects
Another option that helps to process large numbers of Active Directory objects is the Find feature. In a sense, it works as a filter, but has a wider scope: you can find objects in the entire directory (forest), in any domain, or in a selected container. To find an object, you can use the Find command in each container's context menu or select a container and click the Find objects in Active Directory ![]() button on the toolbar.
button on the toolbar.
Search (and advanced search) fields can vary, depending on the type of directory objects (users, computers, printers, etc.). Search criteria for advanced operations are composed in the same way as filters and have the same constraints. The Custom Search option is the most flexible; it allows you to specify practically any attribute of any directory object. The Windows .NET version of the Active Directory Users and Computers snap-in provides also the Common Queries option that finds the user, computer, and group objects only. For example, using this option, you can find disabled user and computer accounts, or user accounts that have not been used during a specified number of days.
| Note | When you find users in the Find Users, Contacts, and Groups window, the string entered in the Name field is verified for matches with all user-naming attributes — cn, First name, Last name, and Display name. |
| Note | The In list comprises the names of containers (OUs) you've already visited. |
In the window of the objects found, you can select all context menu commands that are available for these objects in the usual snap-in window.
An example of the Find window and a sample result is shown in Fig. 7.14. This search query finds all groups in the entire directory with names starting with the letter "s". The example shown might not be particularly useful, but note that you can search the whole domain forest (two domains in this case) as well as a selected domain or container. In addition, it demonstrates that such a group as Server Operators is present in either domain, but only one (root) domain has the Schema Admins group.
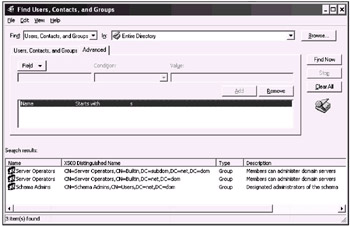
Fig. 7.14: Finding objects in Active Directory
Fine Tuning the Find Window
The display mode shown in Fig. 7.14 is not the default. To see the distinguished names (i.e., all RDNs of the parent objects) of found objects, click Choose Columns in the View menu, select the X500 Distinguished Name item and add it to Columns shown.
To further filter the result of a find operation, click Filter in the View menu. The filter bar will appear at the top of the result pane in the Find window. How to filter out some groups and users among a number of similar objects is shown in Fig. 7.15.

Fig. 7.15: Filtering the search results: among all administrators, we have selected those that belong to the ADMINs OU
| Note | In the Find window, it is possible to turn on the filter option for clients (by default, the filter is set to off) by using the Enable filter in Find dialog box policy in the user's administrative templates (sub-node Desktop | Active Directory). |
It so happens that it is not possible to see some directory objects' (computers, printers, etc.) distinguished names. In that case, you can add the Published At column to the default view of the Find window. The canonical names of the objects will be displayed in that column. For example, for the XP-PRO3 computer that belongs to the net.dom domain and is placed in the COMPs organizational unit, the displayed string will be ntds://net.dom/COMPs/XP-PRO3.
Multiple Selection of Directory Objects
One of the most troublesome disadvantages of the Active Directory Users and Computers snap-in in Windows 2000 is its inability to manipulate a number of directory objects, primarily, and user objects. Windows .NET offers a pleasant improvement in that area.
For the most of directory objects (e.g., computers, groups, OUs, and etc.), you can change the description only. However, in user objects, over 30 attributes can be changed simultaneously. You select the objects as usual — using the <Shift> and <Ctrl> keys. Then, you select the Properties command on the context or Action menu. The set of allowed commands will be determined by the type of the objects selected. When two or more objects are selected, the modified Properties window opens. An example of that window for user objects is shown in Fig. 7.16.
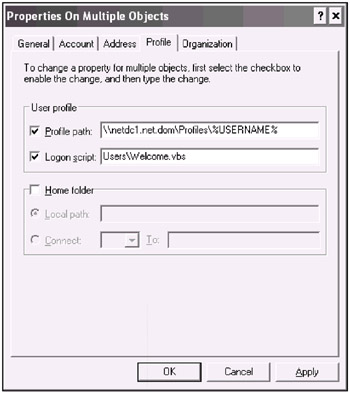
Fig. 7.16: Appointing a profile and logon script to a number of users
On the Profile tab, it is possible to set all the same properties that are available in the usual user's properties window. If you set a box, you define the value entered in the appropriate field. If the field is empty, the existing attribute value will be cleared. If a box is not checked (the appropriate field is grey), the existing value will be retained without changes.
|
|
EAN: 2147483647
Pages: 154