9.3 Some Picks
| This section describes just a few of the applications you can install using Fink. First up is lynx, a text-based web browser that's great for viewing or downloading web pages quickly. After that, we talk about Pine, an email client and USENET newsreader. Finally, we discuss GIMP, a general-purpose graphics manipulation package that can do all sorts of great things with images. 9.3.1 Browsing the Web with LynxThere are a number of excellent web browsers available for Mac OS X, including Safari, Camino, Mozilla, and OmniWeb. However, attractive, graphically based web browsers can be slow ” especially with flashy, graphics-laden web pages on a slow network.
The Lynx web browser (originally from the University of Kansas and available on many Unix systems) is different because it's a text-based web browser that works within the Terminal application. Being text-only causes it to have some trade-offs you should know about. Lynx indicates where graphics occur in a page layout; you won't see the graphics, but the bits of text that Lynx uses in their place can clutter the screen. Still, because it doesn't have to download or display those graphics, Lynx is fast , which is especially helpful over a dial-up modem or busy network connection. Sites with complex multicolumn layouts can be hard to follow with Lynx; a good rule is to page through the screens, looking for the link you want and ignore the rest. The Lynx command line syntax is: lynx " location " For example, to visit the O'Reilly home page, enter lynx " http://www . oreilly.com ", or simply lynx " www.oreilly.com ". Figure 9-11 shows part of the home page. Figure 9-11. Viewing the O'Reilly home page in Lynx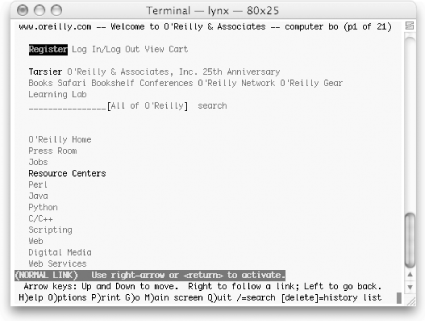 To move around the Web, use your keyboard's arrow keys, spacebar, and a set of single-letter commands. The third line from the bottom of a Lynx screen gives you a hint of what you might want to do at the moment. In Figure 9-11, for instance, "(NORMAL LINK) Use right-arrow or <return> to activate" means you can follow the link by pressing right arrow. The bottom two lines of the screen remind you of common commands, and the help system (which you get by typing h ) lists the rest (use the spacebar to scroll forward one screenfull, and press b to move back a screenfull). When you first view a screen, the link nearest the top is selected and highlighted. To select a later link (farther down the page), press the down-arrow key. The up-arrow key selects the previous link (farther up the page). Once you've selected a link you want to visit, press the right-arrow key to follow that link; the new page appears. Go back to the previous page by pressing the left-arrow key (from any selected link; it doesn't matter which one). 9.3.1.1 Dumping a web page with LynxYou can use Lynx to dump the contents of a web page in plain text, which you can then paste into an email message to send a web page around in a plain, easy-to-read format. Lynx preserves URLs in documents by formatting them as footnotes. To dump a web page, use lynx -dump URL , as in lynx -dump "http://www.intuitive.com/kana.shtml ". This produces the following output: Calligraphy "Chokkan" The calligraphy on the Intuitive Systems Web site was produced by Master Japanese Calligrapher [1]Eri Takase, and it means "insight" or "intuition": The first character means "direct". It is interesting in that it originally meant "ten eyes" or clear, transparent, no concealment. The second character is constructed of characters meaning "bite the heart" and now means "feel" or "sense". Intuition means to "directly sense" [2]close this window References 1. http://www.takase.com/ 2. javascript:window.close( ); 9.3.2 Electronic Mail with PineWhen you install Mac OS X or boot it for the first time, the installer may ask whether you want to sign up for .Mac, Apple's suite of Internet services that includes electronic mail (email). If you signed up for .Mac, you probably use Apple's Mail application to send and receive email. If you didn't sign up for .Mac, you may be using an email account provided by your ISP or employer along with Apple's Mail or some other application. There are many great graphical mail applications for Mac OS X. However, Terminal-based email programs have some benefits:
Pine, from the University of Washington, is a popular program for reading and sending email from a terminal. It works completely from your keyboard; you don't need a mouse. Mac OS X does not include Pine by default. To install Pine, see Section 9.2.2, earlier in this chapter. Start Pine by entering its name at a shell prompt. It also accepts options and arguments on its command line; to find out more, enter pine -h (help). Figure 9-12 shows the starting display, i.e., the main menu . Figure 9-12. Pine main menu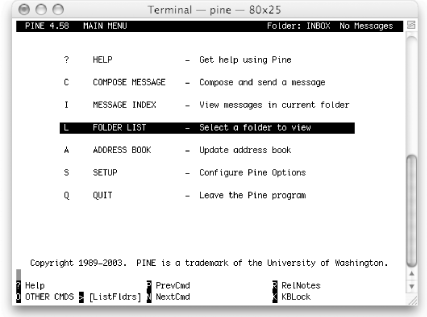 9.3.2.1 Configuring PineThe Pine main menu has a Setup entry for configuring Pine. After you enter S (the "Setup" command), you can choose what kind of setup you want. From the setup screen, you can get to the option configuration area with C (the "Config" command). The configuration screen has page after page of options. You can look through them with the spacebar (to move forward one page), the - key (back one page), the N key (to move forward to the next entry), and the P key (back to the previous entry). If you know the name of an option you want to change, you can search for it with W (the "Whereis" command). When you highlight an option, the menu of commands at the bottom of the screen will show you what can do with that particular option. A good choice, while you're exploring, is the ? (help) command, to find out about the option you've highlighted. There are several kinds of options:
When you exit the setup screen with the E command, Pine asks you to confirm whether you want to save any option changes you made. Answer N if you were just experimenting or aren't sure. 9.3.2.2 Configuring Pine to send and receive emailBefore you can send or receive email with Pine, you must configure it to talk to your email servers. You will need the following information (if you are not using .Mac, you will need to get this information from your ISP or system administrator):
Enter the setup screen by pressing S at Pine's main menu. Then press C to enter the Config screen. To configure your email account, do the following:
The exact settings may vary. If you need more help, visit the Usenet newsgroup comp.mail.pine and look for the latest posting of the FAQ. After you've made these changes, press E to exit Setup, press Y to commit changes, and then quit and restart Pine. 9.3.2.3 Reading email with PineWhen you first start Pine, the main menu appears, as shown earlier in Figure 9-12. You may also be prompted for your password, since Pine needs this to connect to your POP or IMAP server. The highlighted line, which is the default command, gives a list of your email folders. [1] You can choose the highlighted command by pressing Return, pressing the greater-than sign ( > ), or typing the letter next to the command. (Here, this is l ”a lowercase L. You don't need to type the commands in uppercase.) But because you probably haven't used Pine before, the only interesting folder is the inbox, which is the folder where your new messages wait for you to read them.
The display in Figure 9-13 shows that there are two messages waiting. Let's go directly to the inbox by pressing I (or by highlighting that line in the menu and pressing Return) to read the new mail. Figure 9-13 has the message index for our inbox. Figure 9-13. Pine message index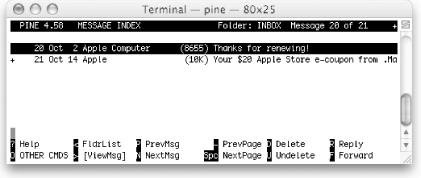 The main part of the window is a list of the messages in the folder, one message per line. If a line starts with N , it's a new message that hasn't been read. (The first message has been sitting in the inbox for some time now.) Next on each line is the message number ; messages in a folder are numbered 1, 2, and so on. That's followed by the date the message was sent, who sent it, the number of characters in the message (size), and, finally, the message subject. Let's skip the first message and read number 2. The down-arrow key or the N key moves the highlight bar over that message. As usual, you can get the default action ”the one shown in brackets at the bottom of the display (here, [ViewMsg] ) ”by pressing Return or > . The message from Apple will appear. Just as > takes you forward in Pine, the < key generally takes you back to where you came from ”in this case, the message index. You can type R to reply to this message, F to forward it (send it on to someone else), D to mark it for deletion, and the Tab key to go to the next message without deleting this one. When you mark a message for deletion, it stays in the folder message index, marked with a D at the left side of its line, until you quit Pine. Type Q to quit. Pine asks if you really want to quit. If you've marked messages for deletion, Pine asks if you want to expunge ("really delete") them. Answering Y here deletes the message. 9.3.2.4 Sending email with PineIf you've already started Pine, you can compose a message from many of its displays by typing C . (Though, as always, not every Pine command is available at every display.) You can also start from the main menu. Or, at a shell prompt, you can go straight into message composition by typing pine addr1 addr2 , where each addr is an email address such as bjepson@oreilly.com . In that case, after you've sent the mail message, Pine quits and leaves you at another shell prompt. When you compose a message, Pine puts you in a window called the composer . (You'll also go into the composer if you use the Reply or Forward commands while you're reading another mail message.) The composer is a lot like another Unix text editor (Pico), but the first few lines are special because they're the message header ” the "To:," "Cc:" (carbon copy), "Attchmnt:" (attached file), and "Subject:" lines. Figure 9-14 shows an example, already filled in. Figure 9-14. Pine composer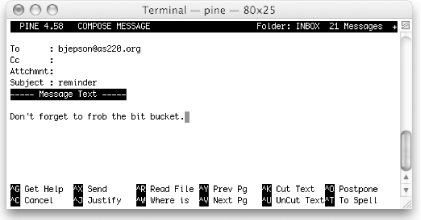 As you fill in the header, the composer works differently than when you're in the message text (body of the message). The list of commands at the bottom of the window is a bit different in those cases, too. For instance, while you edit the header, you can attach a file to the end of the message with the "Attach" command, which is Control-J. (Pine uses the ^ symbol to indicate a control character.) However, when you edit the body, you can read a file into the place you're currently editing (as opposed to attaching it) with the Control-R "Read File" command. But the main difference between editing the body and the header is the way you enter addresses. If you have more than one address on the same line, separate them with commas (,). Pine will rearrange the addresses so there's just one on each line. Move up and down between the header lines with Control-N and Control-P, or with the up-arrow and down-arrow keys. When you move into the message body (under the "Message Text" line), type any text you want. Paragraphs are usually separated with single blank lines.
You can use editing commands such as Control-J to justify a paragraph and Control-T to check your spelling. When you're done, Control-X (exit) leaves the composer, asking first if you want to send the message you just wrote. Control-C cancels the message, though you'll be asked if you're sure. If you need to quit but don't want to send or cancel, the Control-O command postpones your message; then, the next time you try to start the composer, Pine asks whether you want to continue the postponed composition. 9.3.3 Editing Graphics with GIMPGIMP (the GNU Image Manipulation Program) is a powerful free graphics manipulation program. You can get it at http://www.gimp.org/, and can use it to manipulate photos and other bitmap images in ways previously possible only with expensive graphics software.
To run GIMP, you'll need to launch X11 and run the command gimp & at an xterm window. You can also add GIMP to the X11 Applications menu (see Section 9.1.3, earlier in this chapter). The first time you run GIMP, it will walk you through its user installation process (see Figure 9-15). Figure 9-15. Installing GIMP for the first time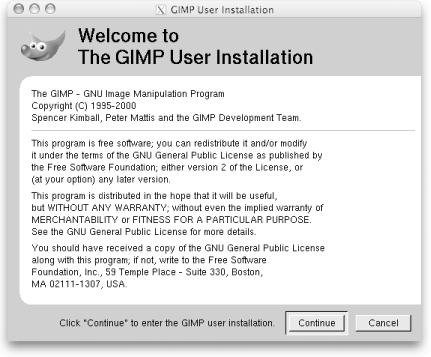 After you've finished setting GIMP up, several windows will appear, as shown in Figure 9-16. Clockwise from the top, they are:
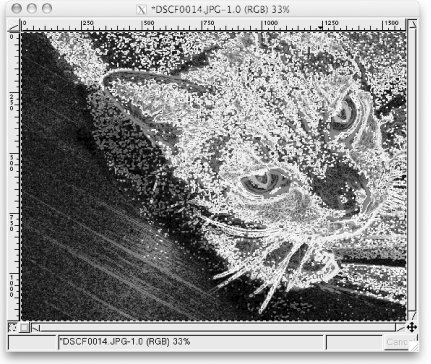
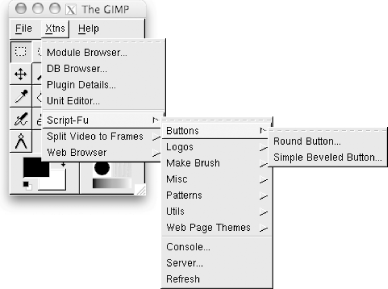
Figure 9-16. The GIMP's default windows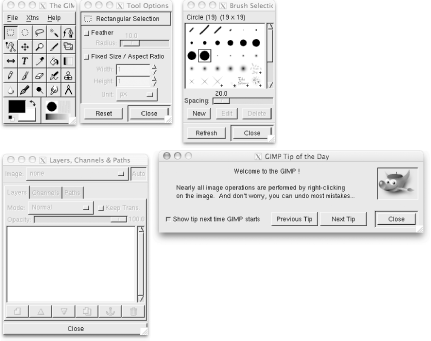 To open an existing file, select File Figure 9-17. Editing a photograph in the GIMP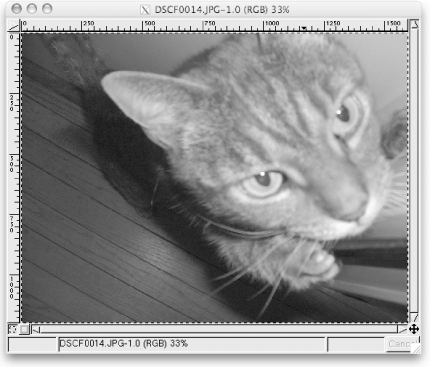 Command-Click or click the wedge in the upper-lefthand corner of the window to bring up a menu. The options are too numerous to describe completely, but the following list describes some you may find useful.
Figure 9-18. Transforming a predator with the Alchemy |
EAN: 2147483647
Pages: 88
- Chapter VI Web Site Quality and Usability in E-Commerce
- Chapter VII Objective and Perceived Complexity and Their Impacts on Internet Communication
- Chapter VIII Personalization Systems and Their Deployment as Web Site Interface Design Decisions
- Chapter XIV Product Catalog and Shopping Cart Effective Design
- Chapter XVIII Web Systems Design, Litigation, and Online Consumer Behavior
- The Four Keys to Lean Six Sigma
- Key #1: Delight Your Customers with Speed and Quality
- Key #3: Work Together for Maximum Gain
- Making Improvements That Last: An Illustrated Guide to DMAIC and the Lean Six Sigma Toolkit
- The Experience of Making Improvements: What Its Like to Work on Lean Six Sigma Projects

 Open), create a new file (File