| All Flex components and all the components you will build are actually ActionScript classes. The base class for the visual components you have been using and the MXML components you will build in this lesson is UIComponent. This means that in a hierarchy of components, UIComponent is at the top, and all the other components inherit from it. 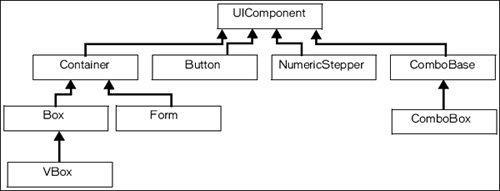 There are general groupings of these classes based on their functionality, such as component, manager and data service classes. Most of the classes you have been using up to this point have been component classes, such as Application, HBox, and TextInput, which have visual representations. You also used the HTTPService tag, which does not descend from UIComponent because it is a nonvisual componenta data service tag.  Note  | You can examine a complete description of the class hierarchy in the Flex ActionScript and MXML API reference, referred to as ASDoc. |
Understanding the Basics on How to Create a Custom Component When you build your own component, you basically want to do one of two things: add functionality to a predefined component or group numerous components together. The basic steps to build a component are as follows: 1. | Create a new file with the filename as the name you want for your component. Because this is a class you are building, it should start with an uppercase letter. Also, remember that these names will be case-sensitive, like Flex is in general.
| 2. | Make the first line of code the XML document type definition you have been using for the main application files.
<?xml version="1.0" encoding="utf-8"?>
| 3. | As the first MXML tag, insert the root tag of your component, which will reflect what you want to do in the component. If it is a container, you most likely want to group several components' functionality into one easier-to-use component. If it is not a container, you most likely want to extend the functionality of a predefined component or further extend the functionality of a custom component.
<mx:VBox xmlns:mx="http://www.adobe.com/2006/mxml"> </mx:VBox>
| 4. | In the body of the component, add the functionality needed. This will vary depending on what functionality you want the component to provide.
| 5. | In the file that will instantiate the component, add an XML namespace so you can access the component. It is considered a best practice to group components in subdirectories according to their purpose. For instance, you will create a directory called views; then under that directory you will add another three subdirectories, one for each of the applications you are building: Dashboard, DataEntry, and EComm. Later in this lesson, you will add a namespace using the letter v as the prefix to have access to all the custom components in the views/dataEntry directory. The statement will appear as follows:
xmlns:v="views.dataEntry.*"
| 6. | Instantiate the component as you would a predefined component. For instance, if you created a file component called MyComp.mxml, using the namespace just created, you would instantiate that component as follows:
<v:MyComp/>
|
Creating a Custom Component Step by Step Now that you know the general approach to building a component, here is a simple example of adding functionality to a predefined component. Assume that you want to build a List that will automatically have three grocery categories displayed in it. Your component will use <mx:List> as its root tag. Up to now, all the MXML pages you've built use the <mx:Application> tag as the root tag. Components cannot use the <mx:Application> tag as the root tag because it can be used only once per application. Here are the six steps of creating a simple component: 1. | Create a file named MyList.mxml. (You don't need to actually do this, just follow along with the logic.)
| 2. | The first line of the component will be the standard XML document declaration
<?xml version="1.0" encoding="utf-8"?>.
| 3. | Because you are extending the functionality of the <mx:List>, you will use it as the root tag. Your skeleton component will appear as follows:
<?xml version="1.0" encoding="utf-8"?> <mx:List xmlns:mx="http://www.adobe.com/2006/mxml"> </mx:List>
| 4. | The functionality to add to the body of the component is to display three <mx:String> tags in the <mx:List>. You know you need to use an <mx:dataProvider> tag to supply data to an <mx:List>, so here is the finished component:
<?xml version="1.0" encoding="utf-8"?> <mx:List xmlns:mx="http://www.adobe.com/2006/mxml"> <mx:dataProvider> <mx:String>Dairy</mx:String> <mx:String>Produce</mx:String> <mx:String>Bakery</mx:String> </mx:dataProvider> </mx:List>
| 5. | Assume that a file named CompTest.mxml is created at the root of the project. Also, the component is created in a directory called myComps. Use the letter c as the prefix for the components in this folder. Therefore, the XML namespace to add to the <mx:Application> tag is xmlns:c="myComps.*".
| | | 6. | Finally, instantiate the component in the main application file:
<?xml version="1.0" encoding="utf-8"?> <mx:Application xmlns:mx="http://www.adobe.com/2006/mxml" xmlns:c="myComps.*"> <c:MyList/> </mx:Application>
|
Note | You will shortly see that Flex Builder makes this process of creating the skeleton of the component very easy. |
The CompTest.mxml output would appear as shown here. 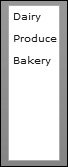
Using Custom Components in Application Architecture You now know the basic mechanics of creating custom components. You might ask yourself, so now what? How does this affect what I have been doing? Why should I use them? How do I use them? The advantages of components mentioned in the opening pages of this lesson should now be more clear: Components make applications easier to build, debug, and maintain. Components ease team development. With planning, components can lead to a suite of reusable code.
To facilitate the use of components as reusable code, you should make them independent of other code whenever possible. The components should operate as independent pieces of application logic with a clear definition of what data must be passed into them and what data will be returned from them. The object-oriented programming term "loosely coupled" is often applied to this kind of architecture. Suppose that you have a component that uses an <mx:List> to display some information. You later learn of a new component that would actually be a better way to display that data. If built correctly, you should be able to switch the display component used in your custom component and not need to make any other changes. You would have changed the inner workings of the custom component, but the data going into the component and what came out did not change, so no changes to the rest of the application were needed. Now, you need to think about how components fit into the bigger picture of application architecture. Although this book is not meant to be a discourse on Flex application architectures, it would be negligent not to show how components can fit into the bigger picture. In the applications you are building in this book you will implement a simple form of model-view-controller (MVC) architecture. MVC is a design pattern or software architecture that separates the application's data, user interface, and control logic into three distinct groupings. The goal is to implement the logic so changes can be made to one portion of the application with a minimal impact to the others. Short definitions of the key terms are as follows: Model: The data the application uses. It manages data elements, responds to queries about its state, and instructions to change the data. View: The user interface. It is responsible for presenting model data to the user and gathering information from the user. Controller: Responds to eventstypically user events, but also system events. The events are interpreted and the controller invokes changes on the model and view.
Generally, the flow of MVC is as follows: 1. | The user interacts with the user interface (a view), such as clicking a button to add an item to a shopping cart.
| 2. | The controller handles the input event.
| 3. | The controller accesses the model, maybe by retrieving or altering data.
| 4. | A view then uses the model data for appropriate user presentation.
|
Consider the e-commerce application you are building. Eventually your EComm.mxml main application page will be the controller. There will be views that do the following: Display the different grocery item categories Display the items in the shopping cart Display a detailed view of a particular grocery item Display all the grocery items in a particular category
All of these will be fronted by the controller, which in your case is the main application page: EComm.mxml. The model will start as an <mx:Model> tag, and by the end of the book transform to data retrieved from a database. Now the stage is set, and you're ready to get started building components and enhancing the architecture and functionality of the applications you are building. |