After users have all the groceries they want in their shopping cart, they need to check out. You just implemented the mechanism to get to a checkout page, and in this task you will create a ViewStack that controls the steps the user will follow to check out.
1. | Create a value object by right-clicking the valueObjects folder and selecting New > ActionScript Class. The name of the class should be OrderInfo. Click Finish.
This class will hold all the information about the order, including billing information about the user.
|
| |
2. | In the class create the following public properties, using the data types shown. Mark the entire class as bindable.
You will later add to the property list a property for the actual shopping cart that holds the grocery items that were purchased.
Note  | The Date class is used here. The class hierarchy of the Date class is very simple; it has only the Object class as a parent. The Date class has many properties that hold date and time information, and many methods to get and set those properties. In this lesson, the key properties will be date, month, and fullYear. |
|
| |
3. | Check to be sure that your complete class appears as follows:
package valueObjects{ [Bindable] public class OrderInfo{ public var billingName:String; public var billingAddress:String; public var billingCity:String; public var billingState:String; public var billingZip:String; public var cardType:String; public var cardNumber:Number; public var cardExpirationMonth:Number; public var cardExpirationYear:Number; public var deliveryDate:Date; } }
This class looks very different from other classes you have built earlier because this class has no constructor. In actuality, it does have a constructor because ActionScript will automatically create a constructor for you if one is not written.
There is a reason to build the class this way. Because the property values will be gathered from different components, it is easy to instantiate an OrderInfo object. Whenever values are gathered from the user, you can simply assign them by using dot notation. If you wrote a constructor that needed all 10 parameters at one time it would be more difficult to populate the object in this particular case.
|
4. | Open Checkout.mxml from the views/ecomm folder and remove the Label inserted in the last task.
The Label was used only temporarily to be sure the ViewStack implemented in the last task was working.
|
5. | Insert an <mx:ViewStack> tag block with an id of checkoutNav and the width and height set to 100%.
You will have three components instantiated in this ViewStack that correspond to the steps of 1) gathering user info, 2) gathering credit card info, and 3) displaying a confirmation page.
|
6. | Create a new MXML component in the views/ecomm folder named BillingInfo and use an HBox as the base tag. Remove the width and height values.
This is the form to gather user information such as name, address, and so on.
|
| |
7. | Add the following to gather user information:
<mx:VBox> <mx:Form> <mx:Label text="Checkout Page 1 of 3"/> <mx:FormHeading label="Customer Information"/> <mx:FormItem label="Name"> <mx:TextInput /> </mx:FormItem> <mx:FormItem label="Address"> <mx:TextArea width="160"/> </mx:FormItem> <mx:FormItem label="City"> <mx:TextInput /> </mx:FormItem> <mx:FormItem label="State"> <mx:TextInput maxChars="2"/> </mx:FormItem> <mx:FormItem label="Zip"> <mx:TextInput /> </mx:FormItem> </mx:Form> </mx:VBox> <mx:VBox> <mx:Spacer height="40"/> <mx:Form> <mx:FormItem label="Delivery Date"> <mx:DateChooser /> </mx:FormItem> <mx:FormItem> <mx:Button label="Continue"/> </mx:FormItem> </mx:Form> </mx:VBox>
The DateChooser control is used here for the first time in the book. It presents a calendar to the userwho can choose both a particular month and day. The DateChooser selectedDate property then holds the date value selected. The data type of the selectedDate is Date, a class discussed earlier in this lesson.
Tip  | Flex has another date selection control called DateField. This control has what appears to the user to be an empty TextInput box with a calendar icon beside it. The user can click the icon, and a calendar appears for date selection. After the selection, the date appears in the TextInput box. |
|
8. | Create the following Model just below the opening <mx:HBox> tag to group the form information into a single data structure:
<mx:Model > <custInfo> <billingName>{billingName.text}</billingName> <billingAddress>{billingAddress.text}</billingAddress> <billingCity>{billingCity.text}</billingCity> <billingState>{billingState.text}</billingState> <billingZip>{billingZip.text}</billingZip> <deliveryDate>{deliveryDate.selectedDate}</deliveryDate> </custInfo> </mx:Model>
As you have done before, you gather the form information into a Model. You will pass the Model information back to the Checkout page later in this task.
|
| |
9. | Above the Model, use an <mx:Metadata> tag to create a custom event named billingInfoReturn of type ObjectDataEvent, which you will write in a following step.
<mx:Metadata> [Event(name="billingInfoReturn",type="events.ObjectDataEvent")] </mx:Metadata>
What you will do in this component is gather up the user information in the form, place that data in an object, and then dispatch a custom event containing that data. Here you create the name of the custom event.
|
10. | Insert an <mx:Script> block under the <mx:Metadata> tag block and import the events.ObjectDataEvent custom event class.
import events.ObjectDataEvent;
You will build this class in the next step.
|
11. | Right-click the events folder and select New > ActionScript class. Give it the name ObjectDataEvent and set the superclass to flash.events.Event. The custom class will have only one property, an Object named data, which will be passed into the custom event object as the second parameter of the constructor. Inside the constructor, pass the type to the superclass and set the data property with the passed-in object. Override the clone method to use your new constructor and your class should appear as follows:
package events { import flash.events.Event; public class ObjectDataEvent extends Event{ public var data:Object; public function ObjectDataEvent(type:String,data:Object){ super(type); this.data = data; } override public function clone():Event { return new ObjectDataEvent(type, data); } } }
This is a generic custom event class. You can use it whenever you want to use a custom event to pass a generic Object in the custom event object.
|
12. | Back in BillingInfo.mxml, add a click event to the Continue Button at the bottom of the Form and call a function named process().
This function will eventually dispatch the custom event, along with the event object that contains the form data.
|
| |
13. | At the bottom of the <mx:Script> block, create the skeleton for a private function named process(), and data type the function itself as void. In the function create a variable local to the function named o, data typed as ObjectDataEvent and set it equal to a new ObjectDataEvent.
var o:ObjectDataEvent=new ObjectDataEvent();
You are building the custom event object that will be dispatched and handled in the Checkout component. You still have to add the event name and data to the object.
|
14. | As parameters in the new ObjectDataEvent, pass the name of the custom component, the String billingInfoReturn, and the data to be returned, which is stored in the Model whose instance name is checkOutInfo.
var o:ObjectDataEvent=new ObjectDataEvent("billingInfoReturn",checkoutInfo);
The correct object is now created and ready for dispatching.
|
15. | As the secondand lastline of code in the function, dispatch the ObjectDataEvent object just built. Check to be sure that your function appears as follows:
private function process():void{ var o:ObjectDataEvent=new ObjectDataEvent("billingInfoReturn",checkoutInfo); dispatchEvent(o); }
This completes the BillingInfo component. You will now move back to the Checkout component and instantiate the new BillingInfo component. You will also handle the custom event and use the data sent back in the event object.
|
16. | Return to Checkout.mxml. Add an XML namespace to the <mx:VBox> tag so you can use components in the views/ecomm folder. Use the letter v as the prefix.
xmlns:v="views.ecomm.*"
This permits you to use the BillingInfo component you just created.
|
17. | In the <mx:ViewStack> block, instantiate the BillingInfo component. Give it an instance name of billingInfo, and set the width and height to 100%.
<v:BillingInfo width="100%" height="100%"/>
This is the first of three containers that will be in this ViewStack.
|
| |
18. | Handle the custom billingInfoReturn event in the component. In the ActionScript for the event, call a function named doBillingInfoReturn(). Pass the event object as a parameter.
billingInfoReturn="doBillingInfoReturn(event)"
If you happen to save at this point you will get an error because the custom event class is not yet imported.
|
19. | Insert an <mx:Script> block and import the classes valueObjects.OrderInfo and events.ObjectDataEvent. Also create a public variable named orderInfo, data typed as OrderInfo and set equal to a new OrderInfo object.
import valueObjects.OrderInfo; import events.ObjectDataEvent; [Bindable] public var orderInfo:OrderInfo=new OrderInfo();
The whole point of the checkout process is to build an OrderInfo object to be sent to the back end for processing, so obviously you need that class and an instance of that class to place data in. An event object instance of the class ObjectDataEvent is passed to the function, so you need this class for data typing.
|
| |
20. | At the bottom of the <mx:Script> block, create a private function named doBillingInfoReturn() and data type the function as void. The function should accept a parameter named event data typed as ObjectDataEvent. In the function, assign the six properties passed in the custom event object to the orderInfo object instance, using the same property names.
private function doBillingInfoReturn(event:ObjectDataEvent):void{ orderInfo.billingName=event.data.billingName; orderInfo.billingAddress=event.data.billingAddress; orderInfo.billingCity=event.data.billingCity; orderInfo.billingState=event.data.billingState; orderInfo.billingZip=event.data.billingZip; orderInfo.deliveryDate=event.data.deliveryDate; }
Tip | A great way to check to be sure that the data coming from the component is valid is to use the debugger. For instance, before you added the six lines of code to assign property values, you could have marked a breakpoint in the empty function and then debugged the application. After you submitted the form, you would have seen in the Variables pane the data passed in correctly, as well as the exact object path to get to the data. |
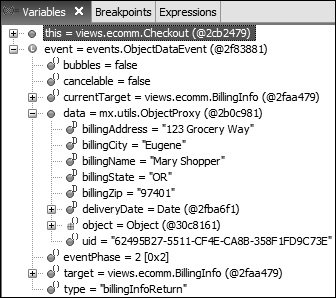
The data passed in the event object is stored in the data property because that is how it is named in the custom event class.
This concludes this task, and you now have the personal information from the user in the OrderInfo object. Next you will use a component to get credit card information.
|