Multipage Forms
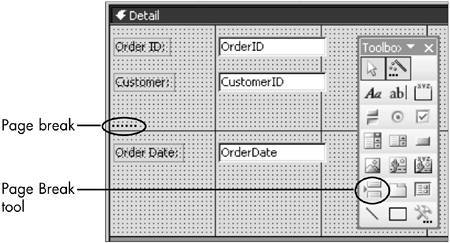
| Sometimes a single form comprises two or more groups of data that you'd like to segregate in some fashion. There are several ways to accomplish that objective. Often design tools, such as a rectangle or a line, can be used successfully to divide data. In other cases, you'll want to take more radical steps and divide the form into separate pages. The less interesting and more mundane method is to include page breaks in the form. The more innovative technique is to use a tab control that accomplishes the objective of creating separate pages without actually creating any additional pages. I don't want to imply that tabbed controls are necessarily better than page breaks. Each has its uses, and, depending on your form design, you might be better served by a page break. For example, you can use page breaks to create multiscreen forms on which each page is the same size and each window shows only one page at a time. But I think that tabbed pages can often accomplish the same objectives more efficiently. Page BreaksA page break forces a new page in a form or report. Let's assume that your form has two pages so that each record is presented in two pages. You're in the first of the two pages. When you press Page Down, the text immediately following the page break appears at the top of your screen. Note that a page break is in effect only in Form View when the Default View property (which is on the Format tab of the Form property sheet) is set to Single View. To create a page break, click the Page Break control in the toolbox, drag it to the form, position the crosshairs, and click. The page break will be selected; click anywhere away from it to see the page break (see Figure 12.31). Figure 12.31. You can use page breaks to create multipage forms.
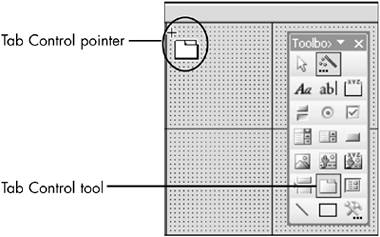
Tab ControlsTab controls are an efficient method of segregating and presenting lots of data in a relatively small area. The Employees form in the Northwind database is a good example of the effective use of a tab control (see Figure 12.32). The Company Info page contains fields such as Hire Date and Reports To; the Personal Info page has fields such as Home Phone and Birth Date. As you will have guessed, you switch pages by clicking the tabs. The tabbed pages usefully separate different types of data, efficiently using the available space. Figure 12.32. The Employees form uses a tab control to present employee data in two tabbed pages.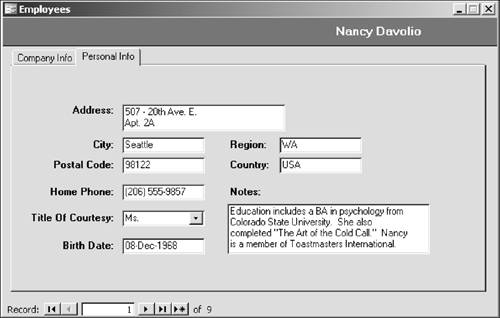 Creating a Tab ControlYou can add tabs by clicking the Tab Control button in the toolbox and dragging it to the Design section (see Figure 12.33). If you click and release at the crosshairs, you'll create a tab control that's 2 inches by 2 inches and that has two tabbed pages. More likely, you'll want to position the crosshairs where you want the top-left corner, and then click and drag across and down for tab pages with dimensions that suit your needs. Figure 12.33. A tab control is initially created with two tabbed pages.
Although it's less complex than the option group you met in Chapter 11, a tab control has a number of separate elements, each with its own property sheet. Specifically, each page has its own property sheet, and the tab control as a whole has a property sheet. When you want to choose a page, click directly on its tab. When you want to choose the tab control, click to the right of the tabs (see Figure 12.34). As always, make sure you're using the correct property sheet by checking the title. Figure 12.34. The Page1 tab page (not the tab control) is selected. You can create a new name for the tabbed page by using the Name property in the property sheet. You can easily replace the numbered page name (such as Page1) on the tabs by right-clicking the tab and selecting View, Properties, Other tab and typing a new name (see Figure 12.34). If you'd like a caption on the tab separate from the name, use the Caption property on the Format tab. Adding Controls to Tab PagesTo add a field to a tab page, just drag and drop it onto the tab page. You can also use the tools in the toolbox. One problem you might have with adding fields is that, by default, grid lines and dots do not appear on tabbed pages. But that situation is easily rectified: Select the tab control and open its property sheet. On the Format tab, edit the Back Style to Transparent (see Figure 12.35). Figure 12.35. You can add grid lines and dots to the tabbed pages.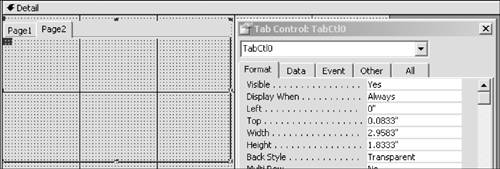 Other Tab TasksIt's unfortunate that in Access the same word can have a variety of meanings. One such word is groups: You have groups in the Database window, groups of controls, groups in reports, and so on. Another example is tab. When you right-click the tab control, there's a command for Tab Order. This is the same dialog box that's available from the View menu, and it has nothing to do with tab controls (see Figure 12.36). Instead, you use the command to change the order in which Access moves the focus from control to control when you press the Tab key (a topic discussed in Chapter 6, "Entering, Editing, and Displaying Data"). Figure 12.36. The context menu offers a variety of commands.
From the same right-click (or, more formally, context) menu, you can choose Insert Page to add a new page to the right of the other pages. Choose Delete Page to delete the page that is currently selected. You can also easily change the order of the pages. Right-click the tab control and choose Page Order. Use the Move Up and Move Down keys to change the sequence of the pages. |

EAN: 2147483647
Pages: 169