| Let's shift gears a bit and take a look at macros. A macro is an object that automates tasks. It is a set of one or more actions that perform specific operations. That definition, plagiarized from Access Help, gives you little idea of what macros are or how you can use them. Let's create a macro to get a better feel: 1. | If the frmOrders form is still open, close it and save your changes.
| 2. | In the Database window, click the Macros button and choose New.
Unlike other Access objects, there is only this one view for a macro.
| 3. | Press F11 to switch to the Database window. Click the Forms tab.
| 4. | Choose Window, Tile Vertically.
| 5. | Select frmCustomers. Drag and drop its icon to the first row of the Action column, which now reads OpenForm.
You have begun to create a macro that will open the Customers form whenever the macro is run.
| 6. | Click in the first row of the Action column and open the drop-down list.
You can choose among dozens of actions to perform. Some of these might appear mysterious and forbidding, but others refer to easily understood actions, such as PrintOut, OpenReport, and ShowAllRecords.
| 7. | Press Tab. In the Comments column, type Opens frmCustomers.
The Comment column in a macro is like the Description column in Table Design view. It's used to provide information to the user, and it is entirely optional.
| 8. | In the lower pane of the Macro window, click the Form Name argument.
The lower pane contains action arguments, which might be (roughly) considered the macro's properties:
Form Name is self-explanatory. View is also easy to understand; its drop-down list contains the possible views in which you can open the form. Filter Name enables you to filter the form's records. Where Condition lets you enter criteria that Access will use to select the records. Data Mode determines what you can do with the data after you open it in either Form or Datasheet view. Its settings are Add, Edit, and Read Only. Window Mode is both self-explanatory and difficult to explain. Click it and read the explanation at the right to get a better feel for the possible selections. Note that these actions are specific to opening a form, the action you entered in the first row of the top pane. Just as each field you enter in Table Design view has its own set of field properties, depending on data type, each action you enter in the top pane of a macro has its own set of arguments, depending on the action.
| 9. | Click Data Mode and type a for "add."
When the form opens, it displays a blank record and is ready for data entry.
| 10. | Choose File, Save. Name the macro mcrOpenfrmCustomers and click OK (see Figure 12.27).
Figure 12.27. The OpenForm action with its arguments. (The macro has been resized for a better view.) 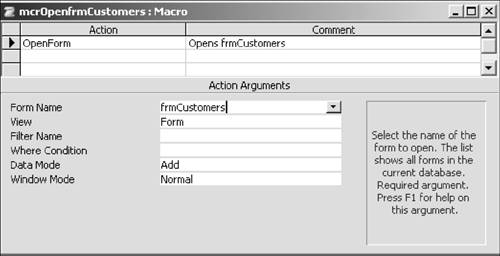
| 11. | Choose Run from the Run menu. The frmCustomers form opens in Data Entry mode.
| 12. | Close the OpenfrmCustomers macro. Leave the frmCustomers form open.
|
Understanding Macros At this point, you might be thinking, "Great, I just spent 10 minutes doing something complicated that got a form to open. I can open a form with a 2-second excursion to the Database window." But sometimes you don't want to open a form (or print a report or apply a filter) manually as a standalone action. You want to have a form open automatically when something else is going on: when you open another form, when a control gets the focus, when you exit a report, or when some other action is executed. In cases such as these, you can use the macro you just created to have frmCustomers open without your involvement. In other words, a macro is useful for automatically performing an action in a host of situations under varied circumstances. You can run a macro automatically by assigning it to an event, an action that triggers a macro. A typical event is a mouse click. Whenever you click, say, a particular control, Access runs the macro and executes the operation (or, more often, operations). Other examples of events include opening a window, giving the focus, and pressing a key. Understanding Events Let's try an example using an event to trigger the macro. Suppose you'd like to print a Customers report whenever you exit the Customers form. You can use a macro to execute this two-step task. The first action is opening the report, and the second is printing a range of pages. If you have problems with the macro after completing all the steps, compare yours with the solution mcrPrintCustRept in the NiftyLionsChap12 End.mdb database. 1. | Click View in the open Customers form to switch to Design view. (Maximize the window if you want.)
| 2. | Choose Edit, Select Form; then choose View, Properties to open the Form property sheet.
| 3. | Click the Event tab. Click in the On Close property and click the ellipsis.
The On Close event TRiggers the macro you assign to it when you close the form.
| 4. | In the Choose Builder dialog box, select Macro Builder and click OK.
Choosing Macro Builder in a property sheet is another way of beginning the macro-creation process.
| 5. | In the Save As dialog box, type mcrPrintCustRept and click OK.
| 6. | Click in the first row of the Action column. Open the drop-down list and choose OpenReport.
The drop-down list in the Action column contains the list of available actions. Note that it includes OpenForm, the action that Access selected for you in the previous example.
| 7. | Press Tab. In the Comment column, type Opens the Customers report.
| 8. | In the action arguments in the lower pane, click Report Name. Open the drop-down list and choose rptCustomers.
| 9. | Click the View action argument. Open the drop-down and choose Print Preview.
If you want to print the entire report immediately, choose Print instead. By selecting Print Preview, you merely open the report.
| 10. | Leaving the second row of the top pane blank, click in the Action column of the third row. Open the drop-down list and choose PrintOut.
You can skip a row or two between actions, just in case you want to use more than one row for a comment. Skipping rows also makes the macro easier to read. Access is indifferent about blank rows: It performs the actions in the order they appear.
| 11. | Press Tab. Type Prints the Customers report.
| 12. | In the action arguments, click Print Range. Open the drop-down list and choose Pages.
| 13. | Click in Page From and type 1. Click Page To and type 1.
| 14. | Click in the Action column of the fifth row. Open the drop-down list and choose Close.
| 15. | Press Tab. In the Comment column, type Close the report.
This action closes the report after it prints the first page, so you don't have to close it on your own.
| 16. | In the action arguments below, click Object Type, open the drop-down list, and choose Report.
| 17. | Click Object Name, open the drop-down list, and choose rptCustomers (see Figure 12.28).
Figure 12.28. It's a good idea to leave a blank row or two between macro steps. 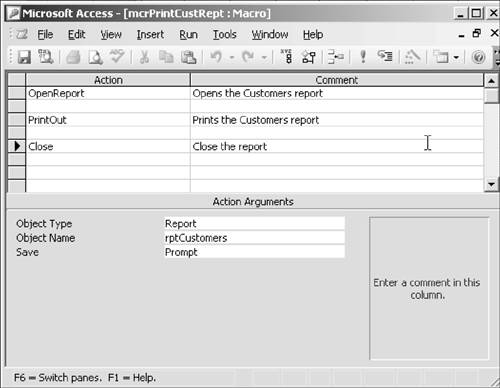
| 18. | Choose File, Save and close the macro window.
| 19. | In frmCustomers, choose File, Save.
If you don't want to run the macro and print the page, skip the next step and the page won't be printed.
| 20. | Click View to switch to Form view.
| 21. | Close the form.
Access opens the Customers report in Print Preview, prints the first page, and then closes it.
|
Q&A | Q1: | I don't understand why you're going through all this work to create a macro. I've used macros before. In Word, I turn on the macro recorder, perform the actions I want, and, bing, I've got a macro that runs whenever I press the shortcut key I've assigned to it. Isn't there some kind of feature in Access that lets you build a macro that way? | | A1: | No, there isn't. When you create a macro in Access, you need to use the Macro window, as you just did. |
|
Setting Conditions You can also add a condition to the macro that determines whether an action is carried out. You enter an expression that can be evaluated as either true or false (or yes or no). If the circumstances are true/Yes, Access proceeds with the action; if False/No, Access does not. For example, suppose that when you open the Orders form, you want the Customers report to open as wellbut only if a certain condition is met. For example, you might want the report to open only if orders were made between certain dates. You can add a condition so that the report opens only when that condition is fulfilled. In the following example, you set a condition in a macro. (If you have problems with the macro after completing all the steps, compare yours with the solution mcrOrdersCust in the NiftyLionsChap12End.mdb database.) NOTE Don't confuse conditions with the action argument of the Where Condition. In the case of the former, the condition determines whether an action will be taken. In the case of the latter, you know that that an action will be taken. When the action is executed, the Where Condition limits the records retrieved to those that meet certain criteria.
1. | In the Database window, open the tblOrders table and look at the Order Date field. Note that orders were made between July 16, 2004, and September 10, 2004. Close the Orders table.
| 2. | In the Database window, click Macros and click New.
| 3. | Click in the Action column. Open the drop-down list and choose OpenForm.
| 4. | Press Tab. In the Comment column, type Opens the Orders form.
Remember, a comment is only "for your information"; it does not affect the action, and it is not required.
| 5. | In the action arguments below, click Form Name, open the drop-down list, and choose frmOrders.
| 6. | Choose View, Conditions. The Condition column is displayed.
| 7. | Click in the third row of the Condition column and type the following expression: [Forms]![frmOrders]![OrderDate] Between #16-Jul-2004# And #10-Sep-2004#.
This expression is comprised of the following components:
[Forms]![frmOrders]![OrderDate] is the identifier for the field that the expression applies to. I briefly mentioned identifiers in Chapter 7, "Find and Filter." Note its syntax. [Forms] is a general identifier for forms and is followed by an exclamation point. [frmOrders] is the form name, also followed by an exclamation point. [OrderDate] is the name of the text box or the control that contains order date values. Between...And is the operator that finds a range of numbers, dates, and so on. The dates of 16-Jul-2004 and 10-Sep-2004 are literal values that are enclosed in pound signs.
| 8. | Press Tab. Open the drop-down list in Action and choose OpenReport.
| 9. | Press Tab. In the Comment column, type Opens only if the Orders form has records between certain dates.
This comment will still be true if you decide later to edit the dates in the condition.
| 10. | In the action arguments below, click Report Name, open the drop-down list, and choose rptCustomers.
| 11. | Click in the View argument, open the drop-down list, and choose Print Preview.
| 12. | Choose File, Save and save the macro as mcrOrdersCust. Close the macro.
| 13. | In the Database window, click Macros and double-click mcrOrdersCust. The form and report open.
| 14. | Close the form and report.
| 15. | Open mcrOrdersCust in Design view.
| 16. | Click in the condition you wrote. Press Shift+F2 to open the Zoom window.
| 17. | Edit the first date in the condition to 7/18/2004 (see Figure 12.29).
Figure 12.29. You can add a condition to a macro so that an action is run only if the condition is true. 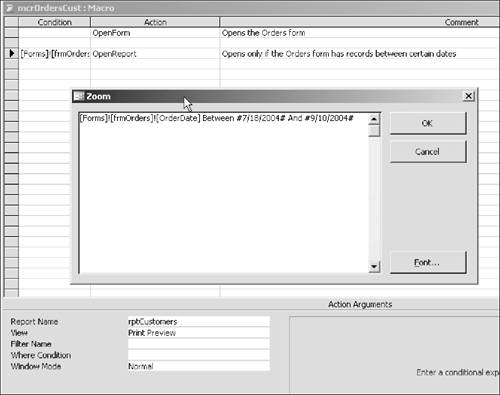
Remember, the form contains records from July 16, 2004, so the condition is now False.
| 18. | Click OK. Close the macro and save your changes.
| 19. | Double-click mcrOrdersCust to run it.
Because the condition for opening the report is False, only the Orders form opens, not the report.
| 20. | Close the Orders form.
|
Macro Groups A macro group comprises several related macros, each with its own name. Bundling macros in a group is a good way to organize them so they can be easily found and used. Otherwise, building macros with macro groups is the same as building macros. The case example at the end of the chapter has an extended example of how to use macro groups. Single Step Tool Finally, let's take a look at a tool Access provides to troubleshoot macros. It's inevitable that you'll create macros that won't work on your first, second, or even eleventh try. Not only must you be painstaking in entering the various conditions and arguments for each action, but you must also be sure to include every action, in the proper sequence. At some point, you're going to assume that Access just knows that an action needs to be performedyou have to open the report before you print it, right?and you won't bother to include specific instructions. But Access knows no such thing. It won't perform any action unless it is explicitly told to do so. Here's where the Single Step tool becomes invaluable. As the name implies, it takes you step by step through each action so you can spot the error(s) you've made. There's no error in mcrOrders, which matches the macro mcrOrdersCust macro you created earlier. But you can use the Single Step tool to go through it and see how the tool works: 1. | Click Macros in the Database window.
| 2. | Select mcrOrders and click Design.
| 3. | Click Single Step on the toolbar and click Run on the toolbar. The Macro Single Step dialog box is displayed (see Figure 12.30).
Figure 12.30. The Single Step tool can help you find out why your macro doesn't work. 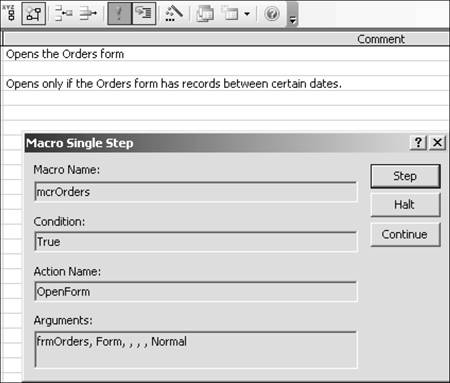
The action name is OpenForm, the first action. Note that the condition is true, even though you didn't enter a specific condition for the OpenForm action. This merely means that the action can be executed.
The Halt button is self-explanatory, but how does Step compare with Continue? Use Step to run the current action and move to the next action. Use Continue to cancel Single Step and run the entire macro without stopping.
| 4. | Click Step.
Access opens the form. The details for the next action of OpenReport are displayed. Because the condition is False (the report includes records before 7/18/2004), the next action will not be executed.
| 5. | Click Continue to end Single Step. Close the macro and close the form.
|
|