Section 3.2. Using JSF with Spring
|
|
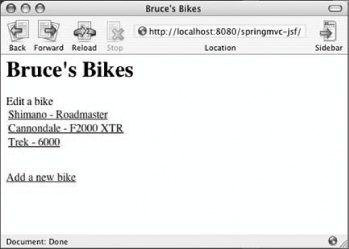
3.2. Using JSF with SpringIn this section you'll see how to use JavaServer Faces and Spring together. Then we'll see how you can use the JSF expression language to access Spring beans. JSF, like Spring MVC and Tapestry, is a second-generation web application framework. The first generation, represented by frameworks such as Struts, have taught us a lot over the past three or four years, and better frameworks have evolved as a result. For example, both JSF and Tapestry have component models, which makes it easier to extend those frameworks and share that work with others. JSF, Tapestry, and Spring MVC also support value bindingswiring HTML elements (in the case of Spring MVC) or components (JSF and Tapestry) to JavaBean properties. In that simple mechanism lies a lot of power. More about that later... In the first example, you'll implement Bruce's Bike Shop using JSF and Spring. 3.2.1. How do I do that?The JSF version of Bruce's Bike Store looks nearly identical to the Struts and Spring MVC versions, as you can see from Figure 3-3. Figure 3-2. JSF version of the main page You can dive right into the JSF version of bikes.jsp: <%@ taglib prefix="f" uri="http://java.sun.com/jsf/core" %> <%@ taglib prefix="h" uri="http://java.sun.com/jsf/html" %> <html> <f:view> <head> <title> <h:outputText value="#{rentABike.storeName}"/>Note: These tags are from the JSF tag libraries. </title> </head> <body> <h1><h:outputText value="#{rentABike.storeName}"/></h1> <h:outputText value="Edit a bike"/> <h:form> <h:dataTable value="#{rentABike.bikes}" var="bike"> <h:column> <h:commandLink action="#{editBikeController.editBike}"> <h:outputText value="#{bike.manufacturer} - #{bike.model}"/> <f:param name="bikeSerialNo" value="#{bike.serialNo}"/> </h:commandLink> </h:column> </h:dataTable> <h:outputText value="<br/><br/>" escape="false"/> <h:commandLink action="#{editBikeController.newBike}"> <h:outputText value="Add a new bike"/> </h:commandLink> </h:form> </body> </f:view> </html>The preceding code uses JSF tags, such as f:view, h:form, h:outputText, and h:dataTable to create the same web page that you implemented with Spring MVC and Struts. You start by importing the JSF tag libraries with the taglib directive. As you use the JSF tags, keep in mind that tag names represent component/renderer pairs. Components maintain state and renderers generate markup. For example, the h:dataTable tag represents the data component paired with the table renderer. This distinguishes JSF from component-less frameworks such as Struts, whose JSP tags typically generate markup directly. The first thing to do in this JSP page is create a view. All JSP pages in a JSF application must enclose all component tags, such as h:outputText and h:commandLink, in a view component. That component is represented by the f:view tag. After the f:view tag, you use an h:outputText tag to set the window title to a value binding#{rentABike.storeName}which references the bike store's name. Notice you're using value bindings such as #{bike.model} and #{bike.serialNo} throughout the rest of the page to access the bikes in the bike store. A few things about this JSP page are worth mentioning before moving on:
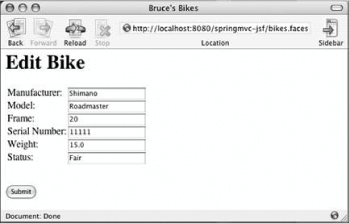
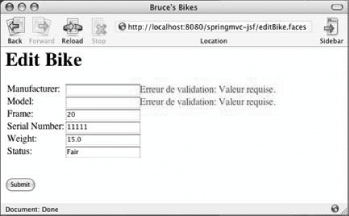
Now you need to implement the editBike.jsp, as shown in Figure 3-3. Figure 3-3. JSF version of the editBike.jsp Here's how you implement editBike.jsp with JSF: <%@ taglib prefix="f" uri="http://java.sun.com/jsf/core" %> <%@ taglib prefix="h" uri="http://java.sun.com/jsf/html" %> <html> <f:view> <head> <title> <h:outputText value="#{rentABike.storeName}"/> </title> </head> <body> <h1><h:outputText value="Edit Bike"/></h1> <h:form> <h:panelGrid columns="2"> <h:outputText value="Manufacturer:"/> <h:panelGroup> <h:inputText required="true" value="#{editBikeController.bikeToEdit.manufacturer}"/> <h:message for="manufacturer" style="color: Red"/> </h:panelGroup>Note: This grouping defines the grouping for the manufacturer control. If the user value doesn't pass validation, you'll get an error message in red. <h:outputText value="Model:"/> <h:panelGroup> <h:inputText required="true" value="#{editBikeController.bikeToEdit.model}"/> <h:message for="model" style="color: Red"/> </h:panelGroup> <h:outputText value="Frame:"/> <h:panelGroup> <h:inputText required="true" value="#{editBikeController.bikeToEdit.frame}" converter="javax.faces.Integer"/> <h:message for="frame" style="color: Red"/> </h:panelGroup> <h:outputText value="Serial Number:"/> <h:panelGroup> <h:inputText required="true" value="#{editBikeController.bikeToEdit.serialNo}"/> <h:message for="serialNo" style="color: Red"/> </h:panelGroup> <h:outputText value="Weight:"/> <h:panelGroup> <h:inputText required="true" value="#{editBikeController.bikeToEdit.weight}" converter="javax.faces.Double"/> <h:message for="weight" style="color: Red"/> </h:panelGroup> <h:outputText value="Status:"/> <h:panelGroup> <h:inputText required="true" value="#{editBikeController.bikeToEdit.status}"/> <h:message for="status" style="color: Red"/> </h:panelGroup> </h:panelGrid> <h:outputText value="<br/><br/>" escape="false"/> <h:commandButton value="Submit" action="#{editBikeController.saveBike}"/> </h:form> </body> </f:view> </html>Once again, you're using JSF tags to create a web page. You use converters to convert each bike's frame and weight properties from strings to integers and floats, respectively. You're also performing server-side validation by specifying required field values. Finally, you use h:message tags to display error messages next to offending text fields, in red, when the user neglects to enter a value for a required field, as shown in Figure 3-4. Figure 3-4. JSF error messages in French because the browser is set to prefer French Notice the error messages in the preceding snapshot are in French. That's because the user has set his browser settings to prefer French. JSF detects that browser setting and automatically localizes error messages. Now that you've implemented the requisite JSP pages for Bruce's Bike Shop, it's time to specify navigation between those pages. In the faces configuration file, you enter the following: <?xml version="1.0"?> <!DOCTYPE faces-config PUBLIC "-//Sun Microsystems, Inc.//DTD JavaServer Faces Config 1.0//EN" "http://java.sun.com/dtd/web-facesconfig_1_0.dtd"> <faces-config> <navigation-rule> <navigation-case> <from-outcome>edit</from-outcome> <to-view-id>/editBike.jsp</to-view-id> </navigation-case> </navigation-rule> Note: The jsf-config file looks a lot like the Struts config file. You specify an action and a result, in the form of a JSP page. <navigation-rule> <navigation-case> <from-outcome>bikes</from-outcome> <to-view-id>/bikes.jsp</to-view-id> </navigation-case> </navigation-rule> </faces-config> Navigation rules are easy to define and read. Here, you've defined one rule that loads /editBike.jsp whenever an action returns an outcome of "edit" and a second rule that loads /bikes.jsp whenever an action returns an outcome of "bikes". Those outcomes are returned by the following EditBikeController methods: public class EditBikeController { ... public String editBike( ) { HttpServletRequest request = (HttpServletRequest) FacesContext.getCurrentInstance( ). getExternalContext( ).getRequest( ); bikeToEdit = facade.getBike(request.getParameter("bikeSerialNo")); return "edit"; } public String newBike( ) { bikeToEdit = new Bike( ); return "edit"; } public String saveBike( ) { facade.saveBike(bikeToEdit); return "bikes"; } }The preceding methods are invoked by JSF. You ensure that invocation by specifying those methods as actions for the links in /bikes.jsp and the submit button in /editBike.jsp. 3.2.2. What just happened?You just implemented a JSF application that:
Notice the last bullet item listed above. Previously, I mentioned that value bindings were a powerful concept. To grasp just how powerful value bindings are, it pays to consider the most fundamental aspect of any web application: binding fields in a form to model objects. With Struts, you accomplish that task by manually transferring data from a form bean and pushing it to your model. That involves a fair bit of overhead: implementing an action class, mapping that action class to a URL in the Struts configuration file, invoking form bean methods to extract field values, invoking model object methods to set the corresponding bean properties, and, if you are a consientious developer, implementing a test class that tests your action. Wow. That's a lot of work. With second-generation web application frameworks like JSF, Tapestry, and Spring MVC, however, you simply use a value binding. In JSF, you specify a value binding in a JSP page. For example: <h:inputText value="#{someBean.someProperty}"/>Then you just implement the method: public class SomeBean { ... public int setSomeProperty(int property) { ... } }That's all there is to it. No action class, no action mapping, no manually transferring form bean properties to model properties. Value bindings remove all that overhead. Also, notice that value bindings are not invasive: the SomeBean need not know that it's a backing bean for a JSP page in a JSF application because there are no ties to the JSF API. That makes JSF backing beans easy to test. |
|
|
EAN: 2147483647
Pages: 90