Section 3.1. Building a Struts User Interface
|
|
3.1. Building a Struts User InterfaceIn the first example, you'll build a portion of our user interface with Java's most popular user interface framework, Struts. You'll also learn how to wire it to Spring. If you're starting a new project, you may decide to choose an alternative to Struts. We believe that emerging MVC frameworks improve the user and developer experience, but Struts is still the most popular choice. 3.1.1. How do I do that?The Struts user interface looks much like the web MVC interface. You'll configure a central dispatcher. The dispatcher will send requests to a controller, and the controller will invoke business logic in the form of actions. First, you need to configure Struts. That happens in two places: web.xml configures your central dispatcher and struts-config.xml manages the Struts Controller. Example 3-1 shows web.xml. Example 3-1. web.xml<!DOCTYPE web-app PUBLIC "-//Sun Microsystems, Inc.//DTD Web Application 2.2//EN" "http://java.sun.com/j2ee/dtds/web-app_2_2.dtd"> <web-app> <display-name>RentABike</display-name> <description> Renting bikes for fun and profit. </description> <context-param> <param-name>contextConfigLocation</param-name> <param-value> /WEB-INF/rentABikeApp-servlet.xml </param-value> </context-param> <servlet> <servlet-name>SpringContext</servlet-name> <servlet-class> org.springframework.web.context.ContextLoaderServlet </servlet-class> <load-on-startup>1</load-on-startup> </servlet> <servlet> <servlet-name>RentABike</servlet-name> <servlet-class> org.apache.struts.action.ActionServlet </servlet-class> <init-param> <param-name>config</param-name> <param-value>/WEB-INF/struts-config.xml</param-value> </init-param> <init-param> <param-name>validate</param-name> <param-value>true</param-value>12 </init-param> <load-on-startup>2</load-on-startup> </servlet> <servlet-mapping> <servlet-name>RentABike</servlet-name> <url-pattern>*.do</url-pattern> </servlet-mapping> <welcome-file-list> <welcome-file> start.html </welcome-file> </welcome-file-list> <context-param> <param-name>log4jConfigLocation</param-name> <param-value>/WEB-INF/log4j.properties</param-value> </context-param> <listener> <listener-class> org.springframework.web.util.Log4jConfigListener </listener-class> </listener> <taglib> <taglib-uri>/spring</taglib-uri> <taglib-location>/WEB-INF/spring.tld</taglib-location> </taglib> <taglib> <taglib-uri>http://java.sun.com/jstl/core</taglib-uri> <taglib-location>/WEB-INF/c.tld</taglib-location> </taglib> <taglib> <taglib-uri>/struts</taglib-uri> <taglib-location>/WEB-INF/struts-bean.tld</taglib-location> </taglib> <listener> <listener-class> org.springframework.web.context.ContextLoaderListener </listener-class> </listener> </web-app> If you've seen Struts before, you understand that there's nothing new here. We configured two servlets, one for loading the Spring context and one for controlling Struts. Each is labeled in load in a particular order (Spring first, then Struts) using the <load-on-startup> element. We load Spring first because the Struts actions rely on the Spring-created RentABike object, which has to be accessible by the time Struts starts loading its own objects. Notice also that the file loads several tag libraries for use by the .jsp pages via the <taglib> element. Finally, in classic Struts style, we created a custom suffix mapping to map inbound URL requests to the Struts controller. The <servlet-mapping> element says that any URL request whose filename ends in ".do" will be mapped to the Struts controller. There are many books on the inner workings of Struts, and we'll not repeat them here. Next, you'll need to configure the mappings that tie a request to individual actions (Example 3-2). This action map defines the basic flow of the application, and is part of struts-config.xml. Example 3-2. struts-config.xml<?xml version="1.0" encoding="UTF-8"?> <!DOCTYPE struts-config PUBLIC "-//Apache Software Foundation//DTD Struts Configuration 1.1//EN" "http://jakarta.apache.org/struts/dtds/struts-config_1_1.dtd"> <struts-config> <form-beans> <form-bean name="EditBikeForm" type="com.springbook.forms.EditBikeForm"/> </form-beans> <action-mappings> <action path="/bikes" type="org.apache.struts.actions.ForwardAction" parameter="/bikes.jsp"/> <action path="/editBike" type="org.apache.struts.actions.ForwardAction" parameter="/editBike.jsp"/> <action path="/submitBike" type="com.springbook.actions.SubmitBikeAction" name="EditBikeForm" scope="request" validate="true" input="/editBike.jsp"> <display-name>Submit Bike</display-name> <forward name="success" path="/bikes.jsp"/> <forward name="failure" path="/editBike.jsp"/> </action> </action-mappings> </struts-config> This file also contains definitions for any beans used to hold form information. In this case, there is a bean to hold information about the bike being edited, EditBikeForm. You'll need to define a stub for the scheduling part of the application. Once again, you'll read the stub from an array list (Example 3-3). Example 3-3. ArrayListRentABike.javapublic class ArrayListRentABike implements RentABike { private String storeName; final List bikes = new ArrayList( ); public void saveBike(Bike bike) { if(bikes.contains(bike)) bikes.remove(bike); bikes.add(bike); } public void deleteBike(Bike bike) { bikes.remove(bike); } public ArrayListRentABike( ) { initBikes( ); } public ArrayListRentABike (String storeName) { this.storeName = storeName; initBikes( ); } private void initBikes( ) { bikes.add(new Bike(1, "Shimano", "Roadmaster", 20, "11111", 15, "Fair")); bikes.add(new Bike(2, "Cannondale", "F2000 XTR", 18, "22222",12, "Excellent")); bikes.add(new Bike(3, "Trek", "6000", 19, "33333", 12.4, "Fair")); } public String toString( ) { return "com.springbook.ArrayListRentABike: " + storeName; } public String getStoreName( ) { return storeName; } public void setStoreName(String storeName) { this.storeName = storeName; } public List getBikes( ) { return bikes; } public Bike getBike(String serialNo) { Iterator iter = bikes.iterator( ); while(iter.hasNext( )) { Bike bike = (Bike)iter.next( ); if(serialNo.equals(bike.getSerialNo( ))) return bike; } return null; } public Bike getBike(int bikeId) { if(bikeId > bikes.size( )) return null; return (Bike)bikes.get(bikeId); } //etc... }Each action will need access to your façade. You'll build a base action (Example 3-4), which gets the bike shop façade from the Spring context. Example 3-4. BaseAction.javapublic abstract class BaseAction extends Action { private RentABike rentABike; public void setServlet(ActionServlet actionServlet) { super.setServlet(actionServlet); ServletContext servletContext = actionServlet.getServletContext( ); WebApplicationContext wac = WebApplicationContextUtils. getRequiredWebApplicationContext(servletContext); this.rentABike = (RentABike) wac.getBean("RentABike"); } protected RentABIke getRentABike( ) { return rentABike; } // Plus other utility methods suitable for a base action }Remember that you have to define the RentABike bean in rentABikeApp-servlet.xml (Example 3-5). Example 3-5. rentaBike-Servlet.xml<beans> <bean > <property name="storeName"><value>Bruce's Bikes</value></property> </bean> <!-- etc. --> </beans> Each action then does its job (Example 3-6). Example 3-6. SubmitBikeAction.javapublic class SubmitBikeAction extends BaseAction { public SubmitBikeAction( ) { super( ); } public ActionForward execute( ActionMapping mapping, ActionForm form, HttpServletRequest request, HttpServletResponse response) throws java.lang.Exception { EditBikeForm editBikeForm = (EditBikeForm) form; Bike bike = new Bike( ); bike.setManufacturer(editBikeForm.getManufacturer( )); bike.setModel(editBikeForm.getModel( )); bike.setFrame(editBikeForm.getFrame( )); bike.setSerialNo(editBikeForm.getSerialNo( )); bike.setWeight(editBikeForm.getWeight( )); try { this.rentABike.saveBike(bike); return mapping.findForward("success"); } catch (Exception ex) { return mapping.findForward("failure"); } } }You'll need to use Struts tags to render the pages. Example 3-7 is the EditBike.jsp page. Example 3-7. EditBike.jsp<%@ page import="com.springbook.*"%> <%@ include file="include.jsp" %> <%@ taglib prefix="spring" uri="/spring" %> <%@ taglib uri="/WEB-INF/struts-html-el.tld" prefix="html-el" %> <html> <head> <title> Edit Bike </title> </head> <body> <h1>Edit Bike</h1> <form method="POST"> <table border="1" cellspacing="2" cellpadding="2"> <tr> <td align="right">Manufacturer:</td> <td> <html-el:text property="manufacturer" size="25" maxlength="50" style tabindex="1" /> </td> </tr> <tr> <td align="right">Model:</td> <td> <html-el:text property="model" size="25" maxlength="50" style tabindex="1" /> </td> </tr> <tr> <td align="right">Frame:</td> <td> <html-el:text property="frame" size="25" maxlength="50" style tabindex="1" /> </td> </tr> <tr> <td align="right">Serial Number:</td> <td> <html-el:text property="serialNo" size="25" maxlength="50" style tabindex="1" /> </td> </tr> <tr> <td align="right">Weight:</td> <td> <html-el:text property="weight" size="25" maxlength="50" style tabindex="1" /> </td> </tr> <tr> <td align="right">Status:</td> <td> <html-el:text property="status" size="25" maxlength="50" style tabindex="1" /> </td> </tr> </table> <html-el:submit style> Submit Bike </html-el:submit> </form> </body> </html> There's nothing special here. You're using standard Struts tags. Finally, you'll need to code up the EditBikeForm to transfer HTML element values to the Controller (Example 3-8). Example 3-8. EditBikeForm.javapublic class EditBikeForm extends ActionForm { private String manufacturer; private String model; private int frame; private String serialNo; private double weight; private String status; public void reset(ActionMapping mapping, HttpServletRequest request) { manufacturer = null; model = null; frame = 0; serialNo = null; weight = 0.0; status = null; } public ActionErrors validate( ActionMapping mapping, HttpServletRequest request) { ActionErrors errors = new ActionErrors( ); String mappingName = mapping.getPath( ); if (mappingName.equalsIgnoreCase("/SubmitBike")) { if (manufacturer == null || manufacturer.trim( ).length( ) == 0) { errors.add( "bike", new ActionError("error.manufacturer.required)); } if (model == null || model.trim( ).length( ) == 0) { errors.add( "bike", new ActionError("error.mo del.required")); } } return errors; } public EditBikeForm( ) { super( ); } public void setManufacturer(String manufacturer) { this.manufacturer = manufacturer; } public String getManufacturer( ) { return manufacturer; } public void setModel(String model) { this.model = model; } public String getModel( ) { return model; } public void setFrame(int frame) { this.frame = frame; } public int getFrame( ) { return frame; } public void setSerialNo(String serialNo) { this.serialNo = serialNo; } public String setSerialNo( ) { return serialNo; } public void setWeight(Double weight) { this.weight = weight; } public Double getWeight( ) { return weight; } public void setStatus(String status) { this.status = status; } public String getStatus( ) { return status; } }And you can run the application. As before, you'll want to test what you have written (Example 3-9). One thing that is often important to test in applications like this are the validation rules for the forms being submitted. You can easily test just the validation rules with a simple JUnit test. Example 3-9. StrutsTest.javapublic void testBikeValidation( ) throws Exception { ActionMapping mapping = new ActionMapping( ); mapping.setPath("/SubmitBike"); EditBikeForm ebf = new EditBikeForm( ); ebf.setManufacturer("a manufacturer"); ebf.setModel("a model"); ActionErrors errors = ebf.validate(mapping, null); assertEquals(0, errors.size( )); ebf = new EditBikeForm( ); ebf.setManufacturer("a manufacturer"); ebf.setModel(""); errors = ebf.validate(mapping, null); assertEquals(1, errors.size( )); }For more complex testing of the workings of the Actions and ActionMappings themselves, we recommend starting with Lu Jian's fine article "Unit Test Your Struts Application" at http://www.onjava.com/pub/a/onjava/2004/09/22/test-struts.html. 3.1.2. What just happened?Not much. You see a typical Struts application, without Spring. Figure 3-1 shows the flow of control. A client issues an HTTP request. The request goes through a central dispatcher. You configured the central dispatcher in web.xml. A Struts mapping (in struts-config.xml) associates a request with a controller, and the dispatcher routes control to the appropriate controller, which inherits from servlet. Struts then can invoke business logic through actions. Struts, like Spring, also has a generic form submission workflow that manages validation, and error form processing. The key question is this: how does RentABike get access to the Spring context? Figure 3-1. Struts applications have a central dispatcher, a servlet controller, actions, and JSP response pages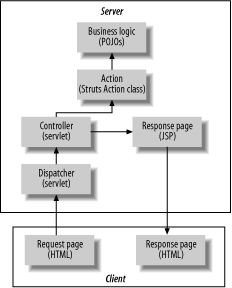 As you've seen, the pieces of your Spring application will normally resolve dependencies through the container. Spring instantiates the objects in the application and injects dependencies in the form of properties, into the application. When you're integrating third-party frameworks, dependency injection is not always possible. This version of the application manages the flow through Struts. When Struts gets a request, it reads the mapping file, which associates an HTTP request with a controller. The controller fires an action. This Struts action then fires a method. The Struts action is where Spring comes in. Each action inherits from a base action. This base action gets the Spring context from the servlet context. Then, the application easily retrieves our façade, and has access to all of the business methods in the application. |
|
|
EAN: 2147483647
Pages: 90
- Article 338 Service-Entrance Cable Types SE and USE
- Example No. D2(b) Optional Calculation for One-Family Dwelling, Air Conditioning Larger than Heating [See 220.82(A) and 220.82(C)]
- Example D3(a) Industrial Feeders in a Common Raceway
- Example No. D5(a) Multifamily Dwelling Served at 208Y/120 Volts, Three Phase
- Annex E. Types of Construction