| Let's start with a simple menu. In the sample application, there's a button with the caption Simple. In this button's Click() event, we'll clear the current menu bar, and add two menus and three menu items to each menu. To add each menu to the command bar, use the AddMenu method of the Controls collection. Both the Key and Prompt parameters are provided to set these properties on the items. The Key property uniquely identifies the menus. Don't use the Caption property to identify the menus because the caption may change, causing bugs or extra maintenance coding. This becomes especially apparent when an application is internationalized. In Listing 4.1, the cmdSimple.Click event creates two menus with three menu items on each. Figure 4.4. shows the menus created and the three menu items on the first menu. Figure 4.4. The first "root" menu is activated, displaying the three menu items attached. Notice the New button is displayed; the default value for the New button is Enabled = True. 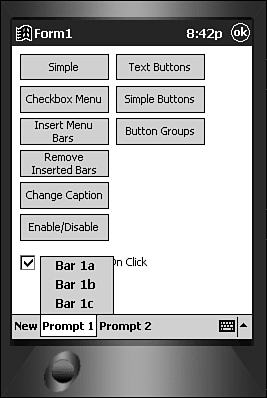 Listing 4.1 Creating a Simple Menu Private Sub cmdSimple_Click() Dim objMenu As MenuBarLib.MenuBarMenu Dim objBar As MenuBarLib.MenuBarMenu ' clear all buttons and menus from the menu bar control MenuBar1.Controls.Clear ' add 1st "root" prompt Set objMenu = MenuBar1.Controls.AddMenu("Prompt 1", KEY_SIMPLE_ROOT1) ' add 1st bar to the 1st root prompt ' set the key as part of the Add method Set objBar = objMenu.Items.Add(, KEY_SIMPLE_BAR1_PROMPT1, "Bar 1a") ' add a tag objBar.Tag = "Tag For Bar 1a" ' add 2nd bar to the 1st root prompt ' reuse objBar because we're done with 1st one Set objBar = objMenu.Items.Add(, KEY_SIMPLE_BAR1_PROMPT2, "Bar 1b") objBar.Tag = "Tag For Bar 1b" ' add 3rd bar to the 1st root prompt Set objBar = objMenu.Items.Add(, KEY_SIMPLE_BAR1_PROMPT3, "Bar 1c") objBar.Tag = "Tag For Bar 1c" ' add 2nd "root" prompt Set objMenu = MenuBar1.Controls.AddMenu("Prompt 2", KEY_SIMPLE_ROOT2) ' add 1st bar to the 2nd root prompt Set objBar = objMenu.Items.Add(, KEY_SIMPLE_BAR2_PROMPT1, "Bar 2a") objBar.Tag = "Tag For Bar 2a" ' add 2nd bar to the 2nd root prompt - again reuse Set objBar = objMenu.Items.Add(, KEY_SIMPLE_BAR2_PROMPT2, "Bar 2b") objBar.Tag = "Tag For Bar 2b" ' add 3rd bar to the 2nd root prompt - again reuse Set objBar = objMenu.Items.Add(, KEY_SIMPLE_BAR2_PROMPT3, "Bar 2c") objBar.Tag = "Tag For Bar 2c" End Sub Responding to Menu Taps Now that the menu is displaying, the application needs to react to the user selecting one of its menu items. Use the MenuBar control's MenuClick event for this response. The menu item tapped is passed as the only parameter to the MenuClick event as an Item. In Listing 4.2, the sample application uses MenuClick to display the values of some of the properties of the tapped menu item, as shown in Figure 4.5. Then, depending on which menu is being displayed via your choices, the event will be passed to the proper subroutine. Figure 4.5. When the menu item "Bar 1a" is tapped, the MenuClick event responds and displays the current values of properties on the menu item. 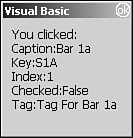 Listing 4.2 Responding to a Menu.Click Event Private Sub MenuBar1_MenuClick(ByVal Item As MenuBarLib.Item) Dim strMessage As String 'check to see if MsgBox should be displayed If chkShowMsgBox.Value Then ' build message string strMessage = "You clicked:" & vbCrLf ' add the caption strMessage = strMessage & "Caption:" & Item.Caption & vbCrLf ' add the key strMessage = strMessage & "Key:" & Item.Key & vbCrLf ' add the index strMessage = strMessage & "Index:" & Item.Index & vbCrLf ' add the checked state of item strMessage = strMessage & "Checked:" & Item.Checked & vbCrLf ' add the tag strMessage = strMessage & "Tag:" & Item.Tag & vbCrLf MsgBox strMessage End If ' since we're using several different "menus" ' let's use the first letter of the .Key property to ' let us know what menu we're using ' and send the event to different Subs for each menu Select Case Mid(Item.Key, 1, 1) 'can't use Left() function Case "S" ' simple Simple_MenuClick Item Case "C" ' checked Checked_MenuClick Item Case Else MsgBox "Unknown Menu" End Select End Sub In Listing 4.2, the menu item tapped is actually passed as an MenuBarLib.Item type. For this sample application, a message box is displayed, informing you of the values of the menu item tapped. Notice that after the message box is displayed, the Item is passed along to the appropriate subroutine (Simple_MenuClick or Checked_MenuClick). This is a good methodology to keep a menu virtually discreet within an eVB application. Checkmark Menus The Pocket PC MenuBar control can display checked menu items. The Item object has a Checked property. If this Checked property is set to True, the menu item will have a check mark placed to the left of the caption. The sample application has a command button labeled Checkmark Menu. In this button's Click event, as shown in Listing 4.3, a menu is created with two groups of checkmarked menu items, as shown in Figure 4.6. A menu separator separates these two groups. Figure 4.6. The checked menus are created and then marked with a check mark by setting Checked to True. 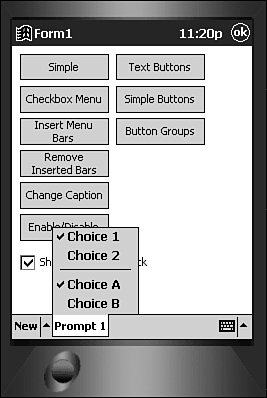 Listing 4.3 Creating Checkmark Menu Items Private Sub cmdMoreComplex_Click() Dim objMenu As MenuBarLib.MenuBarMenu ' this time we'll use "Item" so we can ' use extended properties Dim objBar As MenuBarLib.Item ' clear all buttons and menus from the menu bar control MenuBar1.Controls.Clear ' add 1st "root" prompt Set objMenu = MenuBar1.Controls.AddMenu("Prompt 1", KEY_COMPLEX_ROOT1) ' add 1st bar of 1st set of ' checked prompts to the 1st root prompt ' set .Prompt & .Key property in Add method Set objBar = objMenu.Items.Add(, KEY_COMPLEX_BAR1_PROMPT1, "Choice 1") objBar.Checked = True ' add 2nd bar of 1st set of ' checked prompts to the 1st root prompt Set objBar = objMenu.Items.Add(, KEY_COMPLEX_BAR1_PROMPT2, "Choice 2") ' let's get a separator bar in there Set objBar = objMenu.Items.Add(, , , mbrMenuSeparator) ' add 1st bar of 2nd set of ' checked prompts to the 1st root prompt Set objBar = objMenu.Items.Add(, KEY_COMPLEX_BAR1_PROMPT3, "Choice A") objBar.Checked = True ' add 2nd bar of 2nd set of ' checked prompts to the 1st root prompt Set objBar = objMenu.Items.Add(, KEY_COMPLEX_BAR1_PROMPT4, "Choice B") End Sub In Listing 4.3, a reference to the first menu is retrieved. A menu item is added to this menu, and then its Checked property is set to True. Another item is added that is a complimentary menu item to the first one. A separator bar is added and another group of two menu items are added with the first one checked as well. When one of the checkmark menu items is tapped, the application needs to handle unchecking the tapped menu item and checking the complimentary menu item. The MenuClick event handler farms the call to the Checked_MenuClick subroutine (See Listing 4.4) to accomplish this. Listing 4.4 Handling Taps to Checkmark Menu Items Private Sub Checked_MenuClick(ByVal Item As MenuBarLib.Item) Dim objItem As MenuBarLib.Item ' check to see if already checked If Item.Checked Then ' ignore the click because it is already checked Exit Sub End If Select Case Item.Key Case KEY_COMPLEX_BAR1_PROMPT1 ' if it's checked let's uncheck it ' if it's unchecked, let's check it Item.Checked = Not Item.Checked ' retrieve the 2nd item in ' this set of checkmark prompts ' using the .Key value Set objItem = Item.Parent.Items(KEY_COMPLEX_BAR1_PROMPT2) ' set the checked property to ' the opposite of the other item objItem.Checked = Not Item.Checked Case KEY_COMPLEX_BAR1_PROMPT2 ' if it's checked let's uncheck it ' if it's unchecked, let's check it Item.Checked = Not Item.Checked ' retrieve the 2nd item in ' this set of checkmark prompts ' using the .Key value Set objItem = Item.Parent.Items(KEY_COMPLEX_BAR1_PROMPT1) ' set the checked property to ' the opposite of the other item objItem.Checked = Not Item.Checked Case KEY_COMPLEX_BAR1_PROMPT3 ' if it's checked let's uncheck it ' if it's unchecked, let's check it Item.Checked = Not Item.Checked ' retrieve the 2nd item in ' this set of checkmark prompts ' using the .Key value Set objItem = Item.Parent.Items(KEY_COMPLEX_BAR1_PROMPT4) ' set the checked property to ' the opposite of the other item objItem.Checked = Not Item.Checked Case KEY_COMPLEX_BAR1_PROMPT4 ' if it's checked let's uncheck it ' if it's unchecked, let's check it Item.Checked = Not Item.Checked ' retrieve the 2nd item in ' this set of checkmark prompts ' using the .Key value Set objItem = Item.Parent.Items(KEY_COMPLEX_BAR1_PROMPT3) ' set the checked property to ' the opposite of the other item objItem.Checked = Not Item.Checked End Select End Sub In Listing 4.4, Checked_MenuClick first checks whether a menu item tapped is already checked. If the menu item is already checked, the routine is exited because no action needs to be taken. Next, a Select Case decides which menu item was tapped and retrieves a reference to it. It then inverts its Checked property value (turns False to True; turns True to False). Then it retrieves a reference to its complimentary menu item and inverts its Checked property value as well. Dynamic Menus If it doesn't seem necessary or the best methodology to re-create the menu items wholly on-the-fly in your application, you can dynamically add and remove menu items. A menu item can be inserted in place in a currently populated menu. If the Index parameter is used in the AddMenu method, the menu item will be inserted before the menu item with the index value. All menu items with an index value equal to or greater than the inserted index value will be renumbered one Index value greater. For example, if there are three menu items and a menu item is inserted with an Index value of 2, the menu item currently with an Index of 2 will become 3, and 3 will become 4. To insert a menu item in the middle, specify the index that it should be inserted before. This sample application includes a button labeled Insert Menu Bars. In Listing 4.5, the Click event for this button adds two menu items to the first menu. The first menu item added is inserted before the top menu item. The item is inserted at the top by specifying an Index value of 1 in the AddMenu method. The second menu item added is inserted at the bottom below the lowest menu item. The second inserted menu item doesn't specify an index value, therefore it's added at the end (or bottom). Each prompt will still use a unique key. These key values (as with the other items) help to identify the items for manipulation, removal, and so on. Listing 4.5 Inserting a Menu Dynamically Private Sub cmdInsert_Click() Dim objMenu As MenuBarLib.MenuBarMenu Dim objBar As MenuBarLib.MenuBarMenu ' check to make sure there are menus If MenuBar1.Controls.Count < 1 Then Exit Sub End If ' check to make sure simple menu is displayed If MenuBar1.Controls.Item(1).Key <> KEY_SIMPLE_ROOT1 Then Exit Sub End If ' grab the 1st prompt on the "root" menu bar Set objMenu = MenuBar1.Controls.Item(KEY_SIMPLE_ROOT1) ' add a bar to the 1st root prompt ' index = 1 places before the 1st prompt Set objBar = objMenu.Items.Add(1, KEY_SIMPLE_BAR_INSERTED1, _ "Inserted Prompt 1") ' add a bar to the 1st root prompt ' leaving index empty places ' the prompt at the bottom Set objBar = objMenu.Items.Add(, KEY_SIMPLE_BAR_INSERTED2, _ "Inserted Prompt 2") End Sub First, the code in Listing 4.5 checks to make sure that at least one menu is present on the control. Then, it ensures that the menu displayed is created by the simple menu button. Next, a reference to the first menu is retrieved. This reference is then used to Add() the menu item to the top by using an Index value of 1. Then, another menu item is added to the bottom by not specifying an Index value. After these inserts occur, the menu should look like that in Figure 4.7. Figure 4.7. After building a simple menu by using the Simple button in the sample application, the Insert Menu Bars creates two menu items on-the-flyone at the top and one at the bottom. 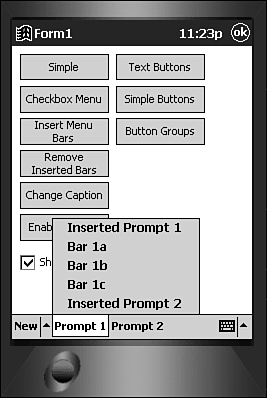 Removing Menu Items You also can remove a menu item. The Remove method of the Items collection accepts either an Index value or the Key value. If the application will be adding and removing menu items, it's best not to use the Index value because the items will have different Index values as they are added and removed. The application should use the Key property to ensure retrieval of the proper item. The sample application has a button on the form with the caption Remove Inserted Bars. Listing 4.6 shows the cmdRemove.Click event. This button removes the menu items inserted in the cmdInsert.Click event shown in Listing 4.5. Listing 4.6 Removing the Inserted Menu Items Private Sub cmdRemove_Click() Dim objMenu As MenuBarLib.MenuBarMenu Dim objBar As MenuBarLib.MenuBarMenu ' check to make sure there are menus If MenuBar1.Controls.Count < 1 Then Exit Sub End If ' check to make sure simple menu is displayed If MenuBar1.Controls.Item(1).Key <> KEY_SIMPLE_ROOT1 Then Exit Sub End If ' grab the 1st prompt on the "root" menu bar Set objMenu = MenuBar1.Controls.Item(KEY_SIMPLE_ROOT1) ' remove the inserted bar at the top objMenu.Items.Remove (KEY_SIMPLE_BAR_INSERTED1) ' remove the inserted bar at the bottom objMenu.Items.Remove (KEY_SIMPLE_BAR_INSERTED2) End Sub In Listing 4.6, again, a check is made to ensure that a menu exists and that it's the correct menu for this action. Next, the application retrieves a reference to the first menu. It then removes the menu items that were dynamically inserted. Notice that it uses the Key values to address these items. Changing Captions Another aspect of dynamic menus is changing the captions. Even if the application doesn't use dynamic menus in the sense of manipulating the number or types of menu items, manipulating the captions can be an important strategy for localizing an international application. Note that the root menu promptsthe prompts are always visible on the bottom of the menucan't be changed. This is a seriously deficient design (or defect) in the control. The sample application has a button labeled Change Caption. This button's Click event, shown in Listing 4.7, first checks to make sure a menu is present on the menu control. Next, a check is made to ensure that the first item on the menu control is a menu (and not a menu button). Then, it displays an InputBox dialog box prompting for a new caption. It then changes the Caption of the currently top menu item on the first menu. Listing 4.7 Dynamically Changing Prompts on Menu Items Private Sub cmdPrompt_Click() Dim objMenu As MenuBarLib.MenuBarMenu Dim objBar As MenuBarLib.MenuBarMenu Dim strCaption As String ' check to make sure there are menus If MenuBar1.Controls.Count < 1 Then Exit Sub End If ' make sure item is a menu bar If MenuBar1.Controls.Item(1).Type <> mbrMenuBar Then Exit Sub End If ' grab the 1st "root" prompt Set objMenu = MenuBar1.Controls.Item(1) ' get the new caption strCaption = InputBox("Caption") Set objBar = objMenu.Items(1) objBar.Caption = strCaption End Sub Manipulating Enabled State Windows design standards state menus should become disabled when their context isn't valid. To implement this on the Pocket PC MenuBar control, set the Enabled property to False. The sample application has a button labeled Enable/Disable. As shown in Listing 4.8, the Click event of the button makes the two checks to see whether a menu exists and whether it's a menu item (not a button). This button changes the Enabled state of the first menu item of the first menu. If the menu item is currently enabled, it will disable it; if it's disabled, it will enable it. Listing 4.8 Enabling and Disabling Menu Items Private Sub cmdEnable_Click() Dim objMenu As MenuBarLib.MenuBarMenu ' this time we'll use "Item" so we can ' use extended properties Dim objBar As MenuBarLib.Item ' check to make sure there are menus If MenuBar1.Controls.Count < 1 Then Exit Sub End If ' make sure item is a menu bar If MenuBar1.Controls.Item(1).Type <> mbrMenuBar Then Exit Sub End If ' add 1st "root" prompt Set objMenu = MenuBar1.Controls.Item(1) Set objBar = objMenu.Items(1) objBar.Enabled = Not objBar.Enabled End Sub This code uses the same methodology to retrieve the first menu item of the first menu. It then changes its Enabled state to the opposite of current value. When the menu item has its Enabled property set to False, it should resemble Figure 4.8. Figure 4.8. A simple menu with the first menu item disabled. 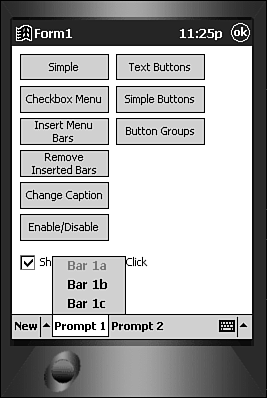  |