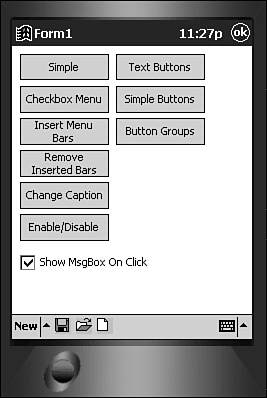
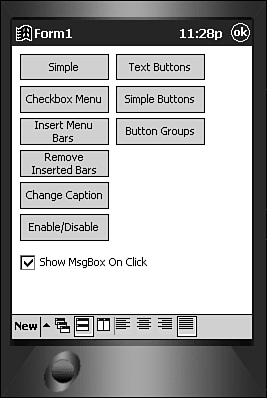
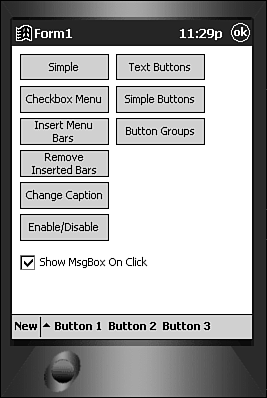
Implementing Menu Buttons Menu buttons can only be placed directly on the menu control itself. You can see an example of menu buttons used in Pocket Internet Explorer. Menu buttons should be used for functionality that's not only common to all forms, but frequently used. Populating the ImageList Although you can use a menu button with only a caption, most buttons are best served with an image. To use an image on a menu button, the ImageList control must be present and populated . First, make sure a reference to the ImageList control is set for the project. Add an instance of the ImageList to the form. Moving Files to a Development Environment Moving files to an actual device is fairly simple. To add files to the physical device, use ActiveSync. (See the ActiveSync documentation for this.) Moving files to the emulator is a bit trickier, but much easier with Windows CE 3.0. In the Windows CE Tools folder (default installation is c:\Windows CE Tools\), follow the path to the Palm300 folder. This folder is essentially the root folder of the emulator's file system and can be found at c:\Windows CE Tools\wce300\MS Pocket PC\emulation\palm300. The sample application uses the bitmap files from the Windows folder; your application's design may require the files to be placed into another folder. To load the images into the ImageList control, call the Add method. The Add method has only one parameterthe actual filename of the image to load. All images used in the sample application are loaded in PopulateImageList, as shown in Listing 4.9. Listing 4.9 Using Images Private Sub PopulateImageList() ' maximum height to use ImageList1.ImageHeight = 16 ' maximum width to use ImageList1.ImageWidth = 16 ' add image ImageList1.Add "\windows\save.bmp" ' set the handle to the count lngImageHandleSave = ImageList1.Count ' add image ImageList1.Add "\windows\Open.bmp" ' set the handle to the count lngImageHandleOpen = ImageList1.Count ' add image ImageList1.Add "\windows\New.bmp" ' set the handle to the count lngImageHandleNew = ImageList1.Count ' add image ImageList1.Add "\windows\Left Justify.bmp" ' set the handle to the count lngImageHandleLeftJustify = ImageList1.Count ' add image ImageList1.Add "\windows\Center Justify.bmp" ' set the handle to the count lngImageHandleCenterJustify = ImageList1.Count ' add image ImageList1.Add "\windows\Right Justify.bmp" ' set the handle to the count lngImageHandleRightJustify = ImageList1.Count ' add image ImageList1.Add "\windows\Full Justify.bmp" ' set the handle to the count lngImageHandleFullJustify = ImageList1.Count ' add image ImageList1.Add "\windows\Cascade.bmp" ' set the handle to the count lngImageHandleCascade = ImageList1.Count ' add image ImageList1.Add "\windows\Tile Horizontal.bmp" ' set the handle to the count lngImageHandleTileHorizontal = ImageList1.Count ' add image ImageList1.Add "\windows\Tile Vertical.bmp" ' set the handle to the count lngImageHandleTileVertical = ImageList1.Count End Sub In Listing 4.9, the ImageList is set up and populated. This subroutine is called from the Form.Load() event. The first task is to set the maximum height and width of the images using the ImageHeight and ImageWidth properties. Then, all images required for the sample application are added. Be sure to use the proper path and save your files so they are available in your device (or emulator). After each image is loaded, a corresponding Public variable is set to the Count of the ImageList; this will be the Index of the loaded image. Because there is no collection of images on the ImageList and therefore no Key property, these public variables keep track of each image's assigned Index. These indexes are always assigned sequentially, so they can be hard-coded or Const(s) can be declared for their value, but that can lead to more error-prone code if images are inserted or deleted from the application. As soon as the ImageList is initialized and the images are loaded, they can be used on buttons placed on the menu bar. On the sample application's form is a button labeled Simple Buttons. Listing 4.10 show this button's Click event. Tapping this button will Clear() the menu and add three buttons, giving each an image by assigning the value to the Image property. The Image property value corresponds to the index value of the image in the ImageList control. It uses the three distinct images loaded previously in the PopulateImageList() subroutine. Listing 4.10 Adding Buttons to the Menu Control Private Sub cmdButtonsSimple_Click() Dim objButton As MenuBarLib.MenuBarButton ' clear all items off the menu MenuBar1.Controls.Clear ' set the ImageList on the MenuBar MenuBar1.ImageList = ImageList1.hImageList ' add the button to the menu bar Set objButton = MenuBar1.Controls.AddButton(KEY_SIMPLE_BUTTON_BUTTON1) ' set the button to the index value ' of the save button objButton.Image = lngImageHandleSave ' add another button to the menu bar ' reuse the objButton variable as ' we're done with it Set objButton = MenuBar1.Controls.AddButton(KEY_SIMPLE_BUTTON_BUTTON2) ' set the button to the index value ' of the open button objButton.Image = lngImageHandleOpen ' add another button to the menu bar ' reuse the objButton variable as ' we're done with it Set objButton = MenuBar1.Controls.AddButton(KEY_SIMPLE_BUTTON_BUTTON3) ' set the button to the index value ' of the open button objButton.Image = lngImageHandleNew End Sub In Listing 4.10, all items are cleared from the menu as in other examples. Then the MenuBar control must be informed which ImageList control will be used. This exchange takes place by setting the MenuBar.ImageList property to the ImageList.hImageList value. The ImageList.hImageList value is actually the handle to that window. This is its only intended use. After this setup is complete, buttons are added to the MenuBar, as shown in Figure 4.9. These buttons are then given an image by setting the Image property on each button. This Image property is the index to the images handled by the ImageList control. Setting the Index property to 1 (Image = 1) sets the button's image to the first image contained by the ImageList control. Figure 4.9. Image displays the button groups created by cmdButtonsSimple_Click().  Responding to Button Taps Another event of the MenuBar control is ButtonClick. This event is fired whenever a button is tapped. The only parameter for this event is a reference to the button actually tapped. This reference is of type MenuBarButton, different from the MenuClick (passed only as Item). In the sample application, a similar approach to the MenuClick message box display is taken in the ButtonClick event, as shown in Listing 4.11. More properties are displayed, but the approach in ButtonClick is the same as MenuClick. Listing 4.11 Handling a Tap on a Menu Button Private Sub MenuBar1_ButtonClick(ByVal Button As MenuBarLib.MenuBarButton) Dim strMessage As String 'check to see if MsgBox should be displayed If chkShowMsgBox.Value Then ' build message string strMessage = "You clicked:" & vbCrLf ' add the Caption strMessage = strMessage & "Caption:" & Button.Caption & vbCrLf ' add the Enabled state - should always be true strMessage = strMessage & "Enabled:" & Button.Enabled & vbCrLf ' add the Image strMessage = strMessage & "Image:" & Button.Image & vbCrLf ' add the Index strMessage = strMessage & "Index:" & Button.Index & vbCrLf ' add the Key strMessage = strMessage & "Key:" & Button.Key & vbCrLf ' add the MixedState strMessage = strMessage & "MixedState:" & Button.MixedState & vbCrLf ' add the Style strMessage = strMessage & "Style:" & Button.Style & vbCrLf ' add the Tag strMessage = strMessage & "Tag:" & Button.Tag & vbCrLf ' add the ToolTip strMessage = strMessage & "ToolTip:" & Button.ToolTip & vbCrLf ' add the Type strMessage = strMessage & "Type:" & Button.Type & vbCrLf ' add the Value strMessage = strMessage & "Value:" & Button.Value & vbCrLf ' add Visible state - should always be true strMessage = strMessage & "Visible:" & Button.Visible & vbCrLf ' add the width strMessage = strMessage & "Width:" & Button.Width & vbCrLf MsgBox strMessage End If ' decide which buttons are currently ' on the menu ' compare the left 2 char of the key ' they *should* always let us know ' which buttons are on the menu ' use Mid- left does not work Select Case Mid(Button.Key, 1, 2) ' use left 2 of the an example button ' since left two are the same Case Mid(KEY_SIMPLE_BUTTON_BUTTON1, 1, 2) ' here we would send the button to ' a specific sub Case Mid(KEY_BUTTONGROUP_GROUP1_BUTTON1, 1, 2) ' here we would send the button to ' a specific sub Case Mid(KEY_TEXT_BUTTON_BUTTON1, 1, 2) ' here we would send the button to ' a specific sub Case Else MsgBox "Unknown Button Type!" End Select End Sub In Listing 4.11, a reference to the tapped button is passed to the ButtonClick event. Unlike MenuClick, this parameter is more tightly typed as MenuBarButton (whereas MenuClick receives an Item, rather than MenuBarMenu). The implementation starts with a check to make sure that the message box should be displayed. This choice is more important with the button groups (below). A string of text of the properties and their current values is composed and displayed. Then, a decision is made as to which menu is currently displayed by using the first two characters of the Button.Key value. Each Key value was defined and set when the buttons were added to the MenuBar control. Although no implementation takes place here, it would be possible to "farm-out" a button to a distinct subroutine for each menu type displayed. It may be possible for your application to consolidate all response code for either ButtonClick or MenuClick into one subroutine. This would allow all implementation code for responding to events (ButtonClick or MenuClick) in one code segment. Because almost all functionality could be driven by the Key value itself, simply pass the reference for the button to this subroutine. Remember to use properties only available on the Item type and not button-specific properties (like Image) Using Button Groups Buttons groups are similar to radio buttons, but are placed on the MenuBar. Only one button in a button group may be selected at one time. An example of a button group is the different view states of a list view control (for example, File Explorer - Large Icons, Small Icons, List, Details). You can place more than one button group on the MenuBar by placing a separator between them. In the sample application is a command button labeled Button Groups. This button's Click event, as shown in Listing 4.12, creates two separate groups of buttons on the menu bar. The first group is a set of three buttons for arranging windows (Cascade, Tile Horizontally, and Tile Vertical). The second group is from Microsoft Word (Left, Center, Right, and Full Justify). Listing 4.12 Creating Button Groups Private Sub cmdButtonGroups_Click() Dim objButton As MenuBarLib.MenuBarButton ' clear all items off the menu MenuBar1.Controls.Clear ' set the ImageList on the MenuBar MenuBar1.ImageList = ImageList1.hImageList ' add the button to the menu bar Set objButton = MenuBar1.Controls.AddButton(KEY_BUTTONGROUP_GROUP1_BUTTON1) ' set the style of the button to button group (mbrButtonGroup) ' this will cause the button to work ' like a OptionButton objButton.Style = mbrButtonGroup ' set the button to the index value of the image objButton.Image = lngImageHandleCascade ' add another button to the menu bar ' reuse the objButton variable as ' we're done with it Set objButton = MenuBar1.Controls.AddButton(KEY_SIMPLE_BUTTON_BUTTON2) ' set the style of the button to button group ' this will cause the button to work ' like a OptionButton objButton.Style = mbrButtonGroup ' set the button to the index value of the image objButton.Image = lngImageHandleTileHorizontal ' add another button to the menu bar ' reuse the objButton variable as ' we're done with it Set objButton = MenuBar1.Controls.AddButton(KEY_SIMPLE_BUTTON_BUTTON3) ' set the style of the button to button group ' this will cause the button to work ' like a OptionButton objButton.Style = mbrButtonGroup ' set the button to the index value of the image objButton.Image = lngImageHandleTileVertical Set objButton = MenuBar1.Controls.AddButton() ' set the style of the button to separator ' this will cause the button groups to be independent objButton.Style = mbrSeparator ' add another button to the menu bar ' reuse the objButton variable as ' we're done with it Set objButton = MenuBar1.Controls.AddButton(KEY_SIMPLE_BUTTON_BUTTON4) ' set the style of the button to button group ' this will cause the button to work ' like a OptionButton objButton.Style = mbrButtonGroup ' set the button to the index value of the image objButton.Image = lngImageHandleLeftJustify ' add another button to the menu bar ' reuse the objButton variable as ' we're done with it Set objButton = MenuBar1.Controls.AddButton(KEY_BUTTONGROUP_GROUP2_BUTTON1) ' set the style of the button to button group ' this will cause the button to work ' like a OptionButton objButton.Style = mbrButtonGroup ' set the button to the index value of the image objButton.Image = lngImageHandleCenterJustify ' add another button to the menu bar ' reuse the objButton variable as ' we're done with it Set objButton = MenuBar1.Controls.AddButton(KEY_BUTTONGROUP_GROUP2_BUTTON2) ' set the style of the button to button group ' this will cause the button to work ' like a OptionButton objButton.Style = mbrButtonGroup ' set the button to the index value of the image objButton.Image = lngImageHandleRightJustify ' add another button to the menu bar ' reuse the objButton variable as ' we're done with it Set objButton = MenuBar1.Controls.AddButton(KEY_BUTTONGROUP_GROUP2_BUTTON3) ' set the style of the button to button group ' this will cause the button to work ' like a OptionButton objButton.Style = mbrButtonGroup ' set the button to the index value of the image objButton.Image = lngImageHandleFullJustify End Sub In Listing 4.12, the menu control is cleared. Then, the ImageList property is set from the hImageList property value as in the other button code. After each button is added, the Style property is set to mbrButtonGroup; this is what causes the button to act in a button group, such as an OptionButton. Each button's Image property is then set to the corresponding handle for the image. Between the two button groups, a button is added and a Style property value of mbrMenuSeparator is assigned. This separator enables each set of buttons to act independently. The menu control should now show two button groups (see Figure 4.10). Figure 4.10. Image displays the button groups created by cmdButtonGroups_Click().  Using Caption Buttons Caption buttons seem to be one of those items that you may never think of using, but sometimes they do work well. A caption button is a button with no image placed directly on the menu bar. Nothing is special about programmatically creating a caption button except that its Caption property is set instead of its Image property. Its appearance is similar to a root menu prompt, but it has no menu bars and triggers a Menu.Button_Click event directly when tapped. Caption buttons do present the challenge of using a lot more real estate on the menu bar, but if your application can afford it, it may have its place. In the sample application is a Text Buttons command button named cmdTextButton. This button's Click event (see Listing 4.13) clears the menu, adds three buttons to the menu and labels them with a caption (see Figure 4.11). Figure 4.11. The three buttons created on the menu bar take up a lot of real estate with just simple captions; use caption buttons judiciously.  Listing 4.13 Creating Text Buttons Private Sub cmdTextButton_Click() Dim objButton As MenuBarLib.MenuBarButton ' clear all items off the menu MenuBar1.Controls.Clear ' add the first button to the menu bar Set objButton = MenuBar1.Controls.AddButton(KEY_TEXT_BUTTON_BUTTON1) ' set its caption objButton.Caption = "Button 1" ' add the second button to the menu bar Set objButton = MenuBar1.Controls.AddButton(KEY_TEXT_BUTTON_BUTTON2) ' set its caption objButton.Caption = "Button 2" ' add the third button to the menu bar Set objButton = MenuBar1.Controls.AddButton(KEY_TEXT_BUTTON_BUTTON3) ' set its caption objButton.Caption = "Button 3" End Sub |