22.10 Questions
|
| < Day Day Up > |
|
22.9 Exercises
-
Open the MyNeedle.dwg file in the C:\Steps\Lesson22 folder. (If that drawing isn't there, use the Needle 2.dwg file in the same folder.) Create the drawing configuration for plotting found in Figure 22.9.1a. Some helpful information includes:
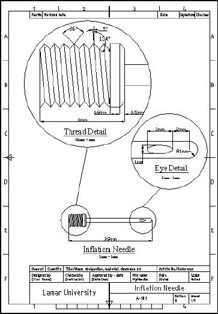
Figure 22.9.1a: Needle.dwg1.1
The text height is 5mm and 2.5mm; the font is Times New Roman.
1.2
The title block text is attributed.
1.3
I used two dimension layers (create new layers as required).
1.4
Dimension text is 3mm.
1.5
Remember that Floating viewports can overlap.
1.6
Save the drawing as MyNeedle2.dwg in the C:\Steps\Lesson22 folder.
-
Open the MySplitter.dwg file in the C:\Steps\Lesson22 folder. (If this drawing isn't there, open the Cable Splitter 2.dwg file instead.) Create the drawing configuration for plotting found in Figure 22.9.2a. Some helpful information includes:
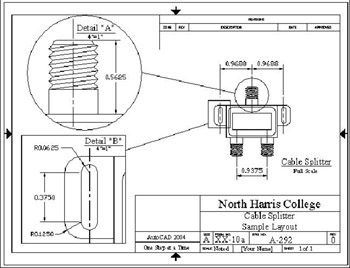
Figure 22.9.2a: Cable Splitter.dwg2.1
The text height is 3/16" and 1/8"; the font is Times New Roman.
2.2
The title block text is ¼", 3/16", and 1/8"; the font is Times New Roman.
2.3
I used two dimension layers (create new layers as required).
2.4
Dimension text is 1/8".
2.5
Remember that floating viewports can overlap.
2.6
Save the drawing as MySplitter2.dwg in the C:\Steps\Lesson22 folder.
-
Open the MyCutter.dwg file in the C:\Steps\Lesson22 folder. (If this drawing isn't there, open the Glass Cutter 2.dwg file instead.) Create the drawing configuration for plotting found in Figure 22.9.3a. Some helpful information includes:

Figure 22.9.3a: Glass Cutter.dwg3.1
The text height is 3/16" and 1/8"; the font is Times New Roman.
3.2
The title block text is ¼", 3/16", and 1/8"; the font is Times New Roman.
3.3
I used two dimension layers (create new layers as required).
3.4
Dimension text is 1/8".
3.5
Remember that floating viewports can overlap.
3.6
Save the drawing as MyCutter2.dwg in the C:\Steps\Lesson22 folder.
-
Open the My Spice Rack.dwg file in the C:\Steps\Lesson22 folder. (If this drawing isn't there, open the Spice Rack 2.dwg file instead.) Create the drawing configuration for plotting found in Figure 22.9.4a. Some helpful information includes:

Figure 22.9.4a: Spice Rack4.1
The text height is 3/16" and 1/8"; the font is Txt.
4.2
The title block text is ¼", 3/16", and 1/8"; the font is Times New Roman.
4.3
I used three dimension layers (create new layers as required).
4.4
Dimension text is 1/8".
4.5
Align the bottle and cap.
4.6
Save the drawing as My Spice Rack 2.dwg in the C:\Steps\Lesson22 folder.
-
Open the MyAssbly.dwg file in the C:\Steps\Lesson22 folder. (If this drawing isn't there, open the motor assbly 2.dwg file instead.) Create the drawing configuration for plotting found in Figure 22.9.5a. Some helpful information includes:
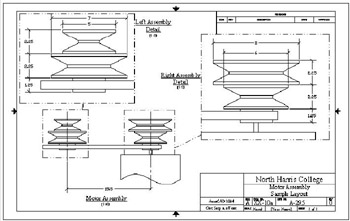
Figure 22.9.5a: Motor Assembly5.1
The text height is 3/16" and 1/8"; the font is Times New Roman.
5.2
The title block text is ¼", 3/16", and 1/8"; the font is Times New Roman.
5.3
I used three dimension layers (create new layers as required).
5.4
Dimension text is 1/8".
5.5
Save the drawing as MyAssbly2.dwg in the C:\Steps\Lesson22 folder.
-
Open the My Pipng Plan.dwg file in the C:\Steps\Lesson22 folder. (If this drawing isn't there, open the Piping Plan 2.dwg file instead.) Create the drawing configuration for plotting found in Figure 22.9.6a. Some helpful information includes:
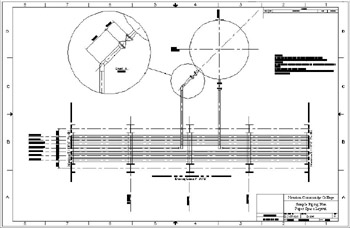
Figure 22.9.6a: Piping Plan6.1
The text height is 3/16" and 1/8"; the font is Times New Roman.
6.2
The title block text is ¼", 3/16", and 1/8"; the font is Times New Roman.
6.3
I used two dimension layers (create new layers as required).
6.4
Dimension text is 1/8".
6.5
Save the drawing as MyPipingPlan2.dwg in the C:\Steps\Lesson22 folder.
-
Open the drillguide.dwg file in the C:\Steps\Lesson22 folder. Create the drawing configuration for plotting found in Figure 22.9.7a. Some helpful information includes:
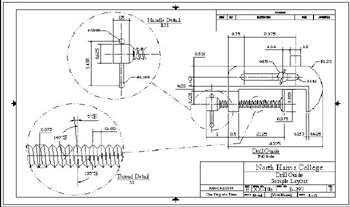
Figure 22.9.7a: Drill Guide7.1
The title block is the ANSI B title block file found in AutoCAD's Template folder.
7.2
The text height is 3/16" and 1/8"; the font is Times New Roman.
7.3
The title block text is ¼", 3/16", and 1/8"; the font is Times New Roman.
7.4
I used three dimension layers (create new layers as required).
7.5
Dimension text is 1/8".
7.6
Save the drawing as MyDrillGuide.dwg in the C:\Steps\Lesson22 folder.
-
Open the Sawed Joint.dwg file in the C:\Steps\Lesson22 folder. Create the drawing configuration for plotting found in Figure 22.9.8a. Some helpful information includes:
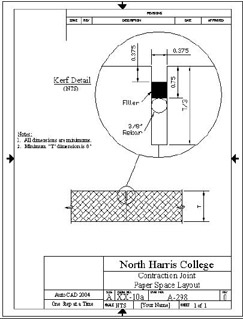
Figure 22.9.8a: Contraction Joint8.1
The title block is the ANSI A title block (portrait) file found in AutoCAD's Template folder.
8.2
The text height is 3/16" and 1/8"; the font is Times New Roman.
8.3
The title block text is ¼", 3/16", and 1/8"; the font is Times New Roman.
8.4
I used two dimension layers (create new layers as required).
8.5
Dimension text is 1/8".
8.6
Save the drawing as MyJoint.dwg in the C:\Steps\Lesson22 folder.
|
| < Day Day Up > |
|
EAN: 2147483647
Pages: 96