16.2 A Whole New Ball Game Editing with Grips
16.2 "A Whole New Ball Game!" Editing with Grips
| Note | Before we begin our experiments with grips, we must reactivate them. Follow this sequence:
It'll also help if we deactivate Noun/Verb Selection. It isn't mandatory; they'll work together. But Noun/Verb Selection might confuse your study of grips, so let's turn it off for now. You can use the Options dialog box just covered, or you can follow this sequence:
|
I've always approached grips with reluctance in my basic AutoCAD classes. It's not that they're not remarkable tools; it's just that most students in a basic class are still trying to master the "normal" modifying tools. These are fairly simple and straightforward “ if you want to copy something, you type copy . AutoCAD then leads you through the necessary steps by prompts at the command line. Grips, on the other hand, are more intuitive. That is, they require that you know how to move from one step to the next , and that you know where the specific desired modification tool is located in the grip prompts.
So, exactly what are grips?
Grips are control points located on all objects, blocks, and groups. We'll look at blocks and groups in Lesson 18, but we can gain an understanding of grips using simple lines, polylines, and circles.
Grips are assigned to specific locations on specific objects. That is, all lines and arcs will have grips at the endpoints and midpoint . All circles will have grips at the center point and quadrants. And all polylines will have grips at the vertices.
| Note | You can control all aspects of Grips display using the Options dialog box (Figure 16.1a). Here, you can set up different grip colors and sizes (not recommended), enable/disable grips in the drawing (the dialog box method of setting the Grips system variable), or enable/disable grips within blocks (more on blocks in Lesson 18). |
There are five basic modification commands available using grips: Stretch , Move , Rotate , Scale , and Mirror . Copy is also available as an option of each of the primary Grip commands.
To access the commands, first select the object(s) you wish to modify. (Do this without entering a command.) The blue grips that display for each of the objects are called unselected grips. Picking on a grip will cause it to change (as shown in Figure 16.2a) to a filled, red, selected grip. Your crosshairs will automatically snap to a grip regardless of the Snap setting. You must select a grip to modify the object. (** To disable [clear] grips, hit the Escape key or pick Deselect all on the cursor menu .)
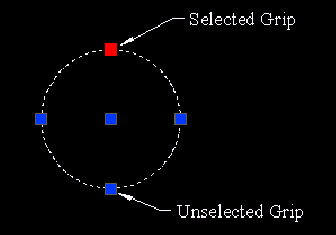
Figure 16.2a:
Note that you can select multiple objects using a window or crossing window just as you've always done. Selecting multiple objects simply means that the grips for several objects will display at once.
To remove an object from a selection set, hold down the Shift key and select the object to remove. Its grips will disappear and the object won't be highlighted and won't be affected by the editing procedure. (Note: In earlier releases, the grips remained visible, but the object wasn't affected by modification procedures.)
Once a grip has been selected, AutoCAD's command line presents the grip options for the Stretch command. You can toggle through the commands ( Stretch , Move , Rotate , Scale , Mirror ) by hitting the space bar.
The initial Grips prompt looks like this:
** STRETCH **
Specify stretch point or [Base point/Copy/Undo/eXit]:
| Note | A nifty trick to using grips involves the Shift key. Holding it down while locating the "to point" of the stretched line will automatically start the Copy option. Continuing to hold it down after the first "to point" is selected will cause the Grip command to function in offset mode. That is, AutoCAD will determine an offset distance from the first "to point" selection; then it'll create subsequent copies at the same interval. These techniques work as well for each of the five Grips commands. |
-
By default, you'll stretch the object using the opposite endpoint as an anchor.
-
Selecting the Base point option will allow you to change the point at which you "hold" the object while stretching it. The default base point is the selected, or "hot," grip.
-
The Copy option provides one of the great benefits of using grips “ you can leave the original object as it's and create stretched copies. (You can create multiple copies by default!)
-
The rest of the options are self-explanatory.
Let's see what we can do with the Stretch Grip command.
Do This: 16.2.1 Editing with Grips - Stretch
-
Be sure you're still in the Grips.dwg file the C:\Steps\Lesson16 folder. If not, please open it now.
-
Follow these steps.
Tools
Command Sequence
Steps
No Button Available
Command:
1. Select the upper part of the star with a crossing window as shown in Figure 16.2.1.1a. (You may want to set the Press and drag system variable ( Pickdrag ) back to .)
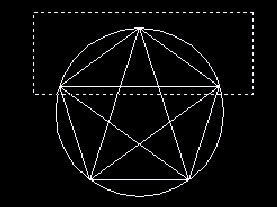
Figure 16.2.1.1a:Command:
2. Notice that grips appear on each of the individual objects and that each highlights (Figure 16.2.1.2a).
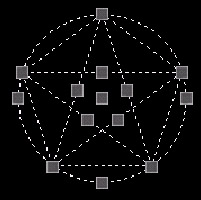
Figure 16.2.1.2a:Command:
3. Select the topmost grip. Notice that is fills and turns red and that the command line presents the initial Grips options.
** STRETCH **
Specify stretch point or [Base point/Copy/Undo/eXit]:
4. Pick a point three grid marks due north of the top of the star. (Turn on the snap to help you.) Notice which objects stretch. Your drawing looks like Figure 16.2.1.4a. (Zoom or pan as necessary for a better view.)
You've discovered the Grips method of resizing a circle. You've also seen that, although it was in the selection set, the horizontal line in the star didn't change. This is because none of its grips was selected.
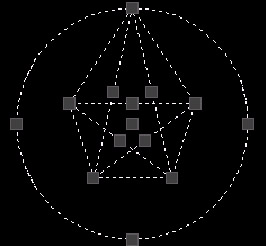
Figure 16.2.1.4a:
Command: u
5. Undo the last modification.
Command:
6. Repeat Step 1.
7. Let's remove the circle from the selection set. Hold down the Shift key and select it. Notice that its grips disappear, and that it's no longer highlighted (Figure 16.2.1.7a).
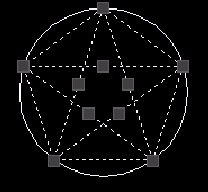
Figure 16.2.1.7a:
Command:
8. Hit the Escape key to clear the grips.
Command:
9. This time, select just the two lines that form the upper point of the star (Figure 16.2.1.9a).

Figure 16.2.1.9a: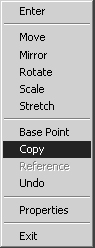
** STRETCH **
Specify stretch point or [Base point/Copy/Undo/eXit]: c
10. Select the topmost grip, then type c at the prompt (or select Copy from the cursor menu) to activate the Copy option.
** STRETCH (multiple) **
Specify stretch point or [Base point/Copy/ Undo/eXit]:
11. Notice how the prompt changes.
** STRETCH (multiple) **
Specify stretch point or [Base point/Copy/ Undo/eXit]:
12. Going north, skip a grid mark and then pick the next. Do this twice (see the drawing in Figure 16.2.1.20a).
** STRETCH (multiple) **
Specify stretch point or [Base point/Copy/ Undo/eXit]: [enter]
13. Hit enter to complete the procedure. (Alternately, you can pick Exit from the cursor menu to complete the Grips procedure).
Command:
14. Clear the grips. Your drawing looks like Figure 16.2.1.20a.
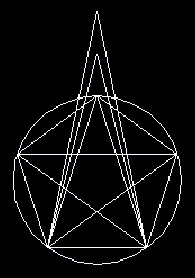
Figure 16.2.1.20a: Command: u
15. Undo the last modification.
We need to add some text to our star for clarity in this next exercise. Use the Txt layer and the default text size and style to add the text My Star , as shown in Figure 16.2b.

Figure 16.2b:
We can use the command line to access the various methods used by grips. Simply use the spacebar to scroll through the options. But there is another way.
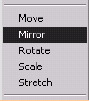
Any time the Grips prompts are on the command line “ that is, any time you've selected a grip “ you can right-click in the drawing area to access the cursor menu that provides the same options as the command line. The menu is shown in Figure 16.2c.
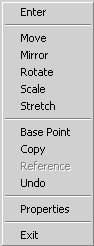
Figure 16.2c:
-
The topmost option is the equivalent of its keyboard counterpart .
-
The next section includes the five Grips commands (the same ones you'll see when using the spacebar to toggle through the Grips commands on the command line).
-
The third section shows the options available for the current Grip command.
-
Properties in the fourth section will cause the Object Property Manager to appear.
-
Exit , of course, returns you to the command prompt.
We'll use this menu, as well as the spacebar approach to toggling Grips commands in our next exercise.
Let's examine the Rotate and Mirror Grips procedures.
Do This: 16.2.2 More Grips Editing
-
Be sure you're still in the Grips.dwg file the C:\Steps\Lesson16 folder. If not, please open it now.
-
Follow these steps.
Tools
Command Sequence
Steps
No Button Available
Command:
1. Select all of the objects. Use a window or crossing window.
Command:
2. Select the grip at the tip of the upper right start point. AutoCAD presents the Grip command options.
** STRETCH **
Specify stretch point or [Base point/Copy/ Undo/eXit]: [spacebar]
** MOVE **
Specify move point or [Base point/Copy/ Undo/eXit]: [spacebar]
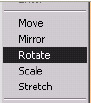
3. Hit the spacebar twice to access the Grips Rotate command.
** ROTATE **
Specify rotation angle or [Base point/Copy/ Undo/Reference/eXit]: c
4. Type c to access the Copy option
** ROTATE (multiple) **
Specify rotation angle or [Base point/Copy/ Undo/Reference/eXit]: 144
5. Tell AutoCAD you wish to create a rotated copy at an angle of 144 ° .
** ROTATE (multiple) **
Specify rotation angle or [Base point/Copy/ Undo/Reference/eXit]: [enter]
6. Hit enter to exit the command, and then clear the grips. Your drawing looks like Figure 16.2.2.6a.
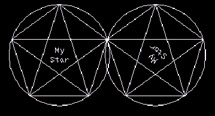
Figure 16.2.2.6a: Command: u
7. Undo the last modification.
Command:
8. Let's try to rotate the objects using the Reference option. Repeat Steps 1 and 2.
** STRETCH **
Specify stretch point or [Base point/Copy/ Undo/eXit]: _rotate
9. Right-click in the drawing area and select the Rotate command.

** ROTATE **
Specify rotation angle or [Base point/Copy/ Undo/Reference/eXit]: _copy
10. Right-click again and select the Copy option.

** ROTATE (multiple) **
Specify rotation angle or [Base point/Copy/ Undo/Reference/eXit]: _reference
11. Right-click again and select the Reference option.
Specify reference angle <0>: [enter]
12. Accept the default reference angle of .
** ROTATE (multiple) **
Specify new angle or [Base point/Copy/ Undo/Reference/eXit]: 180
13. Tell AutoCAD you want a rotated copy at 180 ° .
** ROTATE (multiple) **
Specify new angle or [Base point/Copy/ Undo/ Reference/eXit]: [enter]
14. Hit enter to complete the command; clear the grips. Your drawing looks like Figure 16.2.2.14a.
Remember the Coprot.lsp file we picked up in Lesson 6? This is AutoCAD's method for accomplishing what that Lisp routine did.
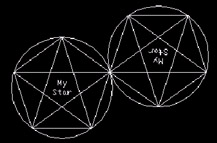
Figure 16.2.2.14a: Command: u
15. Undo the last modification.
Command:
16. Now let's look at the Mirror Grips command. Repeat Step 1.
Command:
17. Select the uppermost grip (at the upper tip of the star).
** STRETCH **
Specify stretch point or [Base point/Copy/ Undo/eXit]: _mirror
18. Right-click to display the Grips menu; pick the Mirror command.

** MIRROR **
Specify second point or [Base point/Copy/ Undo/eXit]: _copy
19. Right-click again and pick the Copy option.
** MIRROR (multiple) **
Specify second point or [Base point/Copy/ Undo/eXit]:
20. Pick a point due east of the hot grip as shown. (Be sure to use ortho .)
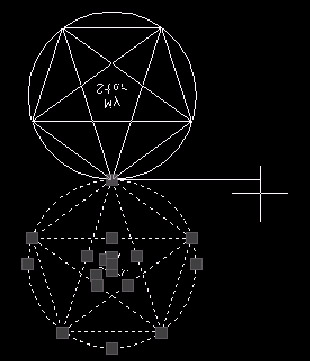
Figure 16.2.2.20a:
** MIRROR (multiple) **
Specify second point or [Base point/Copy/ Undo/eXit]: _exit
21. Pick the Exit option on the Grips menu, then clear the grips. Your drawing looks like Figure 16.2.2.21a.
(Note: These objects were mirrored with the Mirrtext sysvar set to 1 . If yours is set to , the text won't mirror.)
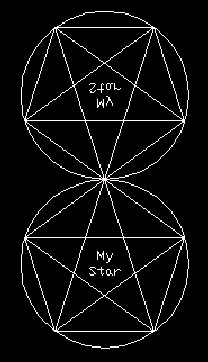
Figure 16.2.2.21a: Command: u
22. Undo the last modification.
This last section will first walk you through the simple Move Grips command. Then we'll use the Scale Grips command to make sized copies of objects.
Let's proceed.
Do This: 16.2.3 Move and Scale with Grips
-
Be sure you're still in the Grips.dwg file the C:\Steps\Lesson16 folder. If not, please open it now.
-
Follow these steps.
Tools
Command Sequence
Steps
No Button Available
Command:
1. Select all of the objects. Use a window or crossing window.
Command:
2. Select one of the grips. (With the Move Grips command, all the objects with active grips will move.) I'm using the grip at the topmost point of the star.

** STRETCH **
Specify stretch point or [Base point/Copy/ Undo/eXit]: _move
3. Right-click to display the Grips menu. Select the Move command.

** MOVE **
Specify move point or [Base point/Copy/ Undo/eXit]: _base
4. Right-click again and select the Base point option.
Specify base point: _cen of
5. Using OSNAPs, pick the center of the circle as the new base point.
** MOVE **
Specify move point or [Base point/Copy/ Undo/eXit]: 6,4.5
6. Tell AutoCAD to move the objects to the absolute coordinate 6,4.5 . Notice that all of the objects with grips showing move even though only one grip has been selected.

Command: qsave
7. Save the drawing but don't exit.
Command:
8. Now let's scale the objects. If the grips are displayed, clear them.
9. Select only the circle and the polygon (Figure 16.2.3.9a).
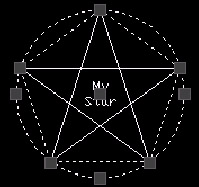
Figure 16.2.3.9a:Command:
10. Select one of the grips. (I'll use the bottom quadrant grip.)

** STRETCH **
Specify stretch point or [Base point/Copy/ Undo/eXit]: _scale
11. Call the Grips menu and pick the Scale command.

** SCALE **
Specify scale factor or [Base point/Copy/ Undo/Reference/eXit]: _copy
12. On the Grips menu, pick the Copy option.

** SCALE (multiple) **
Specify scale factor or [Base point/Copy/ Undo/Reference/eXit]: _base
13. On the Grips menu, pick the Base Point option.
Specify base point: _cen of
14. Using OSNAPs, pick the center of the circle as the base point.
** SCALE (multiple) **
Specify scale factor or [Base point/Copy/ Undo/Reference/eXit]:
15. Make three scaled copies as shown in Figure 16.2.3.15a, and then clear the grips.
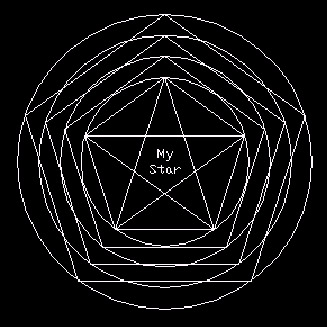
Figure 16.2.3.15a: Command: qsave
16. Save the drawing and exit.
So what do you think of grips?
After learning the basic modifying commands in earlier lessons, grips may be difficult at first. But practice, practice, practice! Grips will increase speed and productivity ( excuse that nasty corporate word) and your earning potential!