The Graphical Device Interface (GDI)
The visible aspect of a C++Builder application is built using forms and controls. Some aspects of the application's GUI may consist of graphics and pictures. The display of these graphics and pictures is where the GDI subsection of Windows API comes into play. The GDI is one of the core parts of the Windows operating system and is housed in GDI.DLL and GDI32.DLL . It encompasses hundreds of functions (in recent versions of Windows there are more than 400 exports in GDI32.DLL ). Everything that draws in Windows uses the GDI, including Windows itself.
The GDI exists for one main reason: device independence. When you draw using GDI functions, you do not need to know the specifics of programming every video card and printer on the market today and tomorrow. The GDI provides a layer of abstraction between your application code and the hardware, so you don't have to worry about hardware issues.
Borland provides another layer of abstraction between the application code and the GDI, with the TCanvas , TBrush , TPen , and TFont classes. We will examine these shortly, but first it's important to understand some GDI essentials.
NOTE
Unfortunately, there is not enough space to cover all the features available within the GDI. For more information, see the Win32 API help on GDI, or the VCL help starting at TCanvas .
The Windows API and the Device Context
As with just about every other part of Windows programming, a handle is needed to interface with the GDI. This handle is known as the Device Context (DC). In the standard Windows API, we can retrieve a DC using the GetDC() routine. After we get the DC, we can use a number of GDI functions to draw within the client area of that window. Let's take a look at an example:
void __fastcall TForm1::ButtonDrawGDIClick(TObject *Sender) { HDC hDC = GetDC(Handle); Rectangle(hDC,10,10,100,100); ReleaseDC(Handle, hDC); } In this example, we pass the window handle of our application's form as a parameter into the GetDC() function. In return, we receive a DC for the client area associated to that window. The Rectangle() function is a GDI routine that will draw a rectangle using the current pen and brush at the specified location. After we have finished drawing, we release the DC using ReleaseDC() .
TIP
To draw anywhere on the desktop, pass NULL as the hWindow argument to GetDC() or GetWindowDC() .
Using TCanvas
When programming using C++Builder, it is preferable to use object-oriented classes and components over C structured API code to improve efficiency and reuse. This is the advantage VCL provides over the Windows API. Support for drawing lines and filled areas is provided by the TCanvas component.
TCanvas is a wrapper around the GDI functionality and is available as a property on the TForm , TPrinter , TImage , TBitmap , and TToolbar components as well as on a number of custom control components. You access Canvas as a property of these components. With TCanvas , we can draw the same rectangle we demonstrated earlier as follows :
void __fastcall TForm1::ButtonDrawCanvasClick(TObject *Sender) { Canvas->Rectangle(10, 10, 100, 100); } In this example, we have used only one line of code to draw a rectangle within the form, whereas previously it took three lines of code when using the Win32 GDI functions directly.
TCanvas provides an object-oriented interface to the Windows API. The biggest advantage is that it handles resources for you. There are some fairly complex rules concerning how to manage GDI resources when using the raw API, whereas TCanvas handles these rules for you seamlessly. Also, TCanvas provides the standard VCL property system for getting and setting many of the attributes of the underlying Device Context, which simplifies your code and makes it much easier to read and understand.
Key Properties
TCanvas has several key properties you should know about:
-
TPen Pen ” The currently selected pen for drawing
-
TBrush Brush ” The currently selected brush
-
TFont Font ” The currently selected font
-
TPoint PenPos ” Positions the pen for drawing
It is important to mention that the canvas will use the current pen, brush, font, and position as appropriate when drawing. Properties to these elements should be changed before any canvas drawing function is called. We'll look at the classes behind some of these properties in a short bit, but first let's take a look at how we can effectively use TCanvas .
Mixing TCanvas with the GDI
TCanvas and its associated classes are coded in the file graphics.pas , but they do not wrap all the GDI functions. Borland has implemented only the most commonly used functions. Although the VCL could be even more helpful, keep in mind that with C++Builder the Windows API is just a function call away.
Because TCanvas provides a Handle property to a device context, we can interweave GDI function calls with our VCL-based code. Going back to our original rectangle example, this could be coded using both the Canvas interface and the GDI as follows:
void __fastcall TForm1::ButtonDrawCanvasGDIClick(TObject *Sender) { Rectangle(Canvas->Handle, 10, 10, 100, 100); } In this example, we are using the standard Win32 GDI function Rectangle() and passing the handle to the Form's Canvas, which is a Device Context. You'll find that this example code achieves exactly the same results as the previous examples.
Drawing Lines, Curves, and Other Shapes
Drawing lines and curves is easy with a TCanvas : Just set up the relevant pen, and then call the appropriate function. There are many functions in TCanvas for line drawing, which are readily available in the C++Builder documentation. A simple line, for example, is drawn using two commands:
Canvas->MoveTo(1, 1); Canvas->LineTo(9, 1);
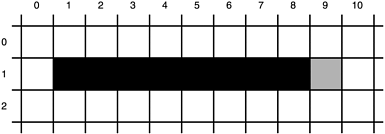
In this example, MoveTo() sets the pen location, and LineTo() draws a straight line from that initial location up to, but not including, the last point specified, which is the position (9,1). This is illustrated in Figure 15.1.
Figure 15.1. LineTo(9,1) does not fill in the last pixel.
To draw a series of connected curves, such as a sine wave, you can use the PolyBezier() function as shown in Listing 15.1:
Listing 15.1 Drawing a Sequence of Curved Lines (a Sine Wave)
void __fastcall TForm1::ButtonDrawSineWaveClick(TObject *Sender) { Canvas->Pen->Color = TColor(EditColor->Text.ToIntDef(0)); //clBlue; Canvas->Pen->Style = psSolid; // solid line Canvas->Pen->Width = EditPenWidth->Text.ToIntDef(1); const int maxpts = 19; TPoint pts[maxpts]; double pi_3 = 3.1415926535897932384626433832795 / 3.0; for (int i = 0; i<maxpts; i++) { pts[i].x = (i+1)*10; pts[i].y = (sin(i*pi_3)*200) + 300; // axis (pi) every 3rd one } Canvas->PolyBezier(EXISTINGARRAY(pts)); /* Show the points as well as the curve */ for (int i = 0; i<maxpts; i++) { Canvas->Rectangle(pts[i].x-3,pts[i].y-3,pts[i].x+3,pts[i].y+3); } } When using PolyBezier() , you need to identify at least four points, which identifies a single curve. The first and fourth points identify the start and end location of the initial curve; the second and third points identify control points for manipulating the curve. Any subsequent curves in the sequence, if they are to be included, require exactly three points per curve. The first two points after the first curve identify control points for the new curve, and the third point identifies the end location for the existing curve and the start location for the next curve if there is to be one.
NOTE
Many of the examples listed in this chapter are designed to point out the API call that's needed to perform the necessary task. There are other elements not shown, such as variables and the identification of header files within the include section. These elements are needed for the code to properly compile. However, all the source described in this chapter can be found on the accompanying CD-ROM.
To draw various polygon shapes, use the Polygon() function. A hexagon, for example, can be drawn as shown in Listing 15.2:
Listing 15.2 Drawing a Polygon Shape (a Hexagon)
void __fastcall TForm1::ButtonDrawHexagonClick(TObject *Sender) { TPoint points[5]; points[0] = Point(80,140); points[1] = Point(140,196); points[2] = Point(116,260); points[3] = Point(44,260); points[4] = Point(20,196); Canvas->Brush->Color = clTeal; // fills hexagon with teal Canvas->Polygon(points, 4); } A hexagon contains five points. In this example, we identify each of those points within a Point array, which is passed in as parameter to the Polygon() function.
Drawing Filled Areas
Filled images use both a pen and a brush . The pen is used for the outline of a shape, and the brush is used to fill in the interior of a shape. For example, a yellow-filled rectangle with a blue outline could be drawn as shown in Listing 15.3.
Listing 15.3 Drawing a Filled Rectangle
void __fastcall TForm1::ButtonDrawRectClick(TObject *Sender) { TRect MyRect(50,50,100,100); Canvas->Pen->Color = clBlue; Canvas->Pen->Style = psSolid; // solid line Canvas->Pen->Width = 2; Canvas->Brush->Color = clYellow; Canvas->Brush->Style = bsSolid; Canvas->Rectangle(MyRect); } Notice how we adjust the Pen and Brush attributes before drawing the rectangle. Also, identifying a boundary rectangle is required for other functions such as the Ellipse() function.
Canvas->Ellipse(MyRect);
In this example, the system draws the ellipse so that it just touches the boundaries of the rectangle.
Drawing Text
There are several ways to draw text using TCanvas . The easiest is to use TextOut() , which starts at a specified (x,y) position. On return, this function positions the PenPos to the end of the drawn text (top right), allowing for easy continuation. Listing 15.4 provides an example.
Listing 15.4 Writing Out Text Using TextOut()
void __fastcall TForm1::ButtonTextOutClick(TObject *Sender) { Canvas->Font->Color = clNavy; Canvas->TextOut(20,20,"Here's how you write text "); Canvas->TextOut(Canvas->PenPos.x,Canvas->PenPos.y, "and how you continue to write text."); } Another way to write out text is to use TextRect() . TextRect() will draw the text within a rectangle and clip any text that does not fit. A simple example is provided in Listing 15.5.
Listing 15.5 Writing Out Text Using TextRect()
void __fastcall TForm1::ButtonTextRectClick(TObject *Sender) { Canvas->Font->Color = clNavy; TRect MyRect(10,10,250,100); Canvas->TextRect(MyRect,10,10, "Here's how you write text within a rectangle."); } The size of the text for either of these functions depends on the font. For a fixed-pitch font, such as Courier, each letter takes up the same amount of space, whether it is an i or a w . With a variable-pitch font, each letter is a different width, so the i takes up less space than the w . To calculate the width and height a given string will take up, TCanvas provides the function TextExtent() , which returns a TSize that can be used for positioning the text as appropriate.
As an example, in the analog clock example code, the text is drawn using the following:
AnsiString text = "Right Click for Menu..."; TSize textSize = Canvas->TextExtent(text); int x = (Width - textSize.cx) / 2; int y = Height - textSize.cy - 2; Canvas->TextOut(x, y, text);
The math performed to calculate x and y in this example ensures that the text is centered at the bottom of the canvas object.
Using TPen
When you draw a line or a lined object, such as an empty circle, on a TCanvas object, the current pen is used to define the color, style, and thickness mode. The Color property identifies the color used to draw lines on the canvas. The Style property determines how the line is drawn: solid, dotted , dashed, and so on. The thickness of line is controlled by the Width property. If the Width is greater than 1, the line will automatically be solid. Therefore, if you need a thick dotted line, one approach is to draw multiple lines next to each other (each line being one pixel apart).
TPen also has a property called Mode , which defines how the pen's color is affected by the underlying color already on the canvas. Of particular interest is the pmNotXor mode, which will perform a "not xor" of the pen's color with the underlying canvas color. This is particularly useful for drawing temporary lines over an image when the line will be erased shortly afterward. The line can then be erased by redrawing the line over the first line because the pmNotXor mode will cancel out the two lines, leaving the original image displayed. This can be used, for example, to paint a zooming region or a crop region within a graphics program. This is shown in Figure 15.2.
Figure 15.2. Painting a crop region over an image.
Let's take a look at the example in Listing 15.6 that shows how to display a crop region in C++Builder.
Listing 15.6 Displaying a crop region
void __fastcall TForm1::FormMouseDown(TObject *Sender, TMouseButton Button, TShiftState Shift, int X, int Y) { if (Button == mbLeft) { oX = X; // anchor point oY = Y; lX = X; lY = Y; Canvas->Pen->Color = clBlack; Canvas->Pen->Style = psDash; // dashed line Canvas->Pen->Width = 1; Canvas->Pen->Mode = pmNotXor; Canvas->Brush->Style = bsClear; DrawSelectRegion = true; } } // - void __fastcall TForm1::FormMouseMove(TObject *Sender, TShiftState Shift, int X, int Y) { TRect MyRect; if (DrawSelectRegion) { MyRect = TRect(oX,oY,lX,lY); Canvas->Rectangle(MyRect); lX = X; lY = Y; MyRect = TRect(oX,oY,lX,lY); Canvas->Rectangle(MyRect); } } // - void __fastcall TForm1::FormMouseUp(TObject *Sender, TMouseButton Button, TShiftState Shift, int X, int Y) { TRect MyRect; if (DrawSelectRegion) { MyRect = TRect(oX,oY,lX,lY); Canvas->Rectangle(MyRect); DrawSelectRegion = false; } } In this example, when the left mouse button is clicked, an anchor is made at the X, Y point, and the canvas properties are set up for displaying a dashed rectangle. When the mouse moves with the left button still down, the rectangle making up the zoom area changes appropriately in size, and the original picture and objects are still displayed. When the mouse button is released, one last rectangle is drawn to erase the previous crop region. The key to making this work is having the pen Mode property set for pmNotXor , which we set when the mouse button was pressed. Additionally, the brush style set for bsClear , ensures that the existing objects on the Canvas are not masked by the drawn rectangle. Let's take a look at the aspects of TBrush .
Using TBrush
A brush is used to determine how to fill-in the selected region of the canvas. TBrush has the properties Color, Style , and Bitmap . Color is a TColor property used to identify the color to be used by the brush. Style determines whether to fill in the object or use a pattern of lines to shade the area. The Style property takes the values bsSolid , bsCross , bsClear , bsDiagCross , bsBDiagonal , bsHorizontal , bsFDiagonal , and bsVertical . These should be self-explanatory. In the last example we used bsClear to keep the background information visible. The effect of these styles can also be seen in the analog clock program example provided on the CD-ROM and described later. The Bitmap property can also be used to identify an external bitmap image that, like Style , defines a pattern for the brush. This is illustrated in Figure 15.3.
Figure 15.3. Placing an image on the canvas of a C++Builder application.
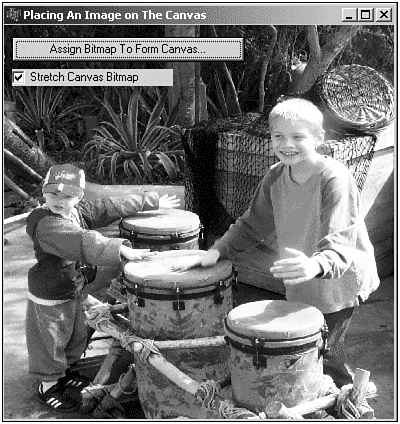
Let's take a look at Listing 15.7, which provides an example on assigning a bitmap brush to the Form Canvas.
Listing 15.7 Tiling and Stretching a Bitmap onto a Form
void __fastcall TForm1::ButtonAssignBitmapToCanvasClick(TObject *Sender) { OpenDialog1->Filter = "Bmp files (*.bmp)*.BMP"; if (OpenDialog1->Execute()) { Graphics::TBitmap *BrushBmp = new Graphics::TBitmap; try { BrushBmp->LoadFromFile(OpenDialog1->FileName); Canvas->Brush->Bitmap = BrushBmp; TRect rect; rect.Left = 0; rect.Top = 0; rect.Right = ClientWidth; rect.Bottom = ClientHeight; if (CheckBoxStretch->Checked) Canvas->StretchDraw(rect, BrushBmp); else Canvas->FillRect(rect); } __finally { Canvas->Brush->Bitmap = NULL; delete BrushBmp; } } } In this example, a bitmap is loaded that is either tiled to the form, or stretched to fit across the whole form depending on the value of the CheckBoxStretch control. This capability might be useful for providing skin support in an application. In a short while, we'll look more in depth at working with TBitmap objects.
Using TFont
The current font is used in text functions such as TextOut() . A TFont object has all the attributes that you would expect, such as Color , Name , Style , Height , and Size . The Color property, of course, is used to identify the color of the text to be displayed. The Name property is used to set the type of font, such as Arial, or Courier. The Style property is used to identify whether the text should be bold, underlined , and/or italicized. Let's take a look at the example code in Listing 15.8:
Listing 15.8 Adjusting the Font of a Canvas
void __fastcall TForm1::ButtonFontClick(TObject *Sender) { if (FontDialog1->Execute()) { EditFont->Text = FontDialog1->Font->Name; Canvas->Font->Name = FontDialog1->Font->Name; Canvas->Font->Style = FontDialog1->Font->Style; Canvas->Font->Size = FontDialog1->Font->Size; Canvas->Font->Color = FontDialog1->Font->Color; } } // - void __fastcall TForm1::ButtonApplyTextClick(TObject *Sender) { Canvas->TextOut(100,100,EditText->Text); } In the ButtonFontClick() event hander, we use a TFontDialog object to obtain the desired font attributes of the user . These attributes are assigned to the property values of the Font property for the Canvas. Next, the ButtonApplyTextClick() event hander is used to write out the text contained within EditText using the Font properties that were previously assigned.
The size of the font can be set in two ways: Height in pixels or Size in points. In general, most users will want to set the font size in points, not in pixels. The TFontDialog , for example, requests a font height from the user, not a pixel size. However, programmatically, it's useful to know the pixel height when placing text on a canvas or image. Fortunately, if you set one, the other is automatically calculated and can be used accordingly .
Using TColor
One of the commonly modified properties of the Brush, Pen, and Font elements associated to a TCanvas object is the Color . The color of a graphics object in the VCL is set using the TColor property. TColor is a VCL mapping of the Windows API COLORREF value, which uses a 32-bit number to specify the color. The color is divided into the constituent components Red, Green, and Blue, so Red is (255,0,0), and White is (255,255,255). The following code snippet provides an example of how to set the color:
void __fastcall TForm1::ButtonFontColorClick(TObject *Sender) { if (ColorDialog1->Execute()) { Canvas->Font->Color = ColorDialog1->Color; } } In this example, we use a TColorDialog object to provide the user with a dialog to select the color. After the color is selected it is assigned to the Canvas Font color.
Not all displays attached to a Windows computer are capable of displaying the full spectrum of colors. The number of colors that can be displayed might be 16, 256, 65536, or 16 million. The number of colors available is also known as the color depth . Table 15.1 lists the possible colors and a description.
Table 15.1. Representation of Colors at Different Color Depths
| Number of Colors | Description |
|---|---|
| 16 colors | With a 16-color VGA display, the colors are fixed and are listed in the help for TColor . |
| 256 colors | A 256-color display is palette-based. This means that only 256 colors can be displayed at one time, but the choice of which colors can be set from the full range of colors. |
| 65,536 colors | The Red, Green, Blue (RGB) values are stored in a 16-bit value. When you choose a color, Windows applies the value closest to the one selected. |
| 16 million colors | All colors are available for display. |
NOTE
There is not enough space in this section for us to cover palette management for 256-color displays. For more information, look at a good Windows API reference text such as Petzold's Programming Windows , Microsoft Press, ISBN: 157231995X.
To determine the number of colors available on your machine, use the Win32 GDI function GetDeviceCaps() . This will identify the number of color planes and the number of bits per pixel. The following code snippet will calculate the number of colors that can be supported:
int BitsPerPixel = GetDeviceCaps(Canvas->Handle, BITSPIXEL); int NumberOfPlanes = GetDeviceCaps(Canvas->Handle, PLANES); int NumberofColors = 1 << (NumberOfPlanes * BitsPerPixel);
An Analog Clock Example
To demonstrate these ideas, an analog clock project, clock.bpr , is provided in the GDIClock folder on the CD-ROM that accompanies this book. This clock is based on an old Borland C++ OWL example, aclock , and shows a simple clock with hour , minute, and second hands. This is shown in Figure 15.4.
Figure 15.4. The analog clock example program.
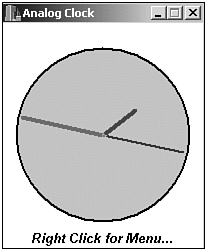
This example program is intended to show the use of the Canvas for drawing. The important functions in this example are the form's InitializeImage() , DrawClockToHiddenImage() , and FormPaint() .
All drawing is done to the canvas of a hidden TImage that is copied onto the form's Canvas in the OnPaint() event handler. We draw to a hidden image that's the same size of the form to speed up the display update. On each OnPaint() event call for the form, hidden canvas is simply copied to the form canvas.
void __fastcall TForm1::FormPaint(TObject *Sender) { // copy the information on the hidden canvas onto the form's canvas. Canvas->CopyRect(ClientRect, HiddenImage->Canvas, HiddenImage->ClientRect); } The result of this processing has the advantage of speeding up the display over the common approach, which is to draw directly on to the canvas during a TForm 's OnPaint event. CopyRect() improves performance.
The example program also demonstrates the use of the Font , Brush , and Pen properties of the canvas, along with the drawing of lines for the hands and an ellipse for the clock face. Using a pop-up menu, the brush style of the clock face can be changed to show the different effects, along with the style of the hands.
| |
| |
| Top |