Windows Agent Interface
| < Day Day Up > |
| When the CSA is installed on a Windows operating system, you need to be familiar with a few visual GUI components such as the tray icon, the system tray options menu, and the user GUI. Other topics discussed in this section regarding the agent software are audible notifications, the Windows Programs menu, local directories and tools, user interaction, and stopping the agent service. Windows Agent Tray IconThe CSA tray icon is represented by a red flag that resides in the system tray (lower-right corner of the Windows taskbar). This icon remains motionless until an agent rule is triggered, in which case it begins to wave. As a local alerting mechanism, the agent flag waves to get the attention of the local user. Another local alerting mechanism enabled by default is the balloon message feature. Balloon messages are messages that pop up just above the system tray when an agent policy rule is locally triggered. Although these visual alerts might prove useful for some users, others might find them distracting; therefore, you can hide them from the user. You can also hide them for other reasons, such as an administrative policy that forbids user interaction with local security mechanisms. NOTE You cannot disable pop-up messages on an agent using central policy because this notification mechanism is a local configuration option only. Another way to disable pop-up messages on the client is to add the following registry key to the agent machine: HKEY_CURRENT_USER\Software\Okena\Cisco Security Agent\ key="BalloonPopupsDisabled"=dword:00000001 Windows System Tray Options MenuThe system tray options menu is accessible by right-clicking the system tray flag icon, as shown in Figure 7-1. When it opens, the following shortcut and configuration options display:
Figure 7-1. Agent System Tray Options Menu NOTE Closing the icon on the taskbar does not suspend security, but only makes the icon disappear. The CSA User GUIThe CSA GUI, also called the Agent Control Panel, might have different options available depending on the policy definition for the local agent. Double-clicking the red flag icon in the system tray opens the control panel for viewing and manipulating the agent. The Agent Control Panel is divided into the following three sections:
The following sections describe the navigation panel options so that you can discover what a fully capable local agent GUI screen can provide. Windows Agent StatusWhen you open the agent GUI, the top-level status screen displays, as shown in Figure 7-2. This screen provides basic information regarding agent health. The following information displays:
Figure 7-2. Status Screen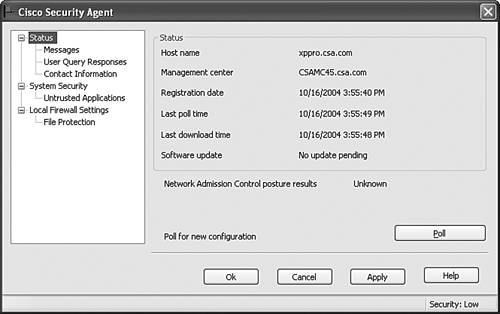 NOTE If the agent is a member of multiple groups, the shortest polling interval is used. The Status screen provides three suboptions:
The next sections describe these suboptions in greater detail. Windows Agent Status > MessagesThe Messages suboption enables the local user to view the list of denied system actions that have occurred as of the last reboot. This information proves useful when troubleshooting the local agent, particularly when the CSA MC is unreachable. As shown in Figure 7-3, you can also open the local security log file by clicking the View Log button. This log provides more detailed information about what has occurred on the local agent as a result of the implemented policy. The Purge Log button enables you to clear the local log file, but not the entries in the Messages window. Figure 7-3. Available Agent Installation Kits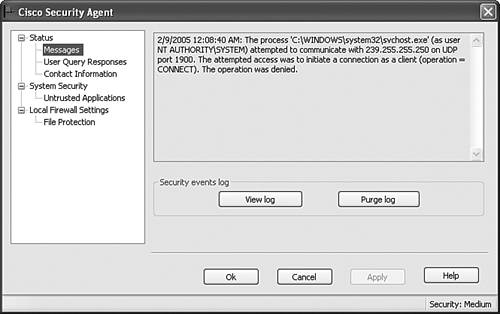 Windows Agent Status > User Query ResponsesThe User Query Responses suboption maintains the list of cached responses from the local agent. A response is cached locally if a rule is triggered that had the Don t Ask Again check box enabled and the user chose Yes, No, or Terminate when prompted along with checking that check box. By checking Don't Ask Again, the user can cut down on the amount of interaction required with the agent such that the agent can auto-respond by using the cached information. Responses can be cached for set time intervals, such as an hour in duration, or permanently remembered. Permanently remembered responses remain cached even through reboots, whereas the timed cached entries do not remain through a reboot. To clear a permanent response from the User Query Responses window, as shown in Figure 7-4, click the Clear button after choosing the permanent responses you want to clear. You can also clear all temporarily cached responses by just clicking the Clear button without specifically choosing any responses. You can also clear all cached entries for a specific agent in the architecture from the Diagnostics window available from the Host Settings page in the CSA MC if that is required. Figure 7-4. User Query Responses Screen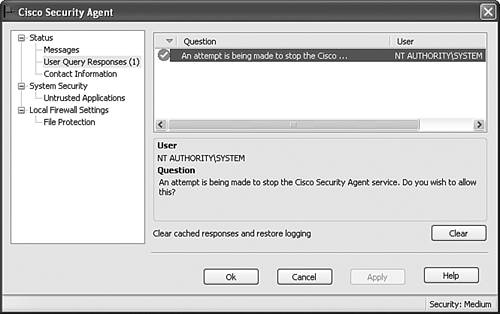 NOTE Cached entries are for the current user only. Systems that are used by more than one person might ask the same query to each person until cached for all users. Windows Agent Status > Contact InformationThe Contact Information suboption is a simple form, as shown in Figure 7-5. This form enables the local user to enter information such as name, telephone number, e-mail address, and location. This information is transmitted to the CSA MC to aid in troubleshooting. Figure 7-5. Agent Contact Information Screen Windows Agent System SecurityThe System Security screen shown in Figure 7-6 is an interactive screen that enables the user to control how some local rules are enforced. Users on protected systems can use this particular screen to temporarily weaken the desired endpoint security. This screen need not be provided to all users or might possibly only be provided dependent on user or system state, such as to administrators and users who are out of the office. Figure 7-6. System Security Screen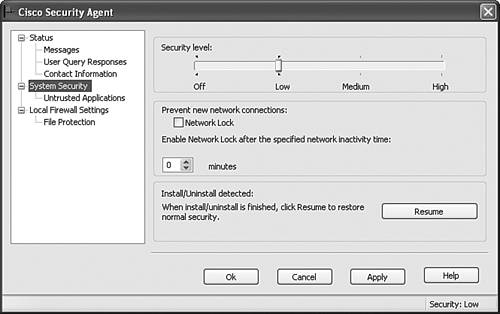 At the top of the System Security screen is the Security Level slide bar. Users can set the bar to four possible levels: Off, Low, Medium, and High. These levels correspond to system state levels, as defined in the CSA MC, that affect whether a rule is enforced at that moment in time. Security levels do not necessarily turn off rules, but could change the rule to a query rather than implicit deny. The security levels of Low, Medium, and High affect the agent according to the administratively defined security policies and states on the CSA MC. These levels do not correspond to generic security assignments but personalized enterprise policy-level definitions. The Off security level always disables the security agent. NOTE It might prove beneficial to provide the slider bar to a user who is currently out of the office so that the user can temporarily lower the security level to install needed software. Users in the office should always have local support staff available to install software and therefore should not need to lower the security level themselves. In the next portion of the screen, you see the Network Lock check box. The network lock, if enabled, prevents all new inbound and outbound network attempts other than those that were already in progress prior to enabling the lock. When enforced, the network lock prevents new network connections regardless of whether another rule permits the network connectivity attempted. You can manually enable the network lock by checking the box, or it can be enabled automatically by setting the timer associated with the Network Lock check box. After a certain number of minutes of network inactivity, the lock is automatically enabled. To disable the network lock, you must uncheck the check box or reboot the system. The final button on this screen is the Resume button. As discussed in Chapter 4, the agent can detect installation programs and can temporarily lower the security of the system to specifically allow the particular installation to occur without the agent interfering. In some cases, such as the installation abnormally terminating, the agent cannot see the installation completion, and the lowered security setting associated with the install executable is not removed. To manually remove the lowered security policy and let the agent know that the installation has completed, you can click the Resume button to alert the agent. Windows Agent System Security > Untrusted ApplicationsThe Untrusted Applications screen displayed in Figure 7-7 provides a list of applications that were downloaded to the system that the user chose not to trust as downloaded content. If you choose to later trust this application, you can come to this screen in the Agent Control Panel GUI and delete the application from the untrusted list. Figure 7-7. Untrusted Applications Screen Local Firewall SettingsBy providing the Local Firewall Settings screen to a user, you enable the user to use the agent as a personal firewall. Without this screen, which is shown in Figure 7-8, all network access control rules are still in place. This screen enables you to locally define which applications have permissions on your system and which permissions are allowed. Firewall permissions are allowed for applications when the user answers a query message as to whether they should be permitted. Figure 7-8. Local Firewall Settings Screen NOTE The local firewall settings do not override centrally defined policies. For applications to have permissions, both the central and local policies must permit them. After the personal firewall has been enabled, users can place the personal firewall in Learning Mode. In Learning Mode, the CSA watches the interactive system to build the local permissions database. Four types of permissions can be assigned to any application:
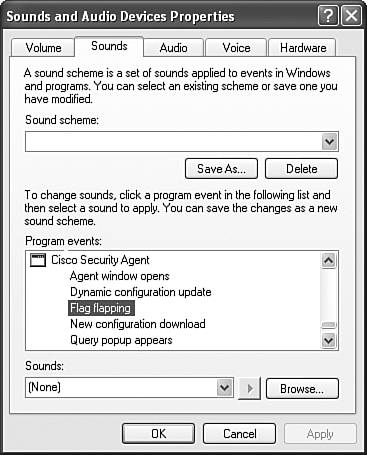
Within each type of permission assigned, the application can be either permitted or denied that permission. The icon representing each action appears next to the application in the list. After an application has been assigned a local permission, you cannot directly change it, but rather must delete it from the list and answer the next associated query appropriately as it is re-added to the list. NOTE Local firewall settings are ignored if the agent is in Test Mode. The File Protection screen shown in Figure 7-9 enables the local user to protect local files and directories from being accessed over the network. This protection is very similar to what can be provided by centralized policies within the CSA MC. In certain cases, the local user might be aware of local files that are not being protected by centrally defined file access control policies. When you add a file or directory to this list, any network attempt to access this asset results in a query so that you may only provide access when it is necessary to do so. Figure 7-9. File Protection Screen To protect directories and files, you must use the correct syntax. If you name the specific path and file, such as c:\directory1\directory2\filename.txt, that file is protected. To protect all files in a directory and all subdirectories, use the ** wildcard (for example, c:\directory1\** to protect all files in directory1 and all subdirectories). To protect just the named directory files but not the subdirectory files, use the * wildcard (for example, c:\directory1\directory2\*). To protect a specific filename no matter where it resides, just name that file outright (for example, filename.txt) . CSA Audible NotificationsCSA can provide a sound notification if certain actions take place. To configure the sounds associated with these events, you must make the necessary changes in the Sounds and Audio Devices Control Panel window, as shown in Figure 7-10. By default, no audible notifications are preset, and these settings are not globally available via the CSA MC. The following is the complete list of events that can be tied to audible notifications:
Figure 7-10. Audible Notifications Configuration
Windows Programs MenuUpon installation, CSA places some links into the Programs list on the Start menu. From here, you have the following options:
CSA Local Directories and ToolsThe CSA default installation directory is C:\Program Files\Cisco Systems\CSAgent. There are a number of directories here, but most notable are the log and bin directories. The log directory includes many local log files, which can prove very useful in troubleshooting a specific agent. Remember, you can get most of the log information as well as other great information about the current system by running the Agent Diagnostic tool. The other directory that a technician may use is the bin directory. The bin directory contains the necessary agent EXE and DLL files and some other tools you might need to use from time to time. An example of a tool in this directory is getcom.exe. This particular tool checks for all COM objects on the system and places them in an ASCII text file for you to peruse when creating COM rules in the CSA MC. CSA User InteractionIf you permit the user to interact with the local security agent GUI, the user should under-stand how to answer the common queries that will pop up when rules are triggered. When a query rule is triggered, the user is presented with some options regarding the question at hand, such as whether downloaded content should be allowed to execute. The user could be given the following options:
Along with the preceding options, the user may be given the ability to check the Don t Ask Again check box, which would locally cache the response for future queries. After selecting the option that is deemed appropriate, the user may be prompted with a query challenge response. A query challenge response is an additional pop-up box that the user receives that asks the user to type a multiletter response exactly as it is presented to them in the onscreen image, as shown in Figure 7-11. This is an option made available to CSA MC administrators who are concerned that an automated client-side application might attempt to choose an undesirable option in place of the default action that would result if the user were not at the machine at the time of the query. Figure 7-11. Query Challenge Response Stopping a CSA AgentThere are three ways to stop CSA from protecting the local system:
It is important that the appropriate policies be in place such that the agent cannot be stopped inappropriately, which would result in an unprotected system. It is also important to remember that in certain cases stopping the agent might be a valid action, such as when a local technician is troubleshooting a problem on the system. System and user states are a great way to control when and how the agent protective rules are implemented. |
| < Day Day Up > |
- Step 1.2 Install SSH Windows Clients to Access Remote Machines Securely
- Step 3.2 Use PuTTY / plink as a Command Line Replacement for telnet / rlogin
- Step 3.3 Use WinSCP as a Graphical Replacement for FTP and RCP
- Step 4.3 How to Generate a Key Pair Using OpenSSH
- Step 5.2 Troubleshooting Common OpenSSH Errors/Problems