Heads-Up Displays
The heads-up display , or HUD, is a very specific user interface item. Rather than being a class of commands, it is in and of itself a MEL command. HUDs are created as text that is projected as a 2D layer on top of the modeling panels. HUDs are useful for monitoring data within a scene, such as the number of polygons on screen, how many keyframes are set on the selected object, or even such mundane information as what camera the user currently is looking through.
HUDs have more in common with script jobs than they do with other user interface elements. They can monitor the Maya environment for many of the same conditions and update accordingly , providing ever-changing feedback on the environment. In fact, through the clever use of system commands and such internal MEL commands as memory , a HUD could be constructed to monitor system resources or monitor the status of a network render. An interesting use of HUDs at one production facility using Maya is to embed legal information, as well as the name of the currently logged-in user, into the Maya viewport, as an aid against leaked information.
Maya comes pre-enabled with a number of HUDs available to the user from the menu, all of which are shown active in Figure 11.32.
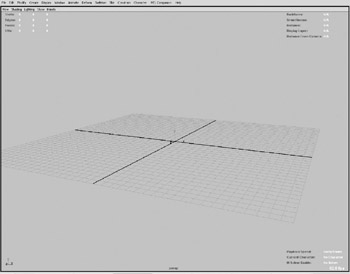
Figure 11.32: A panel with all the default HUDs active.
All of these HUDs are available as preset options of the headsUpDisplay command. However, almost any command that provides return data can be tied to a HUD. The command, be it an existing MEL command or a script created by a user, is what provides the data. How this data is formatted and displayed is the role of the headsUpDisplay command.
Three things must be decided upon when creating a HUD. First, what is the information to be displayed? Second, what commands or procedures must be executed, and possibly created, to provide this information? And third, where and how will this information be displayed?
The answer to the first question is always easy, as it is the reason for creating the HUD in the first place. The second, however, can be slightly more complicated. Occasionally, even if a command exists that provides the information needed, it will not provide the return data in a format conducive to our intended HUD design. In this instances, we need to write accessory scripts that provide return data in a format we want.
Formatting a HUD is somewhat more involved. First, we need to gain an understanding of the two arguments the headsUpDisplay command uses for positioning display elements, sectors and blocks . To the headsUpDisplay command, a modeling pane is made of 10 sectors. The panel is split into a 10x2 grid, as seen in Figure 11.33. Each sector is assigned an index value with which it is identified. An important consideration to remember is that the five columns that define the sectors each have a minimum width of 200 pixels. Meaning, for all five columns to be visible, the modeling pane has to have a width of at least 1000 pixels. If the modeling pane has a resolution less than that, either due to limited screen resolution or the panel being resized, sector columns are eliminated. Sector Columns 2 and 4, composed of sectors 1, 3, 6, and 8 are eliminated first. Then, Sector Column 3, comprising sectors 2 and 7, is eliminated. Note that this is only relevant if those sectors are currently being used. If only sector 7 is being used, and the panel is resized to only 100 pixels wide, the HUD remains, as seen in Figure 11.34.
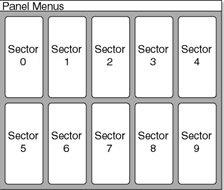
Figure 11.33: The Heads-Up sector layout.
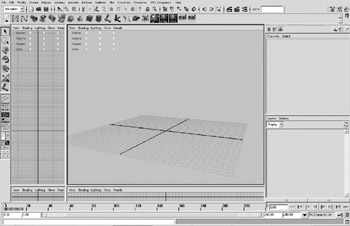
Figure 11.34: The HUD remains the same.
However, if multiple HUD sectors contain information and the pane is similarly resized, as in Figure 11.35, HUDs are removed, though a warning is issued to the user.
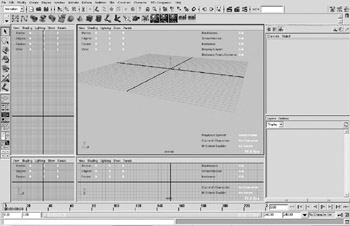
Figure 11.35: HUDs are removed as the panel is resized.
Each sector is made up of blocks. The number of blocks each section is comprised of dynamically changes as HUDs are added and removed from the interface. For this reason, whenever we want to add a HUD, it is best to first find out how many HUDs exist and put ours in the next available spot, rather than being brutish and deleting the HUDs that might occupy the location we want to fill. In Figure 11.36, we see the layout of a block.
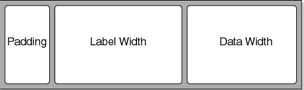
Figure 11.36: Block layout.
The various formatting settings for a block, including the justification and size of text, the vertical size of the block, and the block alignment are all set with separate arguments and variables . Note that the floating-point precision, which is set via an argument, is limited to only eight places. Should we want to provide more, an accessory script that converts the data to a string is needed.
One aspect of HUD blocks to remember is that their vertical placement is dependent on which sector they are in. Blocks placed in sectors 0 through 4, the top row, are placed starting at the top, while the sectors in the bottom row, sectors 5 through 9, are placed starting at the bottom of the screen. This is quite a nice, well thought-out feature of HUD placement. However, by default all blocks are left justified, so those placed in the center and right sides of the screen must be explicitly justified to a more pleasing position.
Many Maya users mistakenly believe that HUDs that provide multiple items of data are created with a single headsUpDisplay command. Rather, the display is created by multiple issuances of the command. Most often, these commands are all contained within their own procedure, and through intelligent use of variables, easily reformat the HUDs quickly. We will take advantage of this in the HUD project.
EAN: 2147483647
Pages: 101