Assigning Work Resources to Tasks
Assigning Work Resources to Tasks
When you assign a work resource, you are attaching the resource name to a task and then indicating how much of the resource's total availability is to be devoted to this task.
When you first add a resource to the project plan, through the use of maximum units (also known as resource units ), you specify how available this resource will be to this project. For example, if the resource is available full time on the project, say, 40 hours a week, you would probably specify that the resource has 100 percent maximum units. If another resource is available 20 hours a week, you would probably specify that this resource has 50 percent maximum units. If you have three of the same type of resource (for example, three graphic designers), you could indicate that there are 300 percent maximum units.
When you assign these resources to tasks, you take the idea of availability a step further by using assignment units . With maximum units, you specify resource availability to the project as a whole. With assignment units, you specify resource availability to the specific task to which the resource is assigned.
For example, one resource might be available full time to perform one task. When that's finished, she'll be assigned full time to the next task, and so on. Upon assigning this resource to the task, you therefore indicate 100 percent assignment units for this resource.
You might have another full-time resource, however, who is spending 40 percent of his time on one task and 60 percent of his time on another task that takes place at the same time. For the first task, you specify 40 percent assignment units; and for the second task, 60 percent. The assignment units specify the percentage of the full 100 percent maximum units being used for the task in question.
Now, take the case of a half-time resource (50 percent maximum units) who is spending all available time on one task. The maximum assignment units you can have for this resource is 50 percent. If this resource is spending half her time on one task and half on another, the assignment units are 25 percent for each task.
Finally, let's look at the case of the three graphic artists whose max units are 300 percent. When you start to assign tasks to a consolidated resource such as this one, Project 2003 does not assume that you want to use all three on one task. You can, but the default assignment units are 100 percent. You can change it to anything up to 300 percent.
| |
Because maximum units and assignment units are both called "units," the terms can be confusing. They're related but different. It would be nice if the respective names were a little more different and a little more descriptive. However, they're vital to our assignment scheduling, and they're what we have to work with. So we need to keep them straight in our minds.
The Max. Units field applies to resources. Think of max units as total resource units . The value you enter in the Max. Units field tells Microsoft Project how much of a particular resource you have available for work on this project, whether it's half of full time (50 percent), full time (100 percent), or three full-time equivalents (300 percent).
On the other hand, the Units field applies to assignments. Think of the Units field as assignment units . The value you enter in the Units field tells Microsoft Project how much of the resource you can use to work on this specific assignment.
Another way to differentiate the two kinds of units is to pay attention to the context in which you see them. If you see a Units field in the Resource Sheet, it's referring to the resource's units on the entire project. If you see a Units field in the Assign Resources dialog box or the Assignment Information dialog box, it's referring to the resource's units on the individual assignment.
Both kinds of units can be expressed in either percentages or decimals.
| |
| Tip | Switch assignment units from percentage to decimal By default, assignment units are expressed as a percentage, but you can express them as a decimal if you prefer. Click Tools, Options, and in the Options dialog box, click the Schedule tab. In the Show Assignment Units As A box, click Decimal. A resource working full time on an assignment is shown as having1assignment unit instead of 100 percent. This setting also changes how maximum units are displayed in the Resource Sheet. |
Creating Work Resource Assignments
By creating an assignment, you specify both the resources assigned to a task and their associated assignment units. Using the Assign Resources dialog box, you can assign one resource to a task, multiple resources to a task, or multiple resources to multiple tasks. To assign a work resource to a task, follow these steps:
-
In the Gantt Chart or other task sheet, click the task to which you want to assign resources.
-
 On the Standard toolbar, click Assign Resources.
 The Assign Resources dialog box appears (see Figure 7-1).
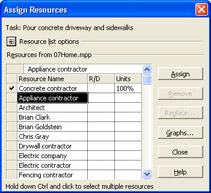
Figure 7-1: Use the Assign Resources dialog box to specify which resources are to be assigned to which tasks, and for how much of their available time. -
In the dialog box, click the name of the work resource you want to assign to the task and then click the Assign button.
The resource name moves to the top of the Resources list in the table, and a default percentage appears in the Units field for the resource. For individual resources, the default assignment units are the same as the resource's maximum units. For consolidated resources with more than 100 percent maximum units, the default assignment units are 100 percent.
-
Review the Units field to make sure that it's appropriate for this assignment.
-
If you want to assign a second resource, click that resource name and then click the Assign button. Modify the Units field as necessary. If you change the Units field, you need to press Enter or click another field.
This procedure ends the edit mode for the field, sets your change, and makes the Assign button available.
Tip Assign multiple resources in one operation You can select all resources to be assigned to a task and assign them at once. Click the first resource, hold down Ctrl, and then click all other resources. Click the Assign button.
-
Repeat Step5for all resources you want to assign to the selected task.
-
To assign resources to a different task, click the next task for which you want to make assignments.
You don't have to close the Assign Resources dialog box to select a different task.
-
Repeat Steps 3 “6 to assign resources to all tasks as necessary.
-
When finished assigning resources to tasks, click the Close button.
Tip Keep the Assign Resources dialog box open as long as you like Unlike other dialog boxes, you can switch back and forth between the task sheet and the Assign Resources dialog box. It's handy to keep it open while you're working out all the details you need to finish making your assignments.
| |
As the project manager, you consider several factors when deciding whom to assign to which tasks. One of the most important factors is the resource's skill set, competencies, and proficiencies. His or her ability to carry out the assigned task is essential to the success of the task. You can set up your resources in Microsoft Project so that you can find and assign resources based on their skill sets.
Another important factor is the resource's availability. If the perfect resource is 100 percent committed to another project during the same timeframe as your project, you can't use this resource. Microsoft Project can help you find resources that are available to work on your project.
There are other factors as well:
Experience Have the resources you're considering for the assignment done similar or related work before? How well did they do it? Perhaps you can use this assignment as an opportunity to pair a more experienced team member with a less- experienced one. This pairing can set up a mentoring situation in which both team members can benefit, and in which your team is strengthened in the long run.
Enthusiasm Are the resources you're considering personally interested in the assignment? In many cases, a resource with less experience but more enthusiasm can be more effective than a seasoned but bored resource.
Team dynamics Do certain tasks require several resources to work together? If so, are the resources you're considering likely to work well together? Do they have a history of conflicts with each other? Do certain team members have good synergy with one another?
Speed Is alacrity important to your project, all other things being equal? Some resources work faster than others. This speed can be a function of experience. Or it can be a function of working style or level of quality. Determine how important speed is to your project, and assign tasks accordingly .
Cost Are you hiring contractors for the project? If you have specific budget limitations, cost is definitely a factor. Sometimes, the rework required by an inexpensive resource can negate any cost savings. Conversely, sometimes more-expensive resources can be a bargain, especially if they work faster than the norm.
Quality What are your quality standards for the project? Try to assign resources who can match those standards.
| |
Adding and Assigning Resources at the Same Time
Suppose that you want to assign a specific resource to a task, but that resource isn't listed in the Assign Resources dialog box because you haven't added him or her to your Resource Sheet yet. You can add new resources to your project plan while working in the Assign Resources dialog box and then immediately assign the newly added resource to tasks. You can then go to the Resource Sheet and complete any detailed resource information you want. To add new resources in the Assign Resources dialog box, follow these steps:
-
In the Gantt Chart or other task sheet, click the task to which you want to assign resources.
-
On the Standard toolbar, click Assign Resources to display the Assign Resources dialog box.
-
In the Resources table, type the resource name in the next available blank Resource Name field and then press Tab to enter the name and stay in the same field.
-
Click the Assign button.
The resource name moves to the top of the Resources list in the table, and 100% appears in the Units field for the resource.
-
Adjust the assignment units if necessary. Assign any additional tasks you want.
-
When finished, click the Close button.
-
Click View, Resource Sheet.
The new resources you added are listed. Modify any resource fields as necessary; for example, Group , Max. Units, Calendar, and so on.
Tip Add resource information from the Assign Resources dialog box Double-click any resource name in the Assign Resources dialog box, and the Resource Information dialog box appears. Enter detailed resource information as appropriate.
You can add an entire group of resources from your e-mail address book, Microsoft Office Project Server 2003, or your Windows Server Active Directory to the Assign Resources dialog box, just as you can in the Resource Sheet. To add resources from a server, follow these steps:
-
With the Gantt Chart or other task sheet open, click Assign Resources on the Standard toolbar.
-
In the Assign Resources dialog box, click the Add Resources button.
If you don't see the Add Resources button (see Figure 7-2), click the + Resource List Options button. The dialog box expands to include the Add Resources button.
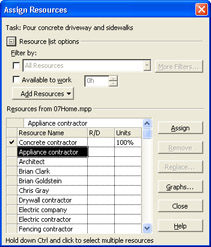
Figure 7-2: Click the “ Resource List Options button to collapse the Assign Resources dialog box; click the + Resource List Options button to expand it. -
Click From Active Directory if you are working with a Windows Server and want to add resources from the Active Directory.
Click From Address Book if you want to add resources from your e-mail program's address book.
Click From Microsoft Project Server if you want to add the resources who are listed as Project Server 2003 users.
-
Click the resources you want from the source you chose and then click the Add button to add the selected resources to the Assign Resources dialog box.
-
After the resources are added, you can immediately assign them to tasks.
Caution Avoid assigning resources to summary tasks Be very careful about assigning resources to summary tasks. Technically you can do it, and in some cases it's beneficial. However, having resources assigned to summary tasks can cause confusion when reviewing rolled up values for work, actual work, cost, and so on. By default, the summary task Gantt bar does not show the resource name, so that can cause still more confusion.
Also take care when you create additional tasks and make them subtasks under existing tasks that have resources assigned. This creates a situation where resources are now assigned to summary tasks.
| |
In addition to filtering for resources in the Assign Resources dialog box, you can filter for tasks and assignments using particular resources. To do this, follow these steps:
-
Display the task or assignment view in which you want to filter for certain assignments, for example, the Gantt Chart or Resource Usage view.
-
Click Project, Filtered For, Using Resource.
-
In the Using Resource dialog box, click the name of the resource whose assignments you want to see.
To filter for a resource's assignments within a particular date range, do the following:
-
Display the task or assignment view in which you want to filter.
-
Click Project, Filtered For, More Filters.
-
In the More Filters dialog box, click Using Resource In Date Range and click the Apply button.
-
In the Using Resource In Date Range dialog box, click the name of the resource whose assignments you want to see and then click OK.
-
Enter the beginning of the date range you want to see and then click OK.
-
Enter the end of the date range you want to see and then click OK.
To see all tasks or assignments again, click Project, Filtered For, All Tasks.
| |
Finding the Right Resources for the Job
You can use the Assign Resources dialog box to narrow your list of resources to only those who meet the criteria needed for the tasks you're assigning. You can filter the resource list to show only those resources who belong to the Marketing department, for example, or only those resources who have a particular job code or skills definition. Using resource fields such as Group or Code comes in handy in these types of scenarios.
If you create and apply resource outline codes, you can also filter for a particular outline code level.
To find resources that meet certain criteria, follow these steps:
-
With the Gantt Chart or other task sheet open, click Assign Resources on the Standard toolbar.
-
In the Assign Resources dialog box, select the check box next to the Filter By box.
If you don't see the Filter By box, click the + Resource List Options button. The dialog box expands to include the Filter By box.
-
In the Filter By list, click the filter that applies to the type of resource you want to find. For example, Group or Resources “ Work.
For additional filters, click the More Filters button.
Any filter that requires additional information includes an ellipsis ( ) after its name. Click the filter, enter the requested information in the dialog box that appears, and click OK.
As soon as you select a filter, the list in the Resources table changes to show only those resources that meet the filter's criteria (see Figure 7-3).
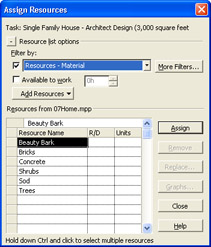
Figure 7-3: By filtering your resource list, you can choose from a set of targeted resources that meet the criteria for the tasks you are currently assigning. -
Assign resources to tasks as usual.
-
When you want to review the full list of resources again, click All Resources in the Filter By list, or simply clear the Filter By check box.
| |
If you set up a resource field that defines certain skill sets, you can use the Assign Resources dialog box to filter for resources with specific skills. For example, you can use the Group field in the Resource Sheet to specify the type of resource; for example, "Writer," "Editor," "Designer," or "Programmer." To assign writing tasks, you can filter for Writer in the Group field. To assign programming tasks, you can filter for Programmer in the Group field. Filtering by the Group field can be especially useful if you have a large number of resources.
Other fields you can use to define skill sets include Code and Outline Code. You can also use custom fields such as Text1 or Number1 to specify skills descriptions or numbers . The Code field is present by default on the Entry table of the Resource Sheet. You can enter any alphanumeric string you like in the Code field. Enter the set of skill codes that correspond with how you identify skills in your organization or develop your own scheme. For example, you can have a set of codes for Designer-1, Designer-2, Programmer-1, and so on. As long as you enter your codes consistently for your resources, you can successfully sort , group, and filter resources by their code.
For a more sophisticated and hierarchical code scheme, set up an outline code for skill sets. With an outline code, you can have a higher level, such as Designer; and sub-levels of 1, 2, and 3. You can then filter or group on the upper-level Designer or find just designers at level 3. You first set up your outline code and then apply the appropriate outline code to resources. With outline codes, you have the added advantage of setting up pick lists and lookup tables, so you don't have to remember the proper method for entering the code.
| Note | For more information about working with custom fields, see "Customizing Fields". For more information about outline codes, see "Working with Outline Codes". |
| |
If you're using Microsoft Office Project Professional 2003 with Project Server and the enterprise features, you can work with your project administrator to define skill sets for everyone in your enterprise resource pool using the resource breakdown structure code, enterprise resource outline codes, and the new multi-value resource outline codes. With these skills defined, you can then use the Resource Substitution Wizard and Team Builder to search throughout the enterprise resource pool to find the resources with the skill set and availability you need.
| Cross-References | For information about the Resource Substitution Wizard and the Team Builder, see "Building Your Enterprise Project Team". |
| |
There is no built-in resource filter for Code or Outline Code. You can create your own filters by clicking New in the More Filters dialog box and then specifying the field name, test, and value for the filter. For example, you can create a filter that finds all resources that have a Code field greater than 9100. Or you can create a filter that finds all resources that have an Outline Code equal to Engineer-1.
New Feature If you're using Project Professional 2003, you might have added certain resources to your project as proposed resources . It would be nice, therefore, to have a filter to find only confirmed resources or to find just proposed resources when setting up assignments. But such resources are not built in, and you need to create them yourself.
| Cross-References | For more information about adding proposed resources, see "Proposing Tentative Resources". For more information about creating custom filters, see "Customizing Filters". |
| |
You can filter your resources to see only those who actually have enough time available for more work. For example, suppose that you assigned all your resources to tasks. Then you add several more tasks and you want to assign only resources who have time for them. To filter for resources with a certain amount of available time, do the following:
-
With the Gantt Chart or other task sheet open, click Assign Resources on the Standard toolbar.
-
In the Assign Resources dialog box, select the Available To Work check box.
If you don't see the Available To Work check box, click the + Resource List Options button. The dialog box expands to include the Available To Work check box.
In the Available To Work box, enter the amount of time needed for the task you're about to assign. For example, if you need a resource with4days of available time, enter 4d in the box.
As soon as you enter the amount of time, the list in the Resources table changes to show only those resources who have the specified availability.
-
Assign resources to tasks as usual.
-
When you want to see the full list of resources again, simply clear the Available To Work check box.
Tip Filter resources and availability at the same time You can find resources in the category you want who have the right amount of available time for your assignments. Under Resource List Options in the Assign Resources dialog box, select both check boxes under Filter By. First, select the resource filter you want to use in the first box and then enter the amount of time in the Available To Work box.
| |
It might look like the Filter By box and its More Filters button are unavailable to you because they're dimmed. They don't look available until you select the check box next to the Filter By box.
The same applies to the Available to Work box. It's dimmed until you select the Available To Work check box.
Selecting the check boxes is necessary because it helps you specify what kind of filter you want to apply. You can apply a resource filter only, or just check for available time. And of course, you can combine the two ”applying a filter to find only those resources who meet the filter criteria and have a certain amount of available time.
| |
You can review graphs of resource availability from the Assign Resources dialog box. This can help you decide which work resource should be assigned to a task. To review the resource availability graph, follow these steps:
-
With the Gantt Chart or other task sheet open, click Assign Resources on the Standard toolbar.
-
In the Assign Resources dialog box, click the work resource whose availability graph you want to view. Note that availability does not apply to material resources.
-
Click the Graphs button. The Resource Availability Graph for the selected resource appears (see Figure 7-4). By default, the work graph is displayed.
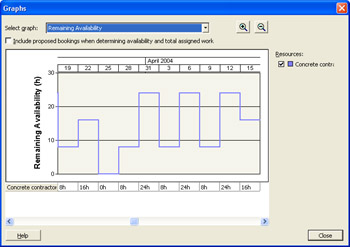
Figure 7-4: In the Work version of the Resource Availability Graph, you can review the selected resource's remaining availability over time. -
To change the field on which the graph is based, click Remaining Availability or Assignment Work in the Select Graph list.
The Work graph shows the total work for all the selected resource's assignments. The Assignment Work graph breaks down the work on the currently selected tasks in relation to the selected resource's total work assigned (see Figure 7-5). The Remaining Availability graph shows when the selected resource has any available time for more assignments.
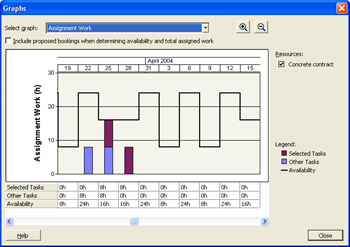
Figure 7-5: With the Assignment Work version of the Resource Availability Graph, you can compare the workload of selected tasks with those of other tasks. -
To change the timescale for the graph, click the Zoom In or Zoom Out buttons .
The Zoom In button provides a closer look at a shorter time period. For example, it can change the graph from a view of weeks to a view of days. The Zoom Out button provides an overview of availability over a longer time period. For example, it can change the graph from a view of weeks to a view of months.
-
When finished reviewing the graph, click the Close button.
The Assign Resources dialog box appears again.
| |
Select multiple resources in the Assign Resources dialog box and then click the Graphs button. The Resource Availability Graph shows graphs for each resource at the same time, using different colors for each resource (see Figure 7-6).
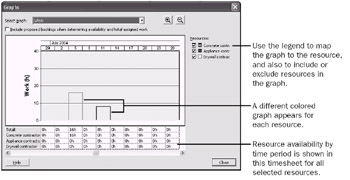
Figure 7-6: View the availability graphs and timesheets for several resources at one time.
In the upper-right corner of the graph window, clear the check box for any resource whose graph you want to hide. The timesheet for all resources still shows below the graph.
| |
Understanding Assignment Calculations
Work is the amount of effort it takes to complete a task. As soon as you assign a resource to a task, the duration is translated into work. A simple example: If you have a task with a 3-day duration and you assign a single full-time resource to it, that resource now has an assignment with 24 hours of work spread across three days ( assuming default calendar settings).
You can see this principle in action by adding the Work field to the Gantt Chart or other task sheet, as follows :
-
Display the Gantt Chart or other task sheet that contains the Duration field.
-
Click the heading of the column to the right of the Duration field. For example, if you are working with the default Gantt Chart with the default Entry table applied, click the Start column heading.
-
Click Insert, Column.
-
In the Field Name box, click Work. To move quickly to the fields that begin with "W," type W .
-
Click OK.
The Work field appears next to the Duration field, and you can see comparisons between the two (see Figure 7-7).
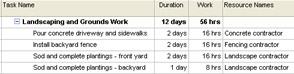
Figure 7-7: Adding the Work field to a task sheet shows the relationship of task duration to task work, based on how tasks are assigned to resources.
That task with a 3-day duration and a single full-time resource assigned translates (by default) to 24 hours of work. Another task with a 3-day duration and two full-time resources assigned translates to 48 hours of work. Another task with a 3-day duration and three full-time resource assigned translates to 72 hours of work.
Duration is the length of time it takes from the start to finish of the task, but work equates to person-hours for the resources assigned.
These calculations are based on the initial assignment; that is, assigning one, two, or three resources at one time to a task that previously had no assigned resources. That is, if you assign two full-time resources to that same 3-day task, both resources are assigned 24 hours of work, also spread across3days (see Figure 7-8). When you assign multiple resources initially , Microsoft Project assumes that you intend for the resources to have the same amount of work across the original task duration.
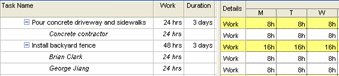
Figure 7-8: In the first task with a single resource assigned, the total work is 24 hours. In the second task with two resources assigned, the total work is 48 hours.
| Tip | Let Microsoft Project calculate duration from work Instead of entering duration and having Microsoft Project calculate work amounts upon assigning tasks, you can do this the other way around. You can enter tasks, assign resources, and then enter work amounts from estimates those resources provide. From those work amounts, Microsoft Project can calculate duration. Just as work is calculated from the duration and assigned resource availability, duration can be calculated from work amounts and assigned resource availability. |
| |
You can control how Microsoft Project translates duration to work amounts. By default, if you specify a 1-day duration, Microsoft Project translates this to 8 hours of work. However, if you want1day to mean6hours to account for non-project work, you can change your calendar options.
Click Tools, Options, and in the Options dialog box, click the Calendar tab. Change the settings in Hours Per Day, Hours Per Week, or Days Per Month, as needed to fit your requirements.
If you want the project or resource calendar to reflect the changes you made to the duration to work-amount settings, you must change the appropriate working time calendars to match. If the calendars don't match the calendar option settings, you'll see odd results.
| Cross-References | For more information about changing the project calendar, see "Setting Your Project Calendar". For information about resource calendars, see "Setting Resource Working Time Calendars". |
| |
| |
When you assign multiple resources initially , Microsoft Project assumes that you intend for the same amount of work to be applied to all assigned resources across the time span represented by the task duration.
If you want the duration to be reduced because multiple resources are assigned, set the duration accordingly. Or start by assigning just one resource at first. Then assign the additional resources in a separate operation. As long as the task is not a fixed-duration task , the duration is reduced based on the number of additional resources added.
The calculations for work and duration can change if you assign one resource initially and then later assign a second resource. This might also be true if you initially assign two resources and later remove one of them.
| Cross-References | For more information about these schedule recalculations, see "Changing Resource Assignments" later in this chapter. |
| |
| Tip | Specify the work time unit you use most often If you don't specify a work unit, by default Microsoft Project assumes the unit to be hours, and automatically enters "hrs" after your work amount. You can change the default work unit if you like. Click Tools, Options and then click the Schedule tab. In the Work Is Entered In box, select the time unit you want as the default. |
EAN: 2147483647
Pages: 268