Adding Detailed Resource Information
Along with the basic resource information such as the resource name , type, units, and calendar, you can add supplementary information to either work or material resources. This data can include additional fields of resource information, notes, or hyperlinks .
Working with Supplemental Resource Fields
You can add initials , group designations, or a code to a resource using the appropriate field in the Resource Sheet or the General tab in the Resource Information dialog box. The following list provides examples of how you might use these fields:
Initials If you want a resource's initials, rather than his or her entire name, to appear in certain fields in your project plan, enter the initials in the Initials field in the Resource Sheet or on the General tab in the Resource Information dialog box.
Group Use the Group field to specify any categories of resources that might be useful for sorting, grouping, or filtering. For example, you can specify the department the resources come from, such as Product Development or Marketing. If you are using contracted resources, you can enter their company's name in the Group field. Or you can use the Group field to specify the resource's title or skill set; for example, Engineer, Architect, or Designer.
| Note | You cannot assign a group name to a task. The group simply provides more information about a resource so you can sort , group, or filter resources. |
Code Enter any code meaningful to you or your company in the Code field. It can be any alphanumeric designation you want. In fact, you can use it the way you use the Group field. You can enter job codes or skill codes, for example. Like the Group field, you can then sort, group, or filter these codes.
| |
If the Group field is not robust enough to identify your resource skill sets, create and assign resource outline codes . Not only can you use outline codes to identify resource skill sets, you can also reflect the levels of your organization's human resource structure. This can be useful when you want to apply a code-based hierarchical or outline structure to your resources that reflects resource properties or attributes in your organization.
After your outline codes are set up and assigned to resources, you can sort, group, or filter by outline codes to see the resources displayed in that structure. These techniques can help you find resources that are appropriate for specific kinds of tasks . You can also search for resources that have a certain outline code (or group) using the Assign Resources dialog box.
If you're using Project Professional with the enterprise features through Project Server, you can identify multiple skills for enterprise resources.
| Note | For more information about outline codes, see "Working with Outline Codes". For more information about finding resources with skills for specific assignments using the Assign Resources dialog box, see "Finding the Right Resources for the Job". For more information about identifying multiple skills for enterprise resources, see "Creating the Enterprise Resource Pool". |
| |
Cost- related fields are an important part of the Resource Sheet. The Resource Information dialog box also includes a Cost tab.
| Cross-References | For more information about resource cost information for both work and material resources, see "Planning Resource Costs". |
Other tables containing different collections of resource fields are available. To apply a different table to the Resource Sheet:
-
Display the Resource Sheet.
-
Click View, Table. Click the table you want.
If the table you want is not listed, click More Tables. Click the table in the list (see Figure 6-14) and then click Apply.
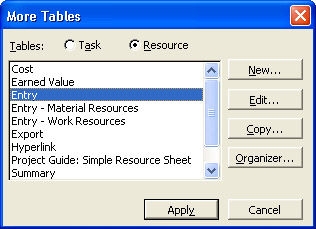
Figure 6-14: Apply any table that fits what you're trying to do.
Dozens of additional resource fields are available for you to add to your Resource Sheet. To add a new field to your current table:
-
Click the column heading to the right of where you want the new column to be inserted.
-
Click Insert, Column or simply press the Insert key.
The Column Definition dialog box appears.
-
In the Field Name box, click the field you want to add.
The fields listed are all resource fields. You can quickly move to a field by typing the first one or two letters of its name.
To hide a field you don't need, follow these steps:
-
Click the column heading you want to hide.
-
Click Edit, Hide Column or simply press the Delete key.
The column is hidden, but the information is not deleted. It's still in the database and can be shown again whenever you display its column.
Tip Hide a column by making it very narrow You might frequently hide and insert certain columns; for example, when you print a view for presenting at a status meeting. If you're getting tired of constantly deleting and then inserting these columns , you can just make them very narrow. Position your mouse pointer on the right edge of the heading for the column you want to hide. When the pointer becomes a black crosshair, drag to the left to narrow the column until the contents cannot be seen.
If you drag past the left column edge, the column will be completely hidden, although it is actually still there.
When you're ready to display the narrow column again, drag the edge of the column heading to the right until you can read the contents of the column.
There's no indication that a column you hid completely is there ”you just have to remember.
| |
By default, the full resource name appears next to the Gantt bars in the Gantt Chart, displaying the resources assigned to this task. To help make your Gantt Chart look a little less cluttered or to enable you to fit more task details in a small space, set a resource's initials as text next to a Gantt bar instead of the full name.
| Cross-References | For more information about resource assignments, see Chapter 7. |
To change the text style of your Gantt bar to include resource initials rather than the full resource name:
-
In the Resource Sheet, make sure that all resources have initials identified for them.
It doesn't necessarily have to be their actual initials ”it can be a short name, a first or last name, a nickname, or whatever you want.
-
Click View, Gantt Chart.
-
Click Format, Bar Styles.
-
In the table area of the Bar Styles dialog box, make sure the Task row is selected.
-
In the lower half of the dialog box, click the Text tab. By default, Resource Names appears in the Right field.
-
Click the Right field and then click Resource Initials (see Figure 6-15). Click OK.
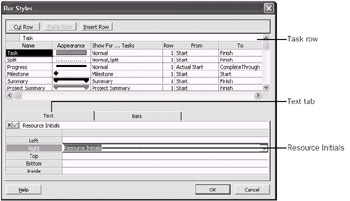
Figure 6-15: Use the Text tab in the Bar Styles dialog box to change the text that appears with the selected Gantt bar.The resource initials you defined replace the full resource names next to the Gantt bars in the chart (see Figure 6-16).

Figure 6-16: Resource initials replace the full resource names next to the Gantt bars.
| |
Specifying Workgroup Information
If you will communicate project information electronically with resources, you might need to complete one or more of the following fields on the General tab in the Resource Information dialog box:
E-mail Specifies the resource's e-mail address, which is essential if you exchange e-mail messages or project files with team members . If the resource is outside your company ”that is, using a different e-mail system than you ”be sure to specify the full e-mail address; for example, someone@microsoft.com .
| Cross-References | For more information about communicating project information through e-mail, see Chapter 18, "Integrating Microsoft Project with Microsoft Outlook," and Chapter 19, "Collaborating Using E-Mail." |
Workgroup Specifies the workgroup method for this resource. The choices are Microsoft Office Project Server, None, or Default. Depending on how your implementation of Project is set up, you might also see a choice for E-mail Only. To set the default workgroup choice, click the Collaborate menu, click Collaboration Options, and click your default workgroup method in the Collaborate Using list.
Windows Account Finds the resource's user account in the local address book and places it in that resource's Windows User Account field.
| Cross-References | For more information about using e-mail as a workgroup communication method, see Chapter 19. For guidelines on setting up Project Server options, see Appendix A, "Installing Microsoft Office Project 2003." |
Adding a Note Regarding a Resource
Use notes to add comments regarding a resource. Notes might include information about the skills or experience of the resource or anything you believe is pertinent to this resource working on this project. To add a note to a resource:
-
 Display the Resource Sheet or other resource view.
 -
Click the resource name, and then on the Standard toolbar, click Resource Notes (see Figure 6-17).
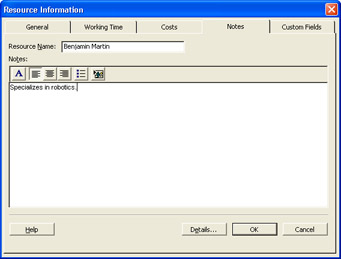
Figure 6-17: Enter relevant notes about a resource in the Notes tab of the Resource Information dialog box. You can also attach outside documents in the Notes tab. -
In the Notes area, type the note.
-
When finished, click OK.
The Note indicator appears next to the resource name in the Indicators field of the Resource Sheet (see Figure 6-18). You can double-click this icon when you want to read the note.
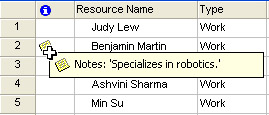
Figure 6-18: Position your mouse pointer over the Note indicator to read the note. Double-click the indicator to open the Notes tab in the Resource Information dialog box.
Hyperlinking to Resource Information
If there's a document or Web site relevant to a resource, you can create a hyperlink to reference it. This is a very efficient method of opening associated documents quickly. To insert a hyperlink, follow these steps:
-
Display the Resource Sheet or other resource view.
-
Click the resource to which you want to link an outside document or Web page.
-
 On the Standard toolbar, click Insert Hyperlink.
 -
In the Text To Display box, type a descriptive name for the document to which you are linking; for example, Quarterly Goals .
-
Find and select the document or site you want to link to your project file (see Figure 6-19).
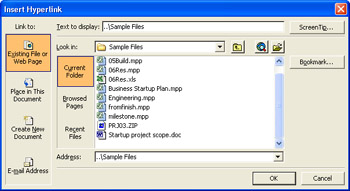
Figure 6-19: The path and name of the selected document appear in the Address box. -
Click OK.
The Hyperlink indicator appears in the Indicators field of the Resource Sheet (see Figure 6-20).
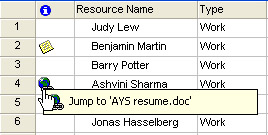
Figure 6-20: Position your mouse pointer over the Hyperlink indicator to read the link. Click the indicator to jump to the link's location.
Whenever you need to review the target of the hyperlink, just click the Hyperlink indicator. The contents open in their own application window.
You can use the Project Guide to help you add notes or hyperlinks to resources. On the Project Guide toolbar, click Resources. In the Project Guide pane, click the Link To Or Attach More Resource Information link. Read the succeeding panes and make choices as directed.
EAN: 2147483647
Pages: 268
- ERP Systems Impact on Organizations
- Challenging the Unpredictable: Changeable Order Management Systems
- ERP System Acquisition: A Process Model and Results From an Austrian Survey
- Context Management of ERP Processes in Virtual Communities
- Development of Interactive Web Sites to Enhance Police/Community Relations