| With that introduction out of the way, you are now ready to begin the actual configuration and implementation of Exchange policies on your Exchange organization. You begin with the simpler of the two, the system policy, and then move onto the recipient policy. Managing System Policies Although system policies are most useful in larger, multiserver environments, you should still consider using them even in a smaller environment. By creating a mailbox store, public folder store, or server policy early on in your Exchange implementation, you can more easily bring new stores and servers online using the same settings as existing stores and servers. In the following sections, we examine the creation and management of mailbox stores, public folder stores, and server policies. When creating and implementing system policies, there is one rather large caveat that you must be aware of at all times: Only one system policy can be applied to each tab. What does this mean? If, for example, you have two mailbox store policies that each have settings configured for the Limits tab, you can only apply one of these policies to any one specific mailbox store. For this reason, it is highly recommended that you only configure system policies that configure one tab of settings at a time. In this way, you can prevent one policy from inadvertently preventing the application of another. The following list contains some of the more common system policy related tasks that you might be required to perform: Creating a System Policies container Creating and applying a mailbox store policy Creating and applying a public folder store policy Removing a system policy from an object
We examine each task in more detail in the following sections. Creating a System Policies Container As mentioned previously, before you can actually start creating system policies, you need a place to store them. If one does not already exist in the administrative group for which you need to create the system policy, you need to create a System Policies container. To create a System Policies container, perform the following steps: - Open the Exchange System Manager.
- Right-click on your Exchange organization and select Properties from the context menu to open the Properties dialog box, shown previously in Figure 5.11.
- Ensure that the Display Administrative Groups check box is selected. Click OK to close the Properties dialog box.
- Acknowledge the warning that you need to close and reopen the Exchange System Manager.
- Expand your organization to locate the administrative group in which you want to create the System Policy container.
- Right-click on the administrative group and select New, System Policy Container from the context menu.
Creating and Applying a Mailbox Store Policy After your System Policy container is created, you are ready to create and apply system policies of your choosing. The popular items that are configured using mailbox store policies are those items on the Limits tab, and these items serve as the example we use in the following procedure. To create and apply a mailbox store policy, perform the following steps: - Open the Exchange System Manager.
- Locate the administrative group with which you want to work and expand it to locate the System Policies container.
- Right-click on the System Policies container and select New, Mailbox Store Policy. The New Policy dialog box opens, as shown in Figure 5.13. Note the property pages that are available for configuration using the new policy.
Figure 5.13. You can configure mailbox store options for the available property pages. 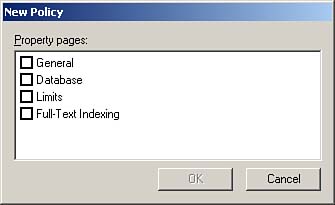
- For this example, we will configure mailbox store limits, so select the Limits property page and click OK.
- The policy Properties dialog box opens to the General tab. Give the new policy a name and switch to the Limits tab, as shown in Figure 5.14.
Figure 5.14. You can configure any or all of the options on the Limits tab. 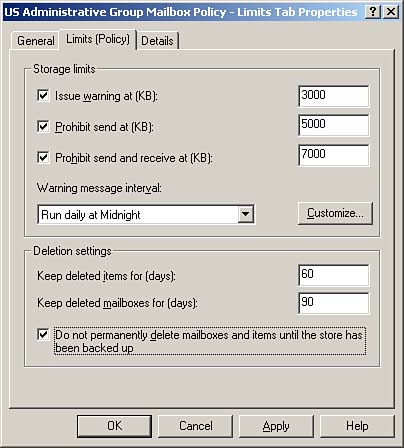
- Enter in the values you need in any or all of the options on the tab. The values you see in Figure 5.14 are those that have been chosen for this specific example; yours may and probably will vary.
- Click OK to close the new mailbox store policy. The new mailbox store policy appears under the System Policies container.
- Right-click on your newly created mailbox store policy and select Add Mailbox Store from the context menu.
- Using the Select the Items to Place Under the Control of This Policy dialog box, locate the mailbox store or stores to which you want to apply this policy, as shown in Figure 5.15. Click OK to close the dialog box.
Figure 5.15. After creating the policy, select a mailbox store to which you want to apply it. 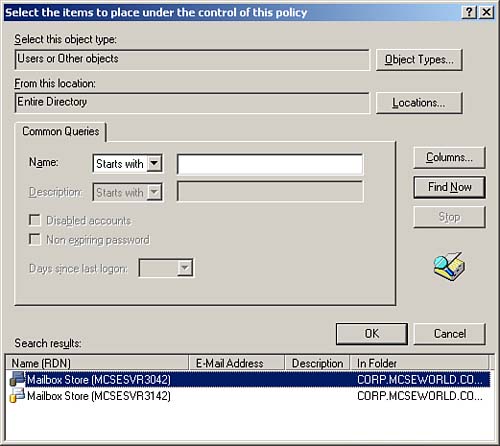
- Acknowledge that you do in fact want to add this policy to the selected mailbox store by clicking Yes when prompted.
 | Remember that you can have only one policy in effect per tab. |
You can verify that the mailbox store policy has been applied by locating the mailbox store to which you have applied it and right-clicking on it. Select Properties from the context menu and switch to the Policies tab, as shown in Figure 5.16. The policies that are applied to this mailbox store are listed here. Figure 5.16. The Policies tab of the mailbox store Properties dialog box displays all policies that are applied. 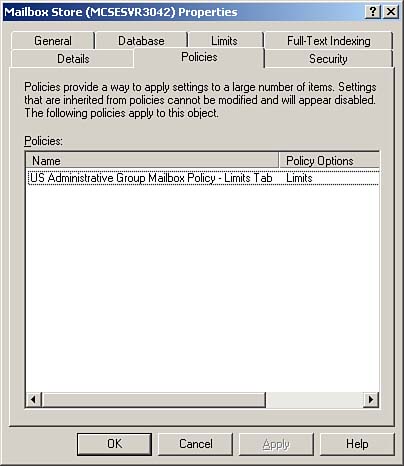
Creating and Applying a Public Folder Store Policy The process to create and apply a public folder store policy is basically the same as for a mailbox store policy but with some different options available. The most common property pages that you might consider using a public store policy to configure are the Replication and Limits property pages. To create and apply a public folder store policy, perform the following steps: - Open the Exchange System Manager.
- Locate the administrative group with which you want to work and expand it to locate the System Policies container.
- Right-click on the System Policies container and select New, Public Store Policy. The New Policy dialog box opens, as shown in Figure 5.17. Note the property pages that are available for configuration using the new policy.
Figure 5.17. You can configure public store options for the available property pages. 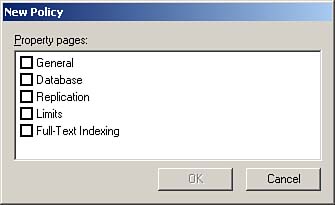
- For this example, we will configure public store replication, so select the Replication property page and click OK.
- The policy Properties dialog box opens to the General tab. Give the new policy a name and switch to the Replication tab, as shown in Figure 5.18.
Figure 5.18. You can configure any or all of the options on the Replication tab. 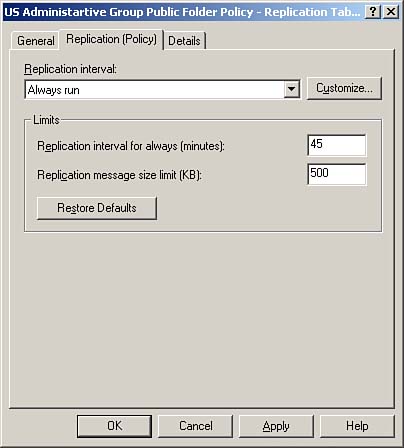
- Enter in the values you need in any or all of the options on the tab. The values you see in Figure 5.18 are those that have been chosen for this specific example; yours may and probably will vary.
- Click OK to close the new public folder store policy. The new public folder store policy appears under the System Policies container.
- Right-click on your newly created public folder store policy and select Add Mailbox Store from the context menu.
- Using the Select the Items to Place Under the Control of This Policy dialog box, locate the public folder store or stores to which you want to apply this policy. Click OK to close the dialog box.
- Acknowledge that you do in fact want to add this policy to the selected public folder store by clicking Yes when prompted.
| Remember that you can have only one policy in effect per property page. |
Again, a quick check of the public folder store Properties dialog box, Policies tab will show you that your policy has in fact been applied.  | The process to create server policies is virtually identical to the two preceding examples, with different options, of course; thus, it is not covered here. If you need to create a server policy, be certain to review the functions of the options available by referring back to the "Server Policies" section of this chapter. |
Removing a System Policy from an Object So now that you have your system policies created and applied, how do you remove the policy from a store object? Simply right-click on the store or server you want to remove from a policy and select Remove From Policy from the context menu, as shown in Figure 5.19. Figure 5.19. Removing a policy from a store or server is a simple task to perform. 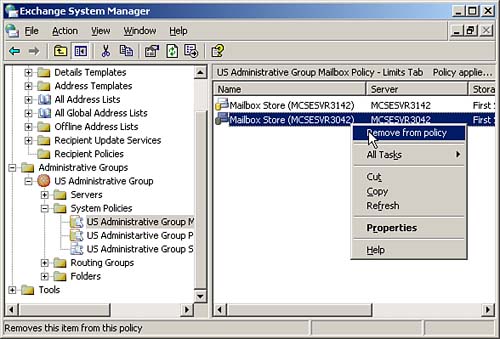
Managing Recipient Policies When creating a new recipient policy, you can either create it to apply email addresses to recipient objects or to define mailbox manager settings for Exchange mailboxes. You examine the creation of both types of recipient policies in the following sections. Configuring Email Addresses with Recipient Policies As discussed previously, the Email Addresses (Policy) option of recipient policies is often used to configure Exchange recipients to be able to receive email sent to different SMTP addresses than the default SMTP address created during the Exchange installation. In the following procedure, we configure all Exchange recipient objects in the corp.mcseworld.com domain to have a primary SMTP address of area51partners.com, changing the area51partners.com SMTP address to a secondary address: - Open the Exchange System Manager.
- Expand the Recipient node to locate the Recipient Policies container.
- Right-click on the Recipient Policies container and select New Policy from the context menu. The New Policy dialog box opens, as shown in Figure 5.20.
Figure 5.20. You can configure recipient policy options for the available property pages. 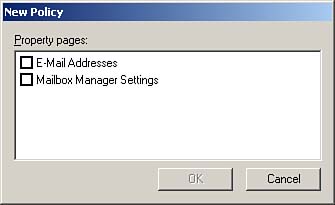
- Select E-mail Addresses and click OK.
- The policy Properties dialog box opens to the General tab. Give the new policy a name and switch to the E-mail Addresses (Policy) tab, as shown in Figure 5.21.
Figure 5.21. You can add or modify email addresses from the E-mail Addresses (Policy) tab. 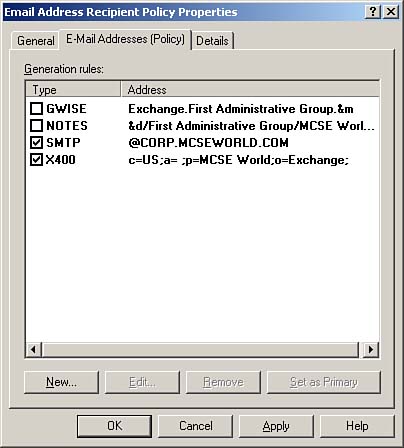
- In this example, we are adding a new SMTP address that will become the primary SMTP address. Click the New button to begin the process and open the New E-mail Address dialog box, as shown in Figure 5.22.
Figure 5.22. You have several different email system types to choose from when creating a new email address. 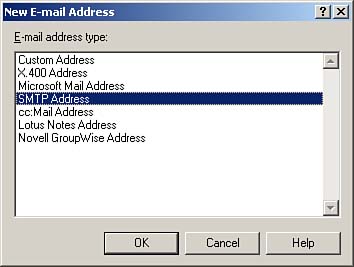
- Select SMTP Address and click OK. The SMTP Address Properties dialog box opens, as shown in Figure 5.23.
Figure 5.23. Enter the email address domain using the format @domain.com. 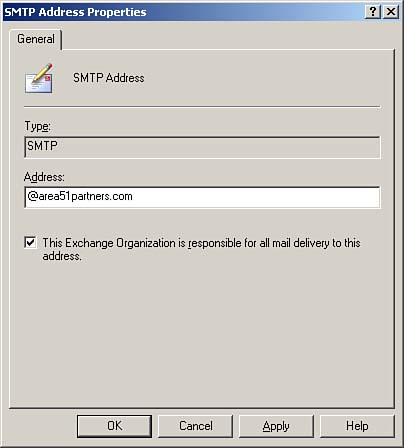
- In the space provided, enter the email address domain for which you are creating the recipient policy. In this example, we use the @area51partners.com domain. Ensure that the This Exchange Organization Is Responsible for All Mail Delivery to This Address check box is selected. Click OK to close the SMTP Address Properties dialog box.
- On the E-mail Addresses (Policy) tab, select the newly added SMTP address and click the Set as Primary button. This causes this SMTP address to be the one displayed in the From box of all outgoing email messages.
- To filter which recipients this recipient policy will be applied to, switch back to the General tab and use the Modify button to build your LDAP query as previously discussed in the "Managing Address Lists" section of this chapter. You can see the result of building the default LDAP query in Figure 5.24.
Figure 5.24. The LDAP query in the Filter Rules area determines which recipients are affected by the recipient policy. 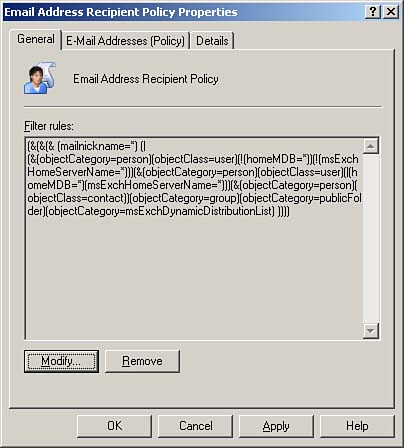
- Click OK to close the recipient policy Properties dialog box.
- Click Yes when prompted about updating recipient email addresses.
- In the Recipient Policies container, right-click on your new recipient policy and select Apply This Policy Now from the context menu.
Configuring Mailbox Manager Settings with Recipient Policies To enable automatic maintenance of your mailbox stores, keeping them from growing out of control sizewise, you might want to consider implementing a mailbox manager recipient policy. The basic process to create this type of recipient policy is similar to that for the email address recipient policy and is presented in the following steps: - Open the Exchange System Manager.
- Expand the Recipient node to locate the Recipient Policies container.
- Right-click on the Recipient Policies container, and select New Policy from the context menu. The New Policy dialog box opens, as shown previously in Figure 5.20.
- Select Mailbox Manager Settings and click OK.
- The policy Properties dialog box opens to the General tab. Give the new policy a name, and switch to the Mailbox Manager Settings (Policy) tab, as shown in Figure 5.25.
Figure 5.25. You can configure mailbox manager options for various Exchange folders. 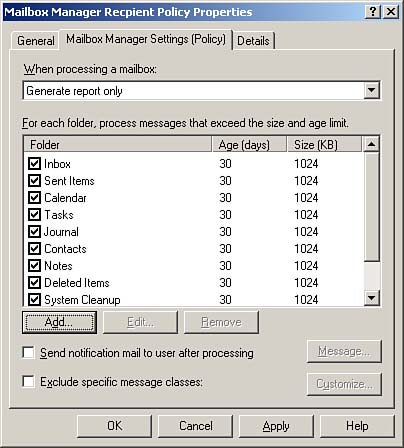
- From the When Processing a Mailbox drop-down list, you can specify what action is to be performed when a mailbox is processed per the configured age and size limit settings.
- In the For Each Folder… area, select the folders to which you want this policy to apply and configure the age and size limits that are to be applied to each of the folders. The default configuration has all Exchange folders listed with an age limit of 30 days and a size limit of 1024KB.
- If desired, select the Send Notification Mail to User After Processing check box. Click the Message button to create the message that is to be sent.
- If desired, check the Exclude Specific Message Classes check box and click the Customize button to add message classes that are to be excluded from processing under this policy.
- To filter the recipients to which this recipient policy will be applied, switch back to the General tab and use the Modify button to build your LDAP query as previously discussed in the "Managing Address Lists" section of this chapter.
- Click OK to close the recipient policy Properties dialog box.
- In the Recipient Policies container, right-click on your new recipient policy and select Apply This Policy Now from the context menu.
|